After looking at all of these photos, I want to fill my house with candles this Christmas.
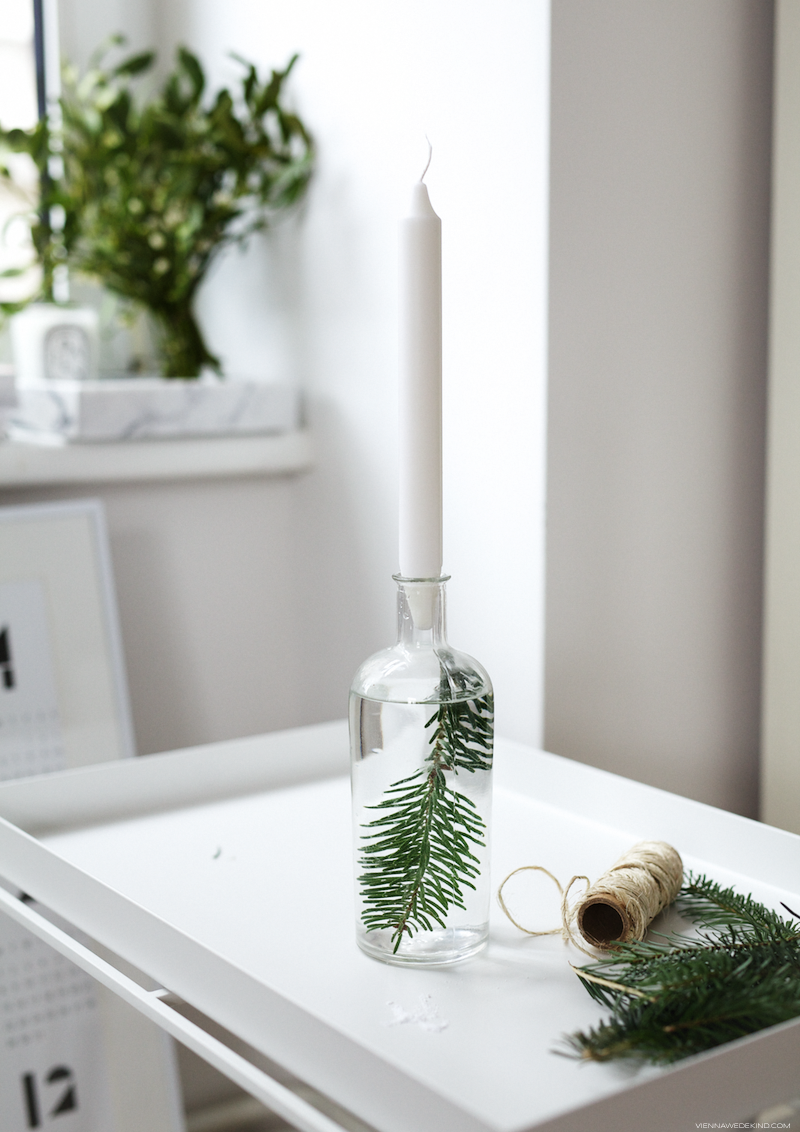

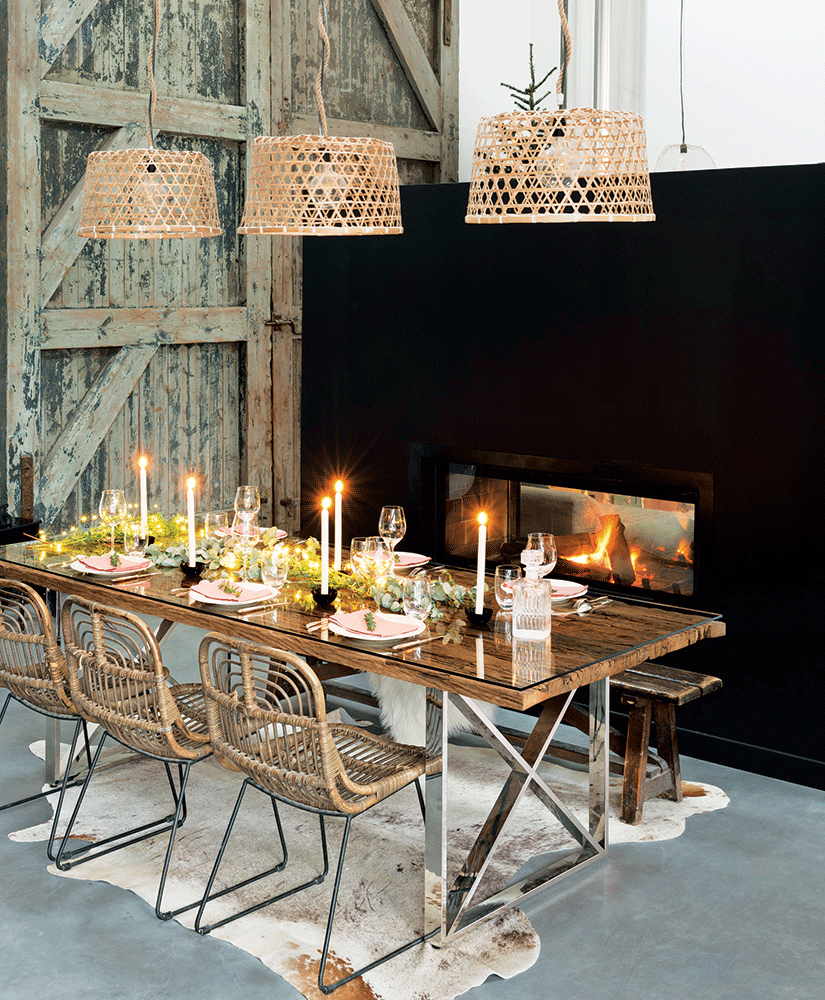

After looking at all of these photos, I want to fill my house with candles this Christmas.
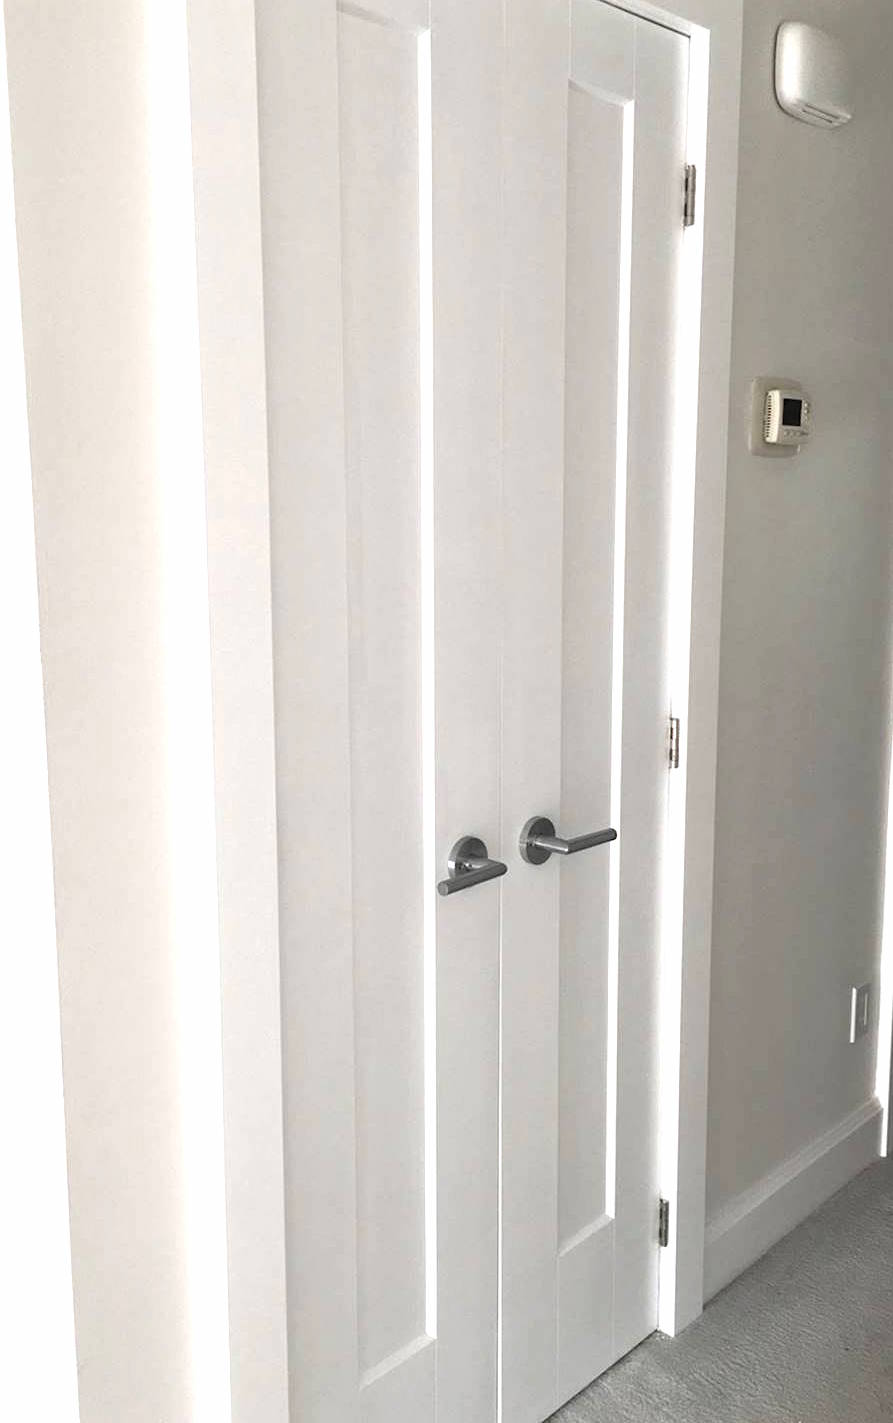
You may recall that in the spring, I had new doors installed in my home. My Metrie Masonite Lincoln Park doors are gorgeous, and I’m so glad I invested in them. My hall closet was an especially good transformation as I said #byebyebifold with the help of Metrie.
While the closet looked great on the outside, the inside was pretty disastrous.

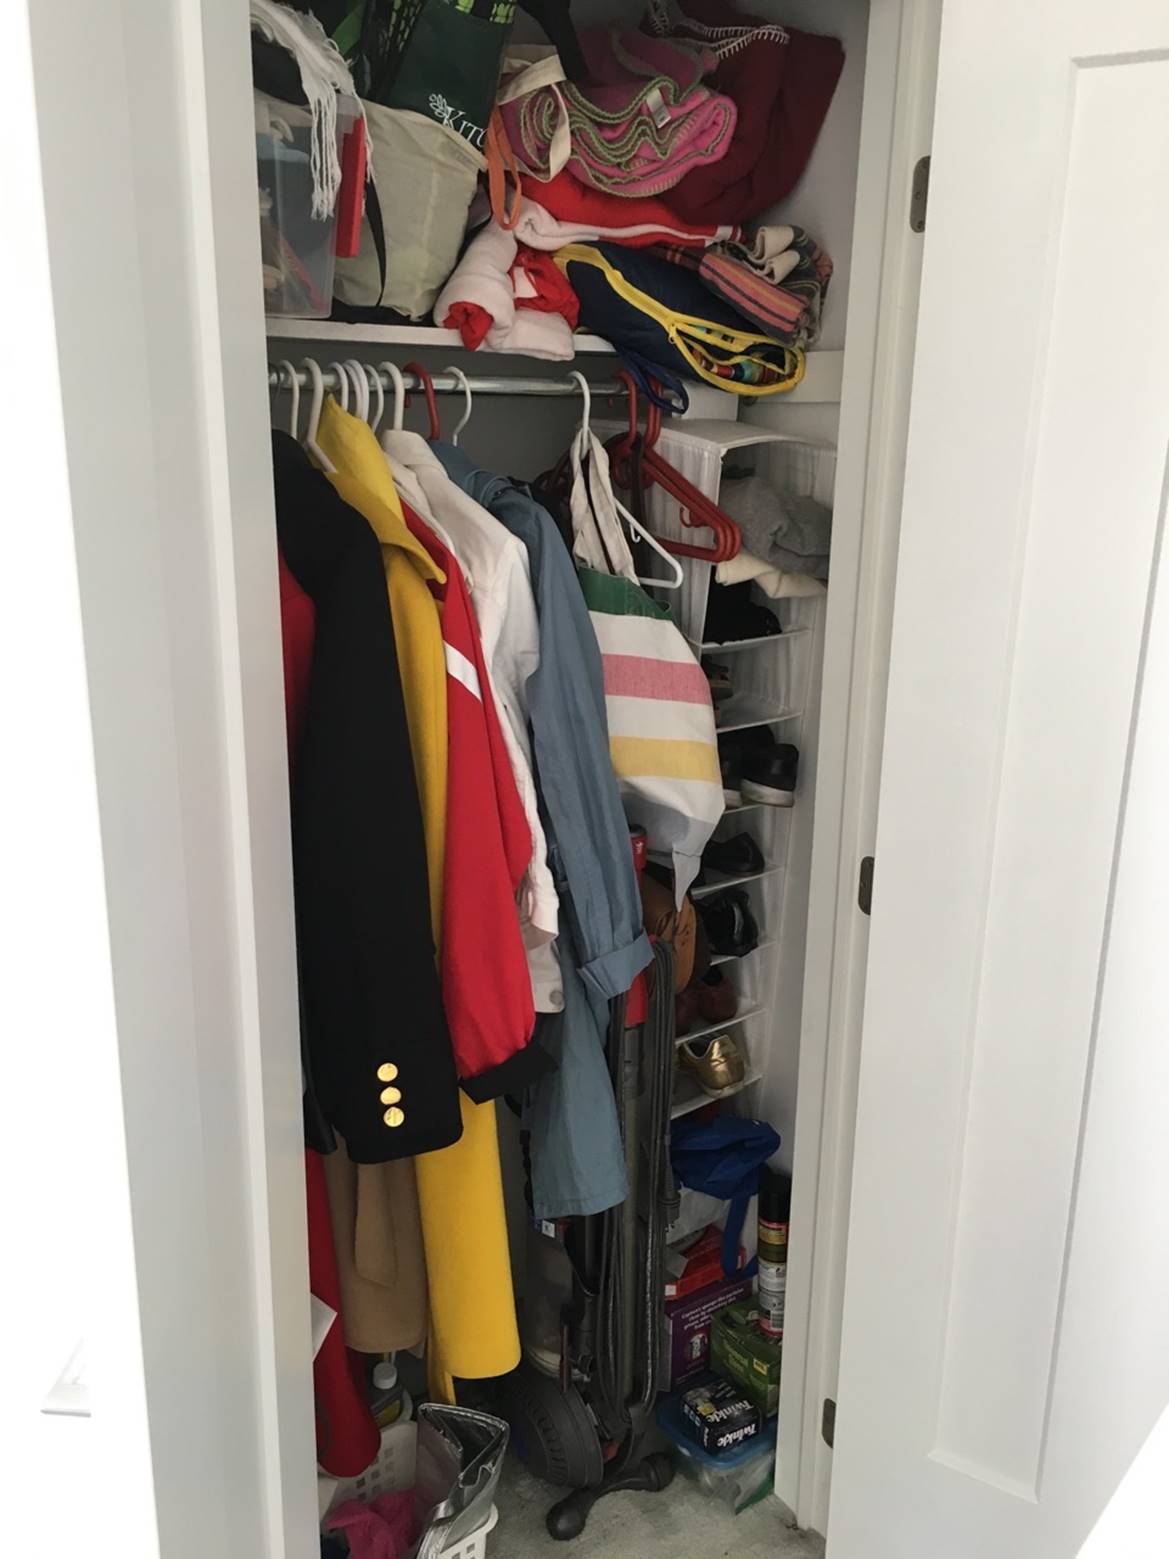
Gosh, it’s just such a mess! It hurts my eyes!
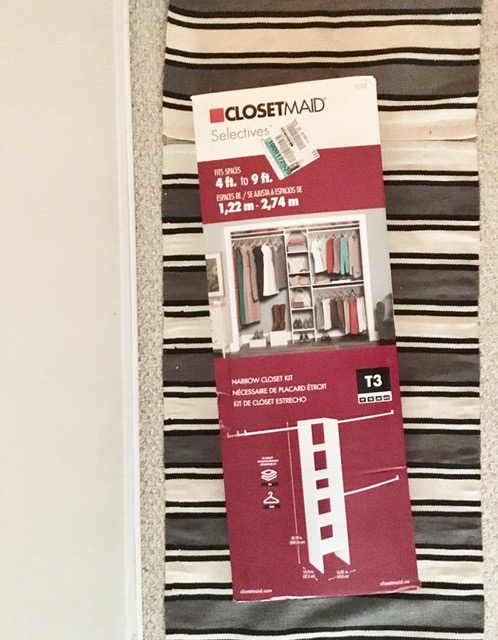
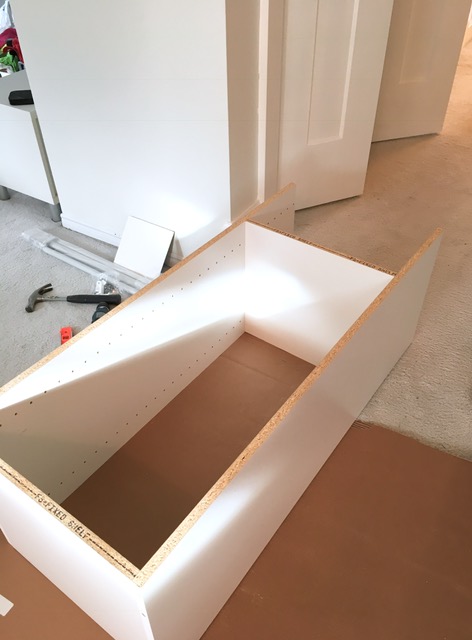
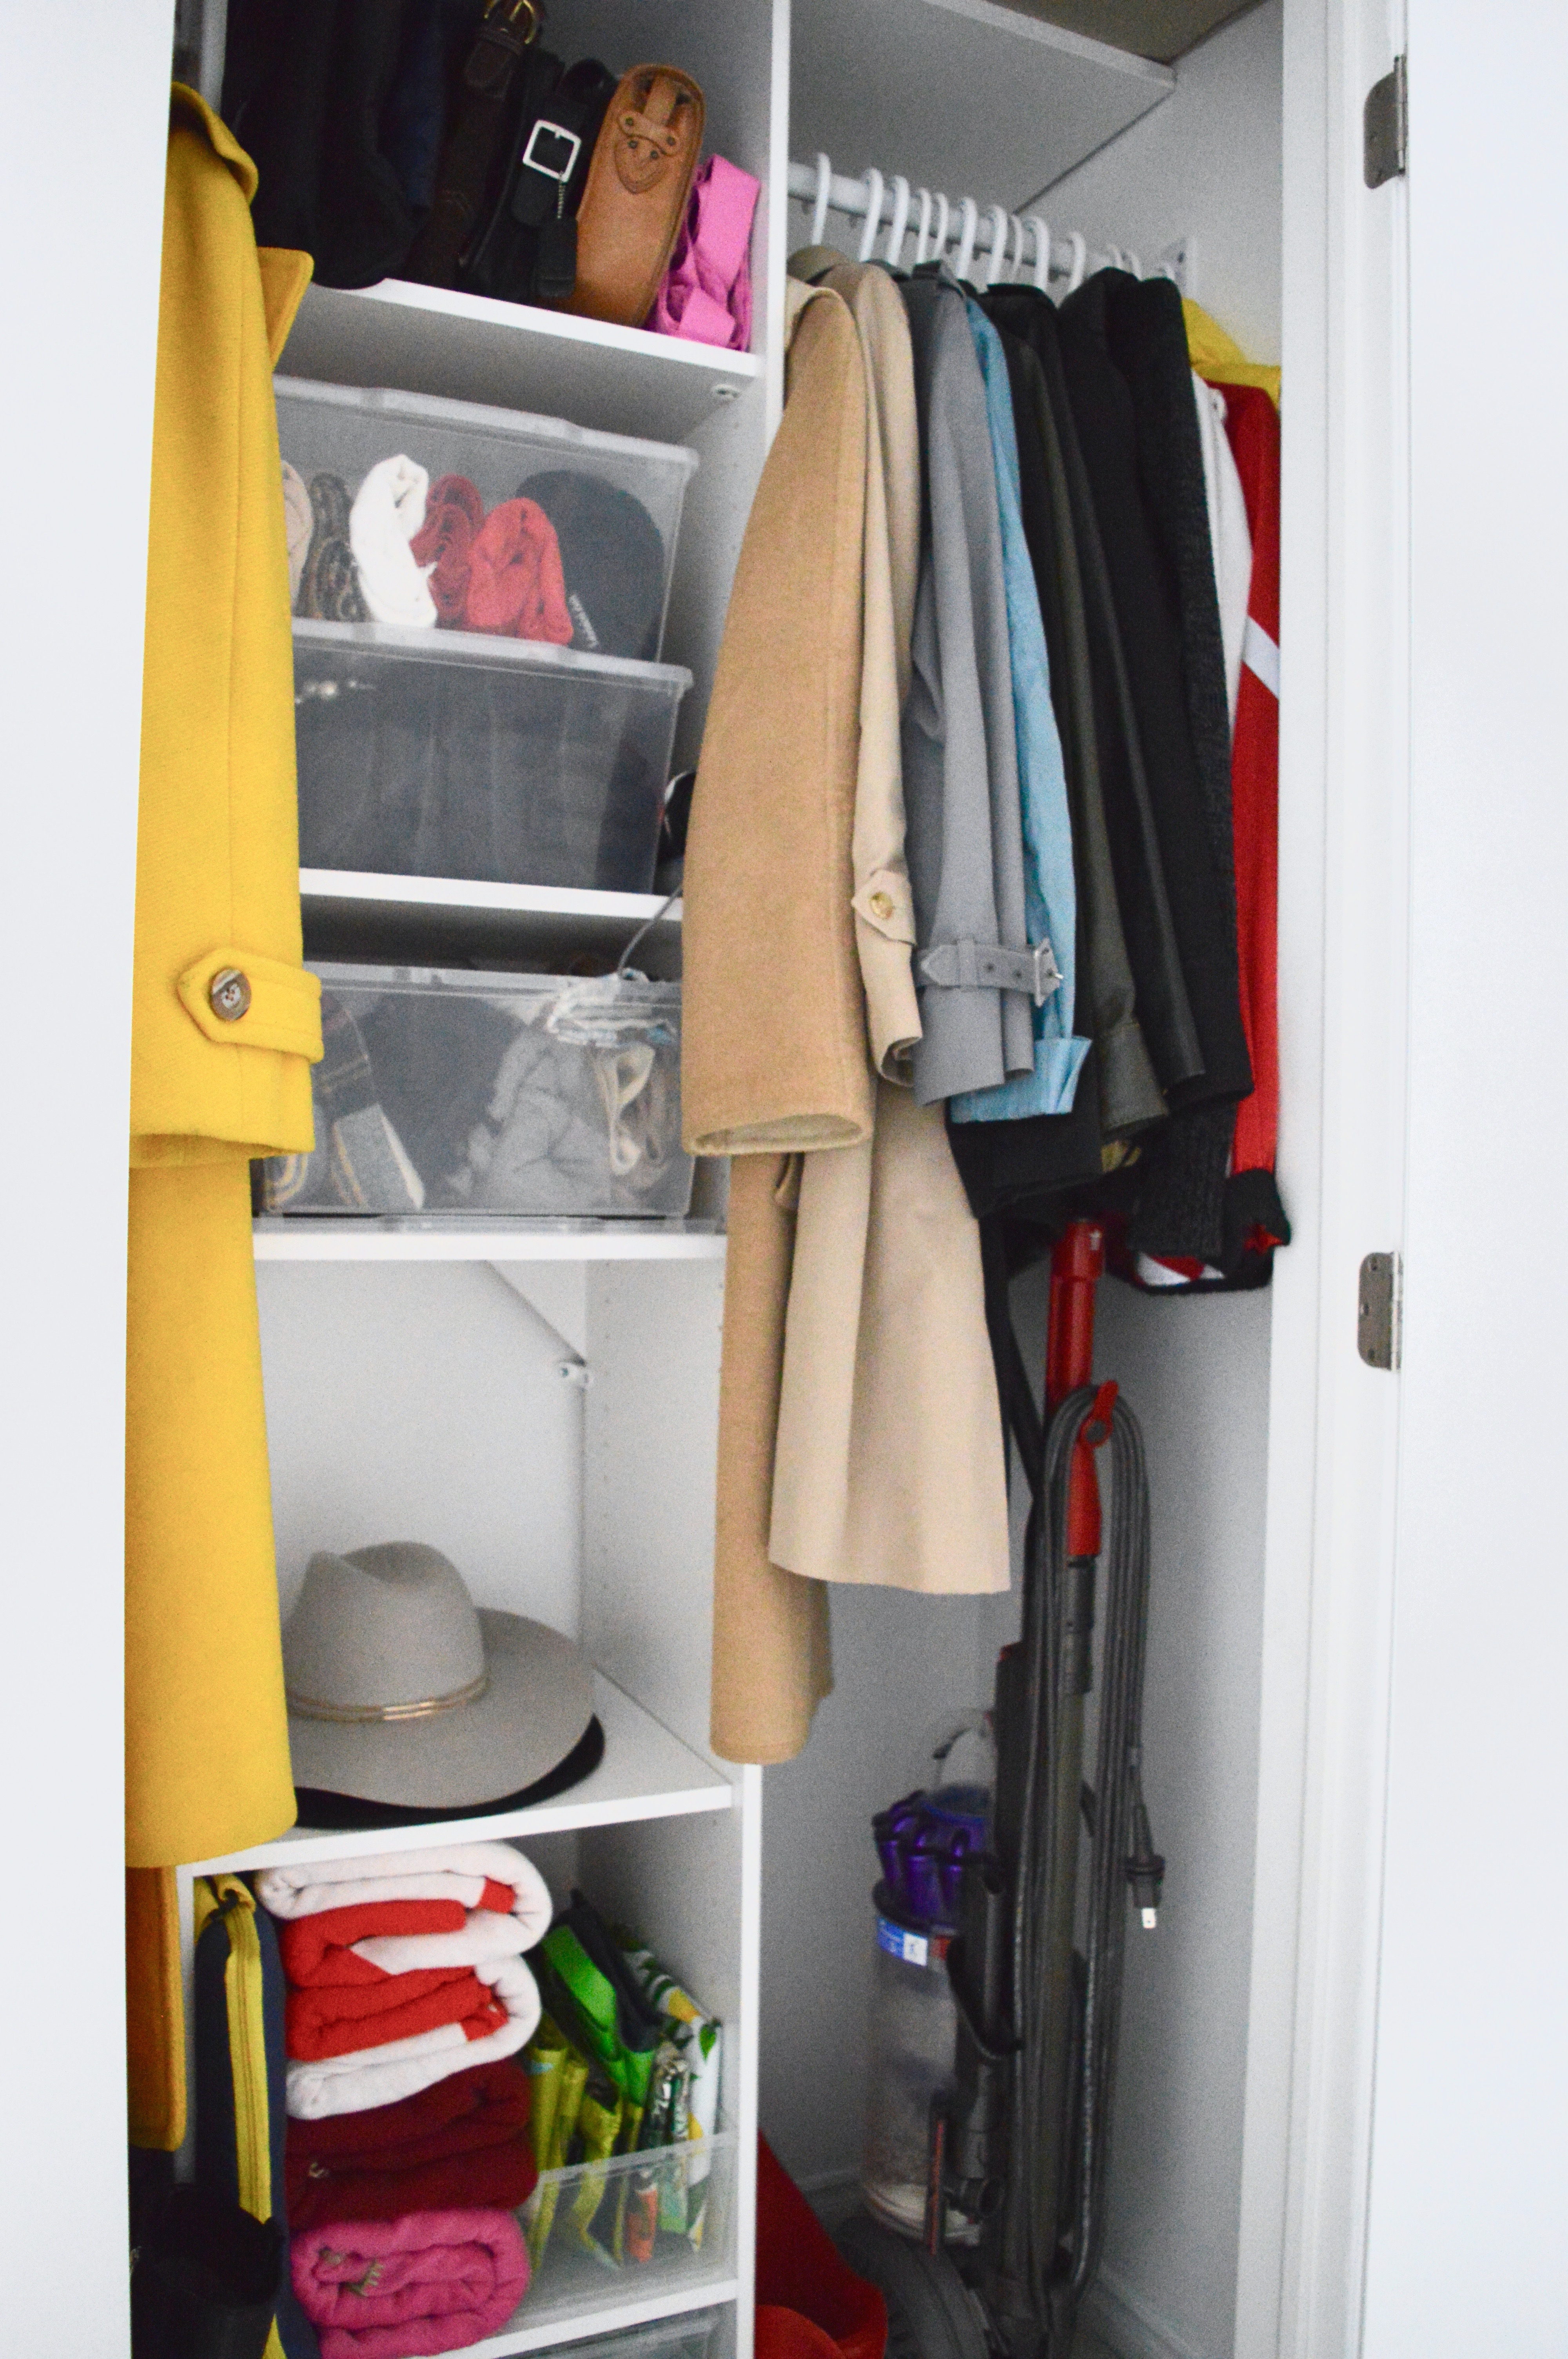
Since this is my only closet on my main floor, it must be effective. In addition to jackets, coats, and winter wear, this closet must house my vacuum, too. The closet is narrow – at only 43″ wide – so I didn’t have much room to play around with. I needed a section for long coats, a section for short coats, space for boots and my vacuum, and shelves for my winter accessories and purses.
Since I worked with the Home Depot Canada on this project, I headed over one night after work to pick up the ClosetMaid narrow closet organizer kit (in white, of course). There are several options for organizer systems, but I knew I wanted one with solid – rather than wire – shelves. I also wanted an organizer that would be affixed to the wall – rather than one that hangs from the rod. I had previously installed closet organizers, so I was already familiar with the general installation procedure.
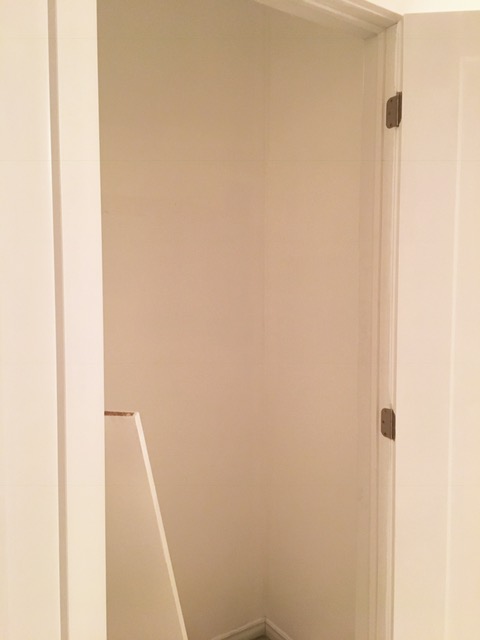
When I knew I’d have a weekend free, I got to work! I first emptied out the closet, removed the support bars, and painted everything a fresh coat of white.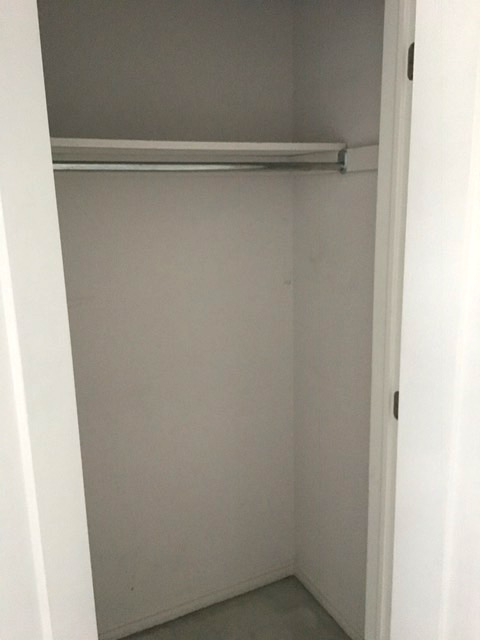
After I waited a day for the paint to dry, I unpacked the pieces and familiarized myself with the ClosetMaid instructions to ensure that I had all the right tools.
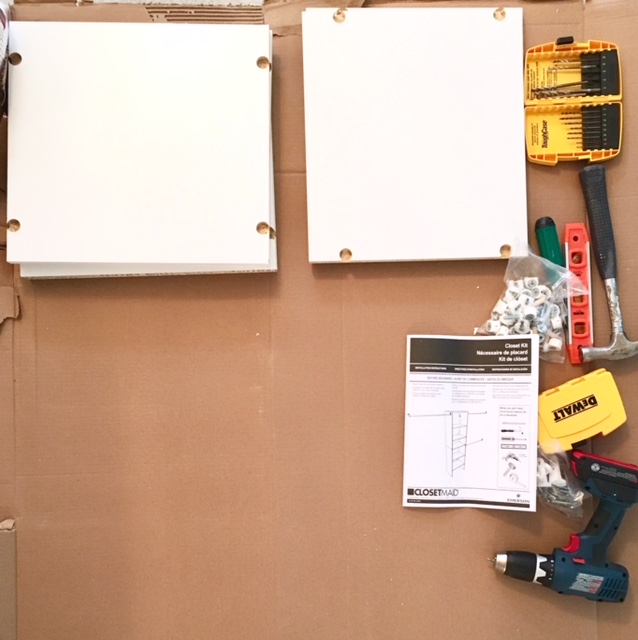
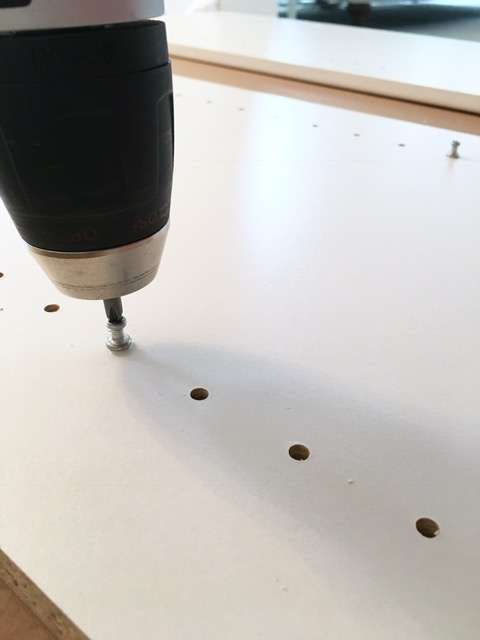
The installation process took me a couple of hours. The instructions were easy to follow, and I didn’t run into any issues. I got to use my power drill/screwdriver on this project, so I was happy. Who else loves tools?
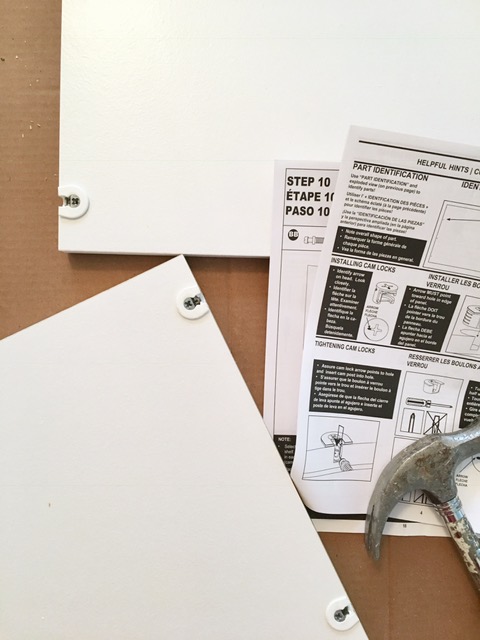
This ClosetMaid organizer has corner support pieces as well as adjustable feet. Once the base piece was in place in the closet, I used my trusty level to make sure the piece was straight.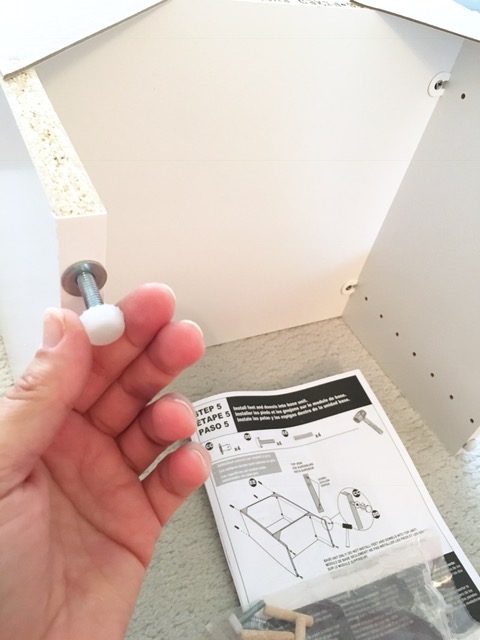
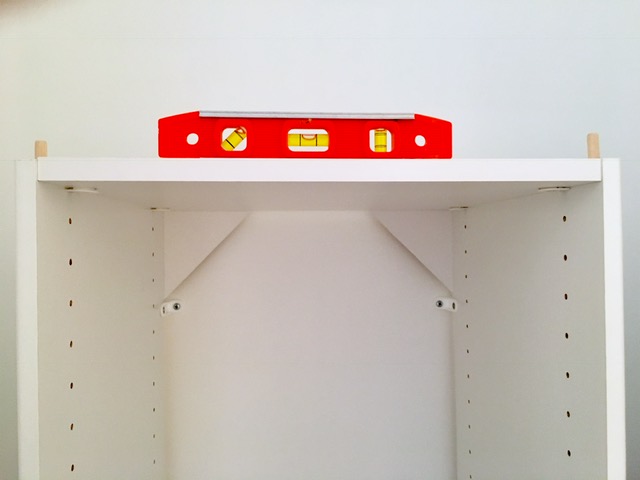
Once the base was in place and affixed to the wall with the support brackets (you can see them right under the corner pieces), I lifted the top piece and placed it on the bottom. I made sure this piece was level, too. And of course I had to make sure that my spacing measurements were right, so my vacuum would easily fit in place.
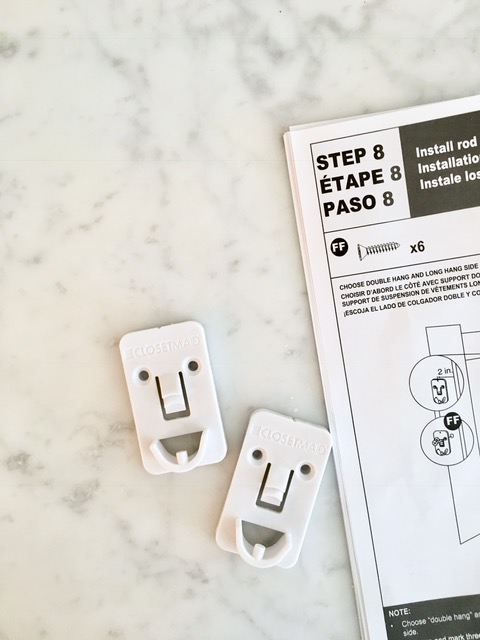
The last pieces to install were the rod holders. These are installed both on the wall and the side of the shelf unit. These ClosetMaid pieces were smiling at me!
Since my closet is so narrow, I knew the rods provided in the kit were going to be too long. The instruction guide advises to “cut the rods” if necessary. This is where I was a bit stuck because I didn’t have anything to cut the metal rods. So, rods in hand, I went off to the Home Depot Canada to buy a saw. The man who helped me told me that I could cut them myself at the cutting station. What? A cutting station? He brought me over to the aisle and showed me what to do. He was kind enough to cut the first rod for me (I had measured them and taped the cut line at home). In a few minutes, I cut the other three rods (one goes in another, so I had a few cuts to make). Easy!

The cutting station has a few saws to choose from. I went with the hack saw on the advice of the Home Depot Canada associate.
Back home, I installed the rods (yay, they fit perfectly), and put all my stuff back in the closet. 
And here’s the after:
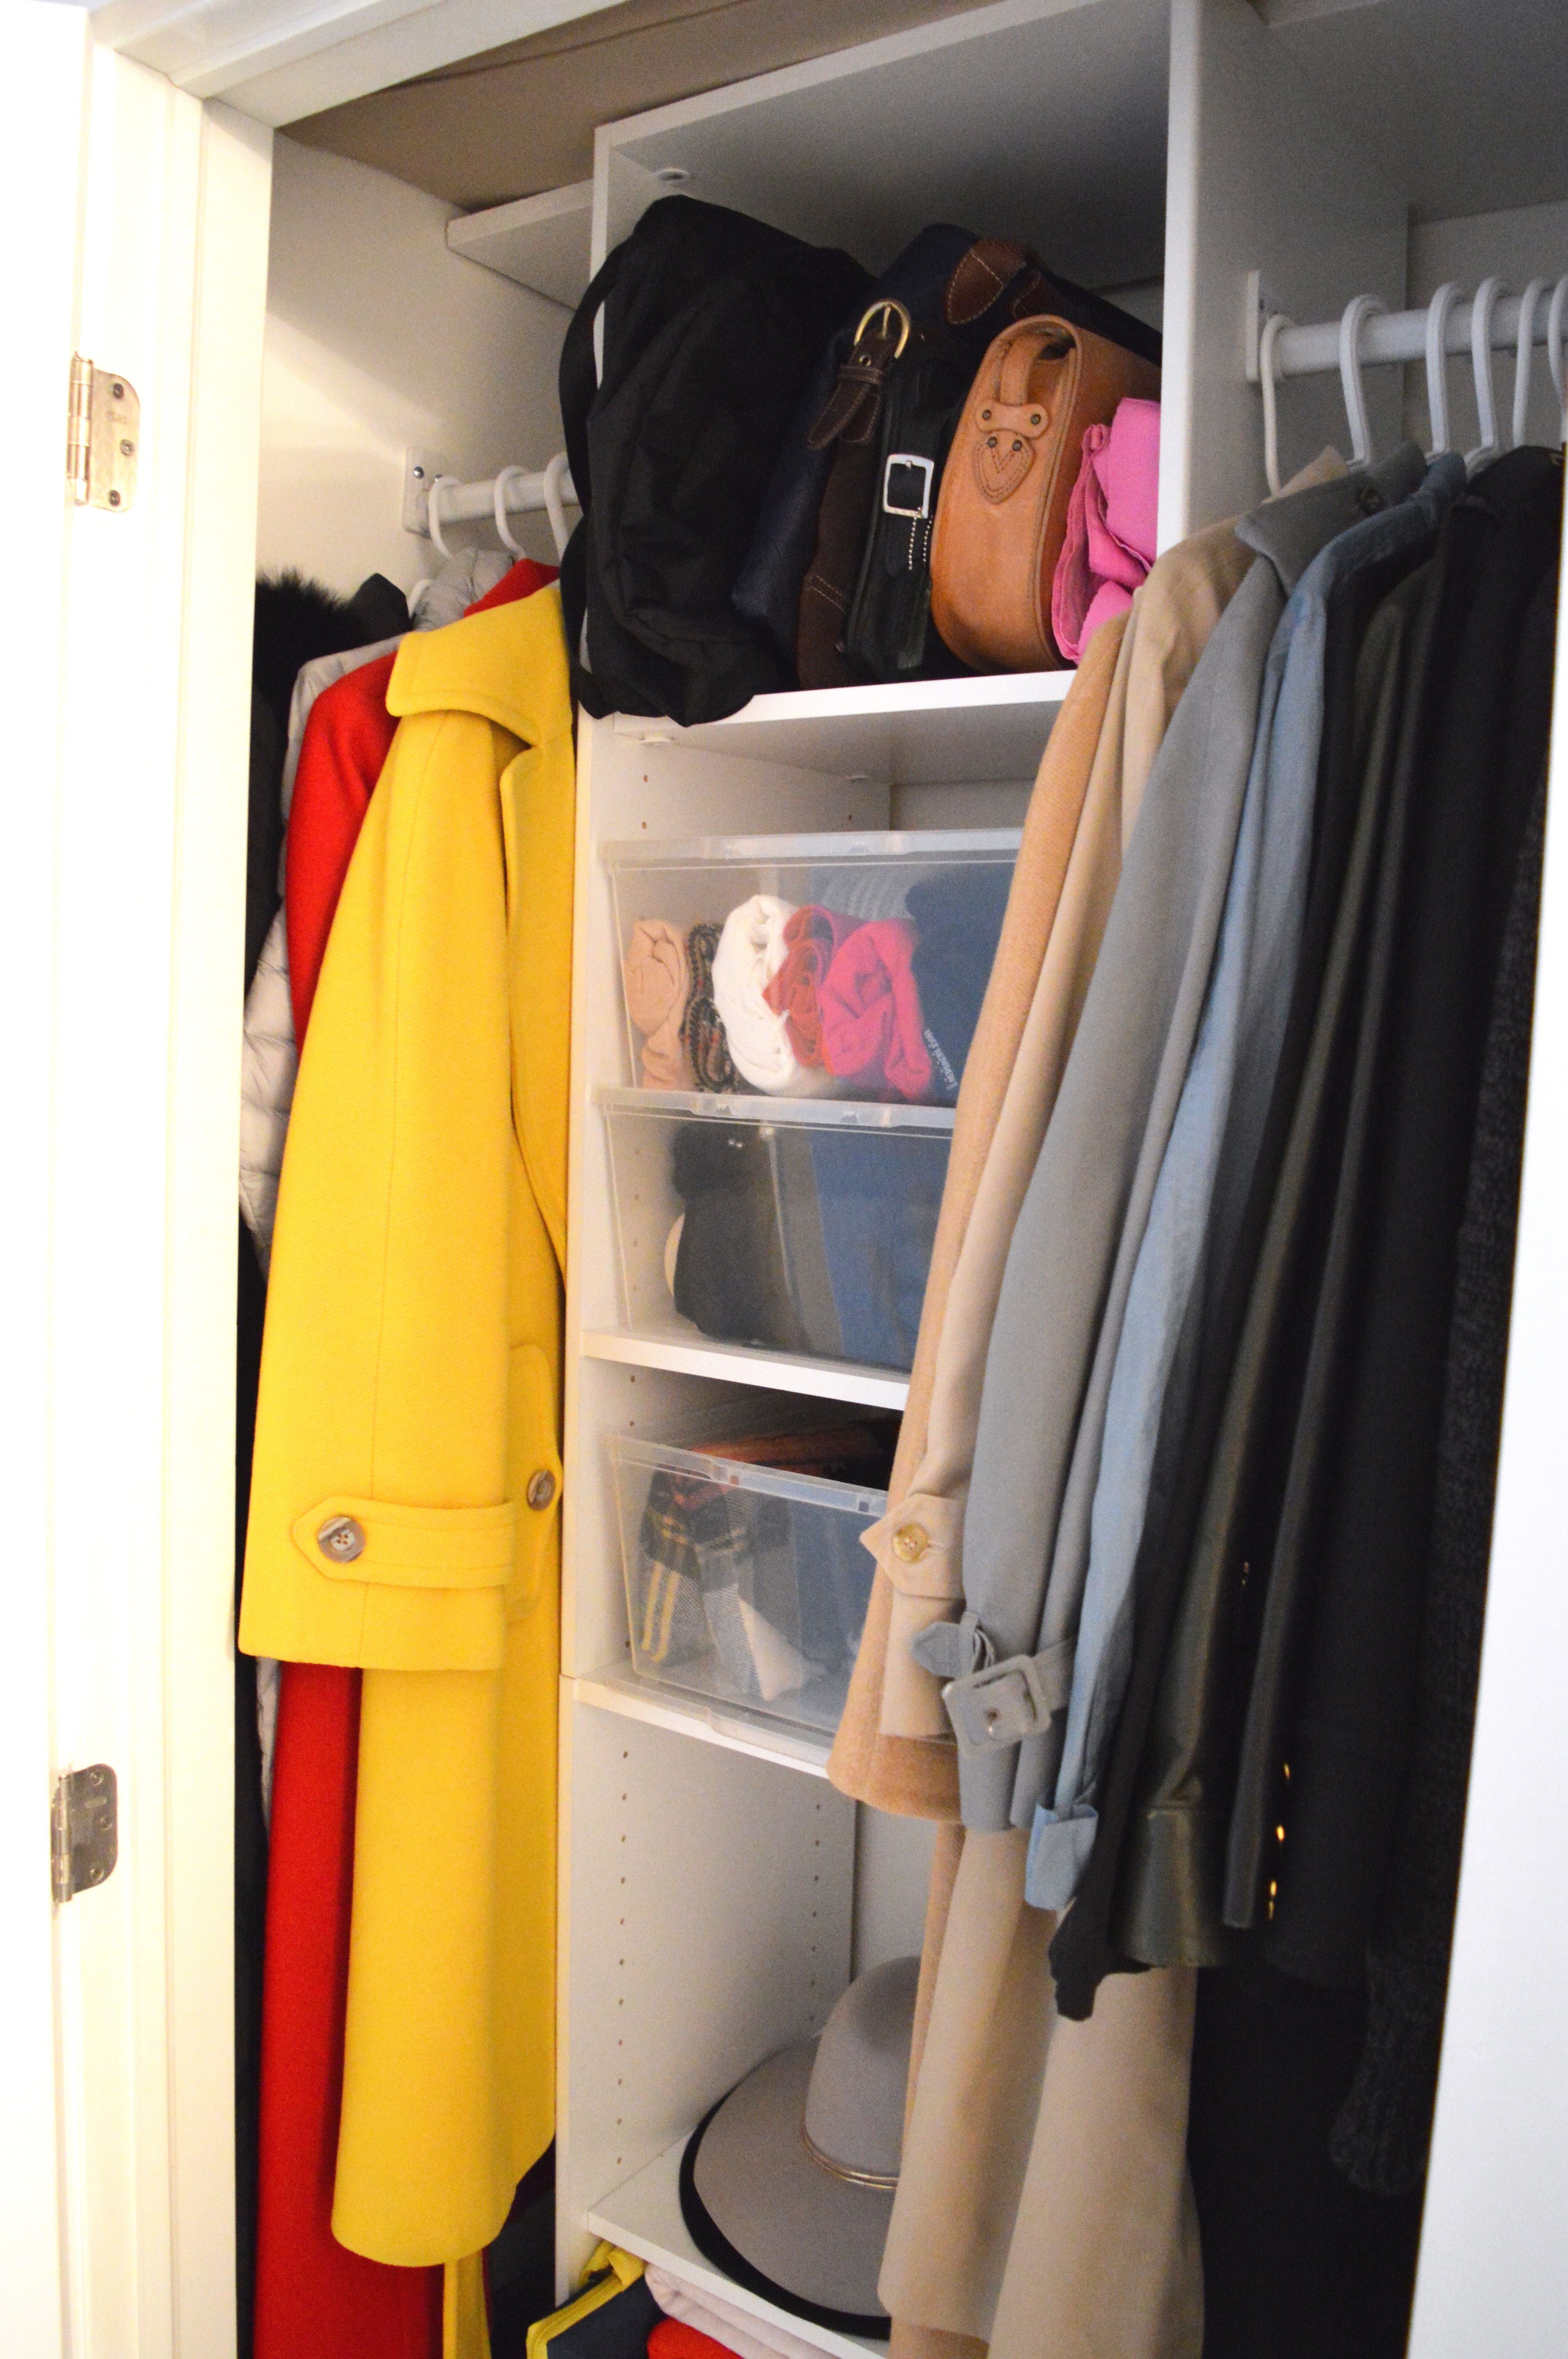
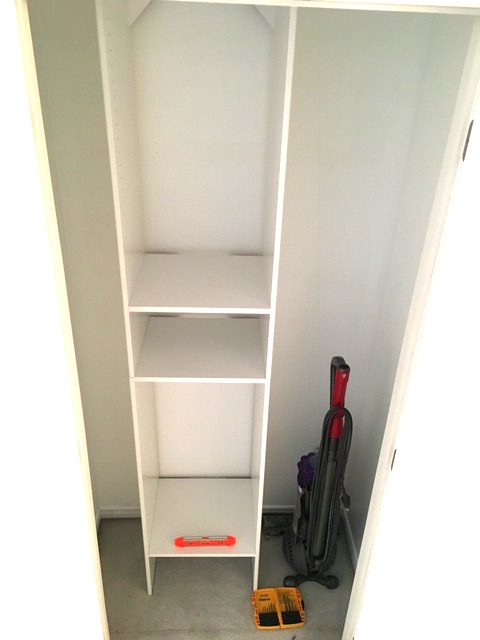
My long coats are on the left side of the shelving unit. At the moment, there is room for four large winter coats. On the right side, you’ll notice my shorter coats that take me through spring and fall. I have other coats stored away in another closet, but that has always been the case. The ones in regular rotation have always been in this hallway closet.
The shelves hold my every day as well as my only-in-certain-seasons items. On the top shelf are purses I regularly rotate. Under those, I have winter accessories (scarves, hats, mittens) in clear storage boxes. Then I have a fairly empty shelf that houses two hats. The bottom shelf has my grocery/shopping bags and my blankets for my patio. Oh – and something you can’t really see in these photos – my patio cushions are on the very top shelf about the full unit. They fit perfectly, which was a pleasant surprise! I have really maximized the function of this little closet!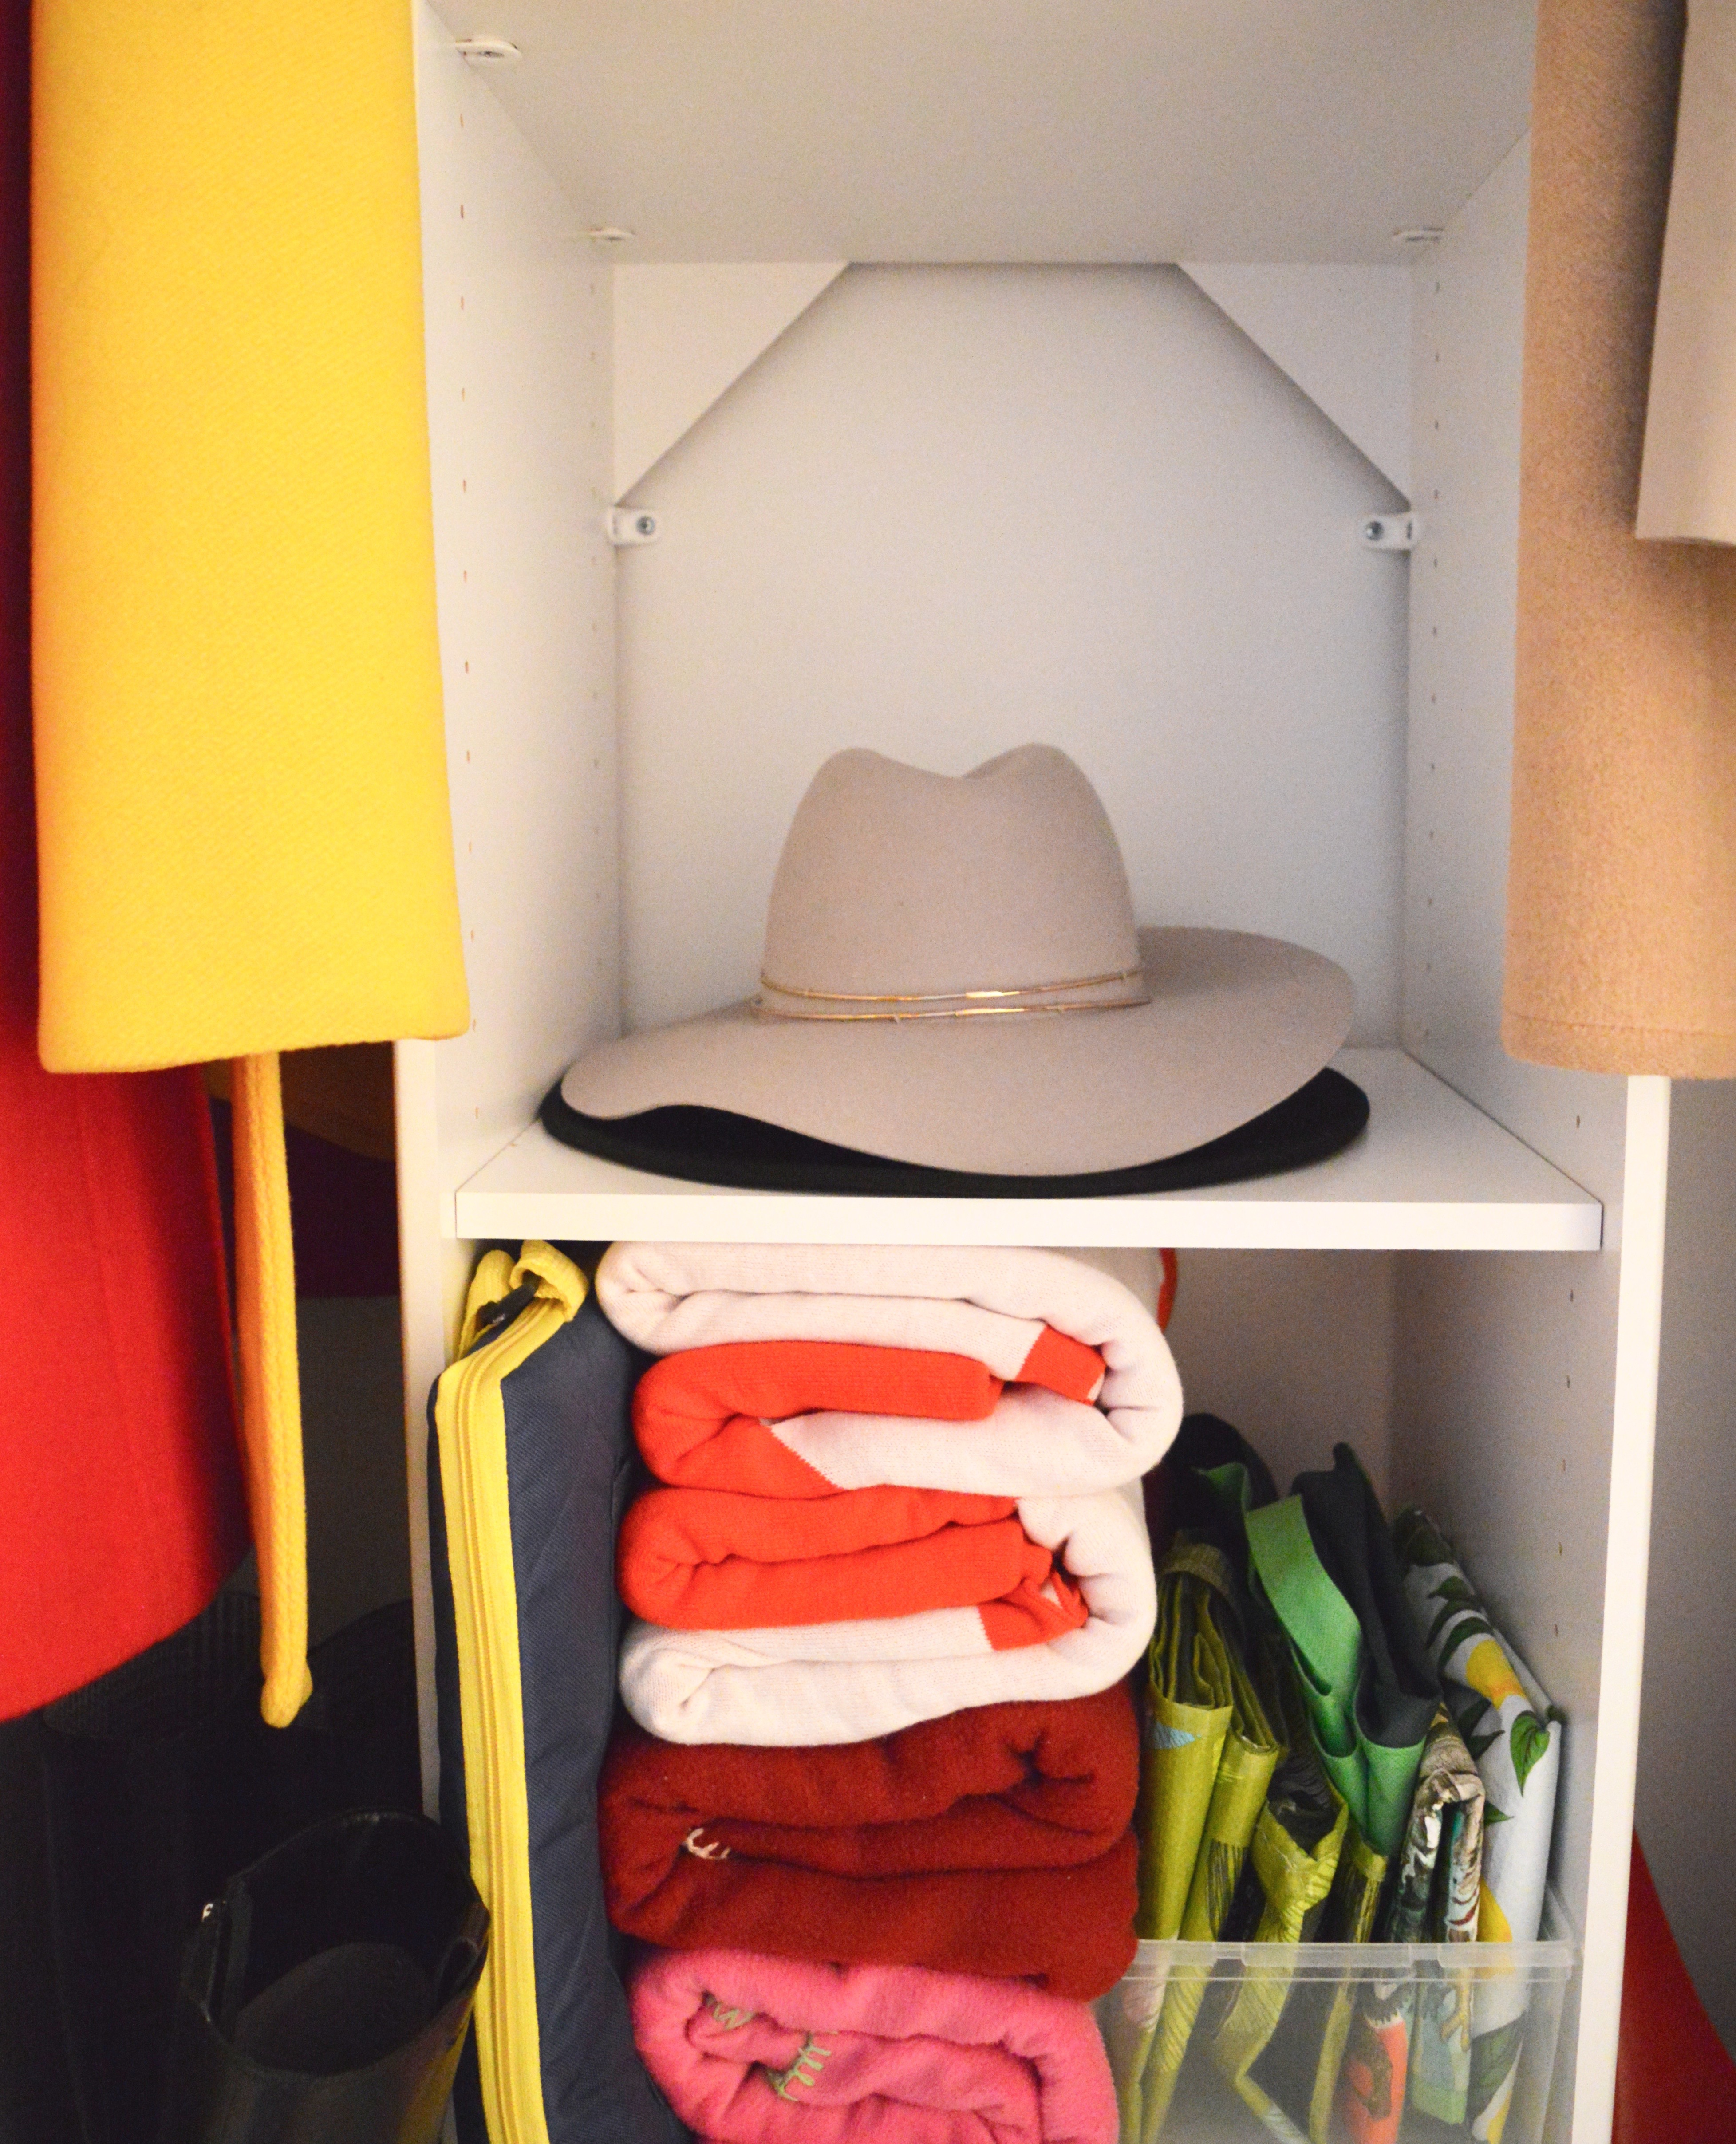
I considered styling this closet, so the photos would be ridiculously pretty, but then it wouldn’t be a representation of real life, so I opted for realness. The items that you see in this closet were in the before photos. These are things that I use daily, and I didn’t want a “just for show” closet to share with you. In true Jordana style, I did arrange my coats by colour. 

There’s room for everything in here now, and even a bit of room to grow. The clear storage containers (clear shoe box and clear utility box) will keep my winter accessories clean and organized when not in use.
Believe it or not – just about all of the items that were falling out of the closet in this post and in the before picture made their way into the after closet. I did remove two bags of bags (useless) and a couple of pairs of shoes, but I did add in two knee-high boots. It’s been great to experience the difference an organizer has made to the look and function of this closet! I’m glad the lovely outside makes way for the tidy inside!
Thanks to Home Depot Canada for sponsoring this post. All opinions and photos are my own.
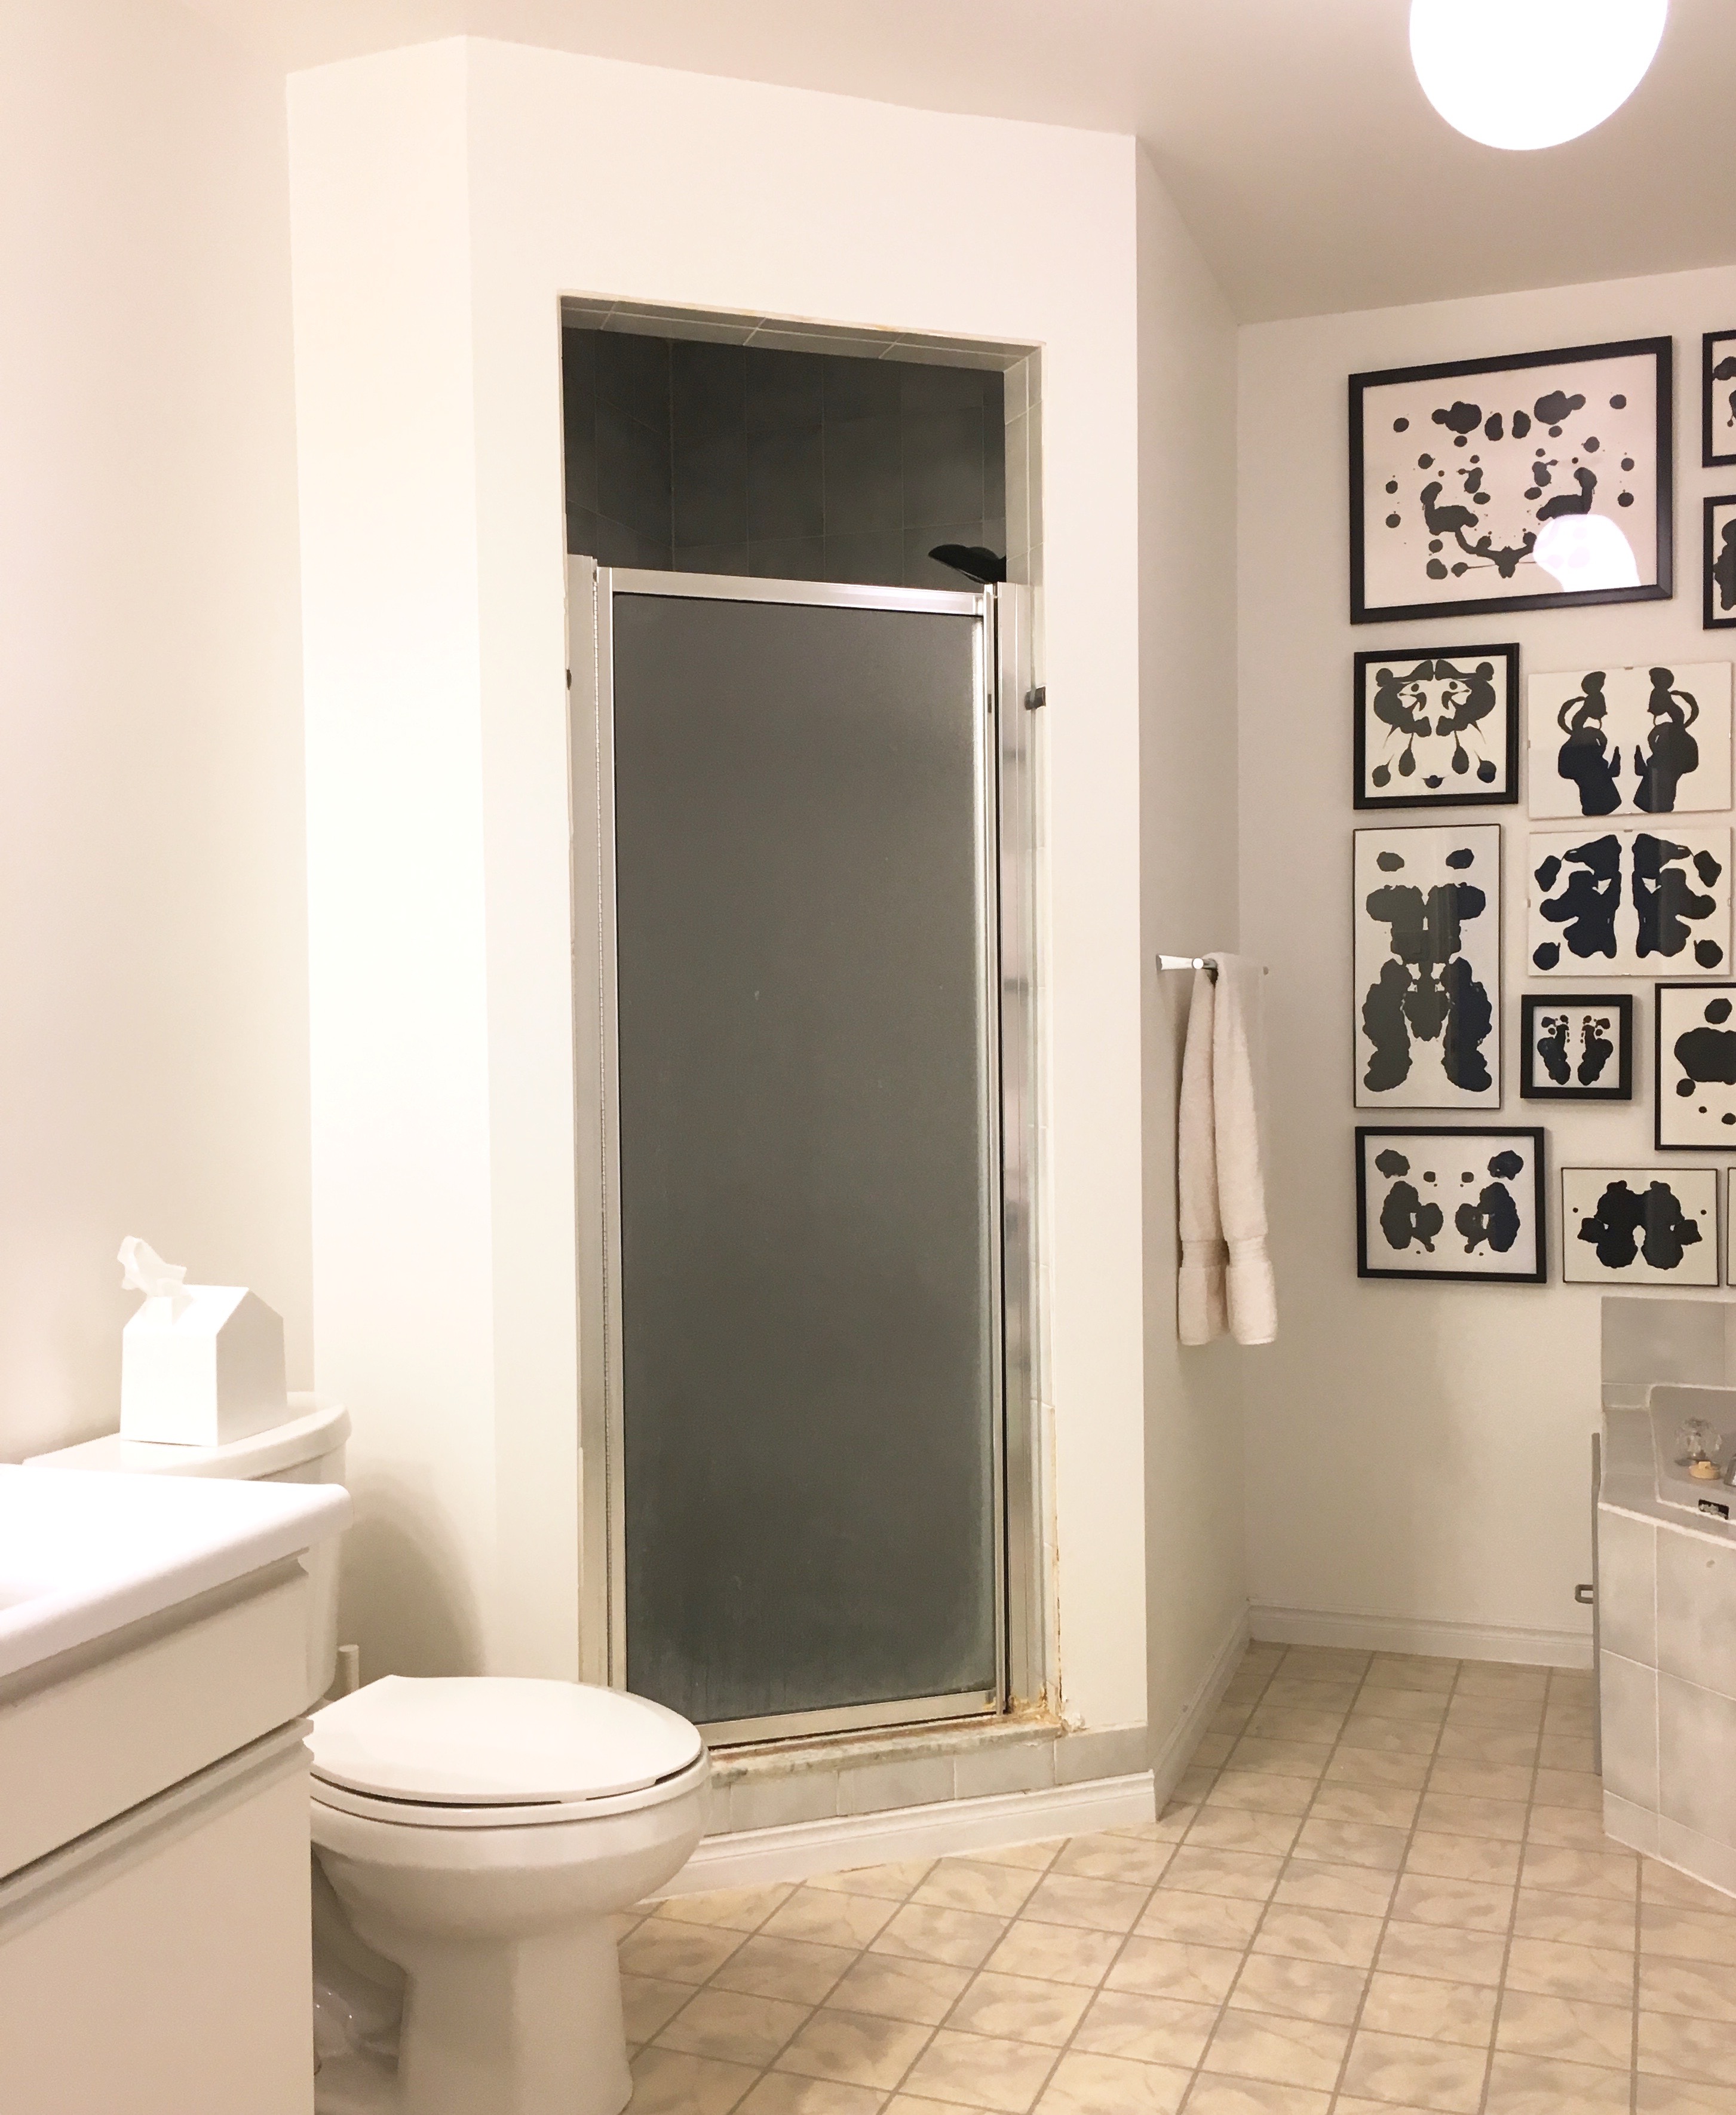
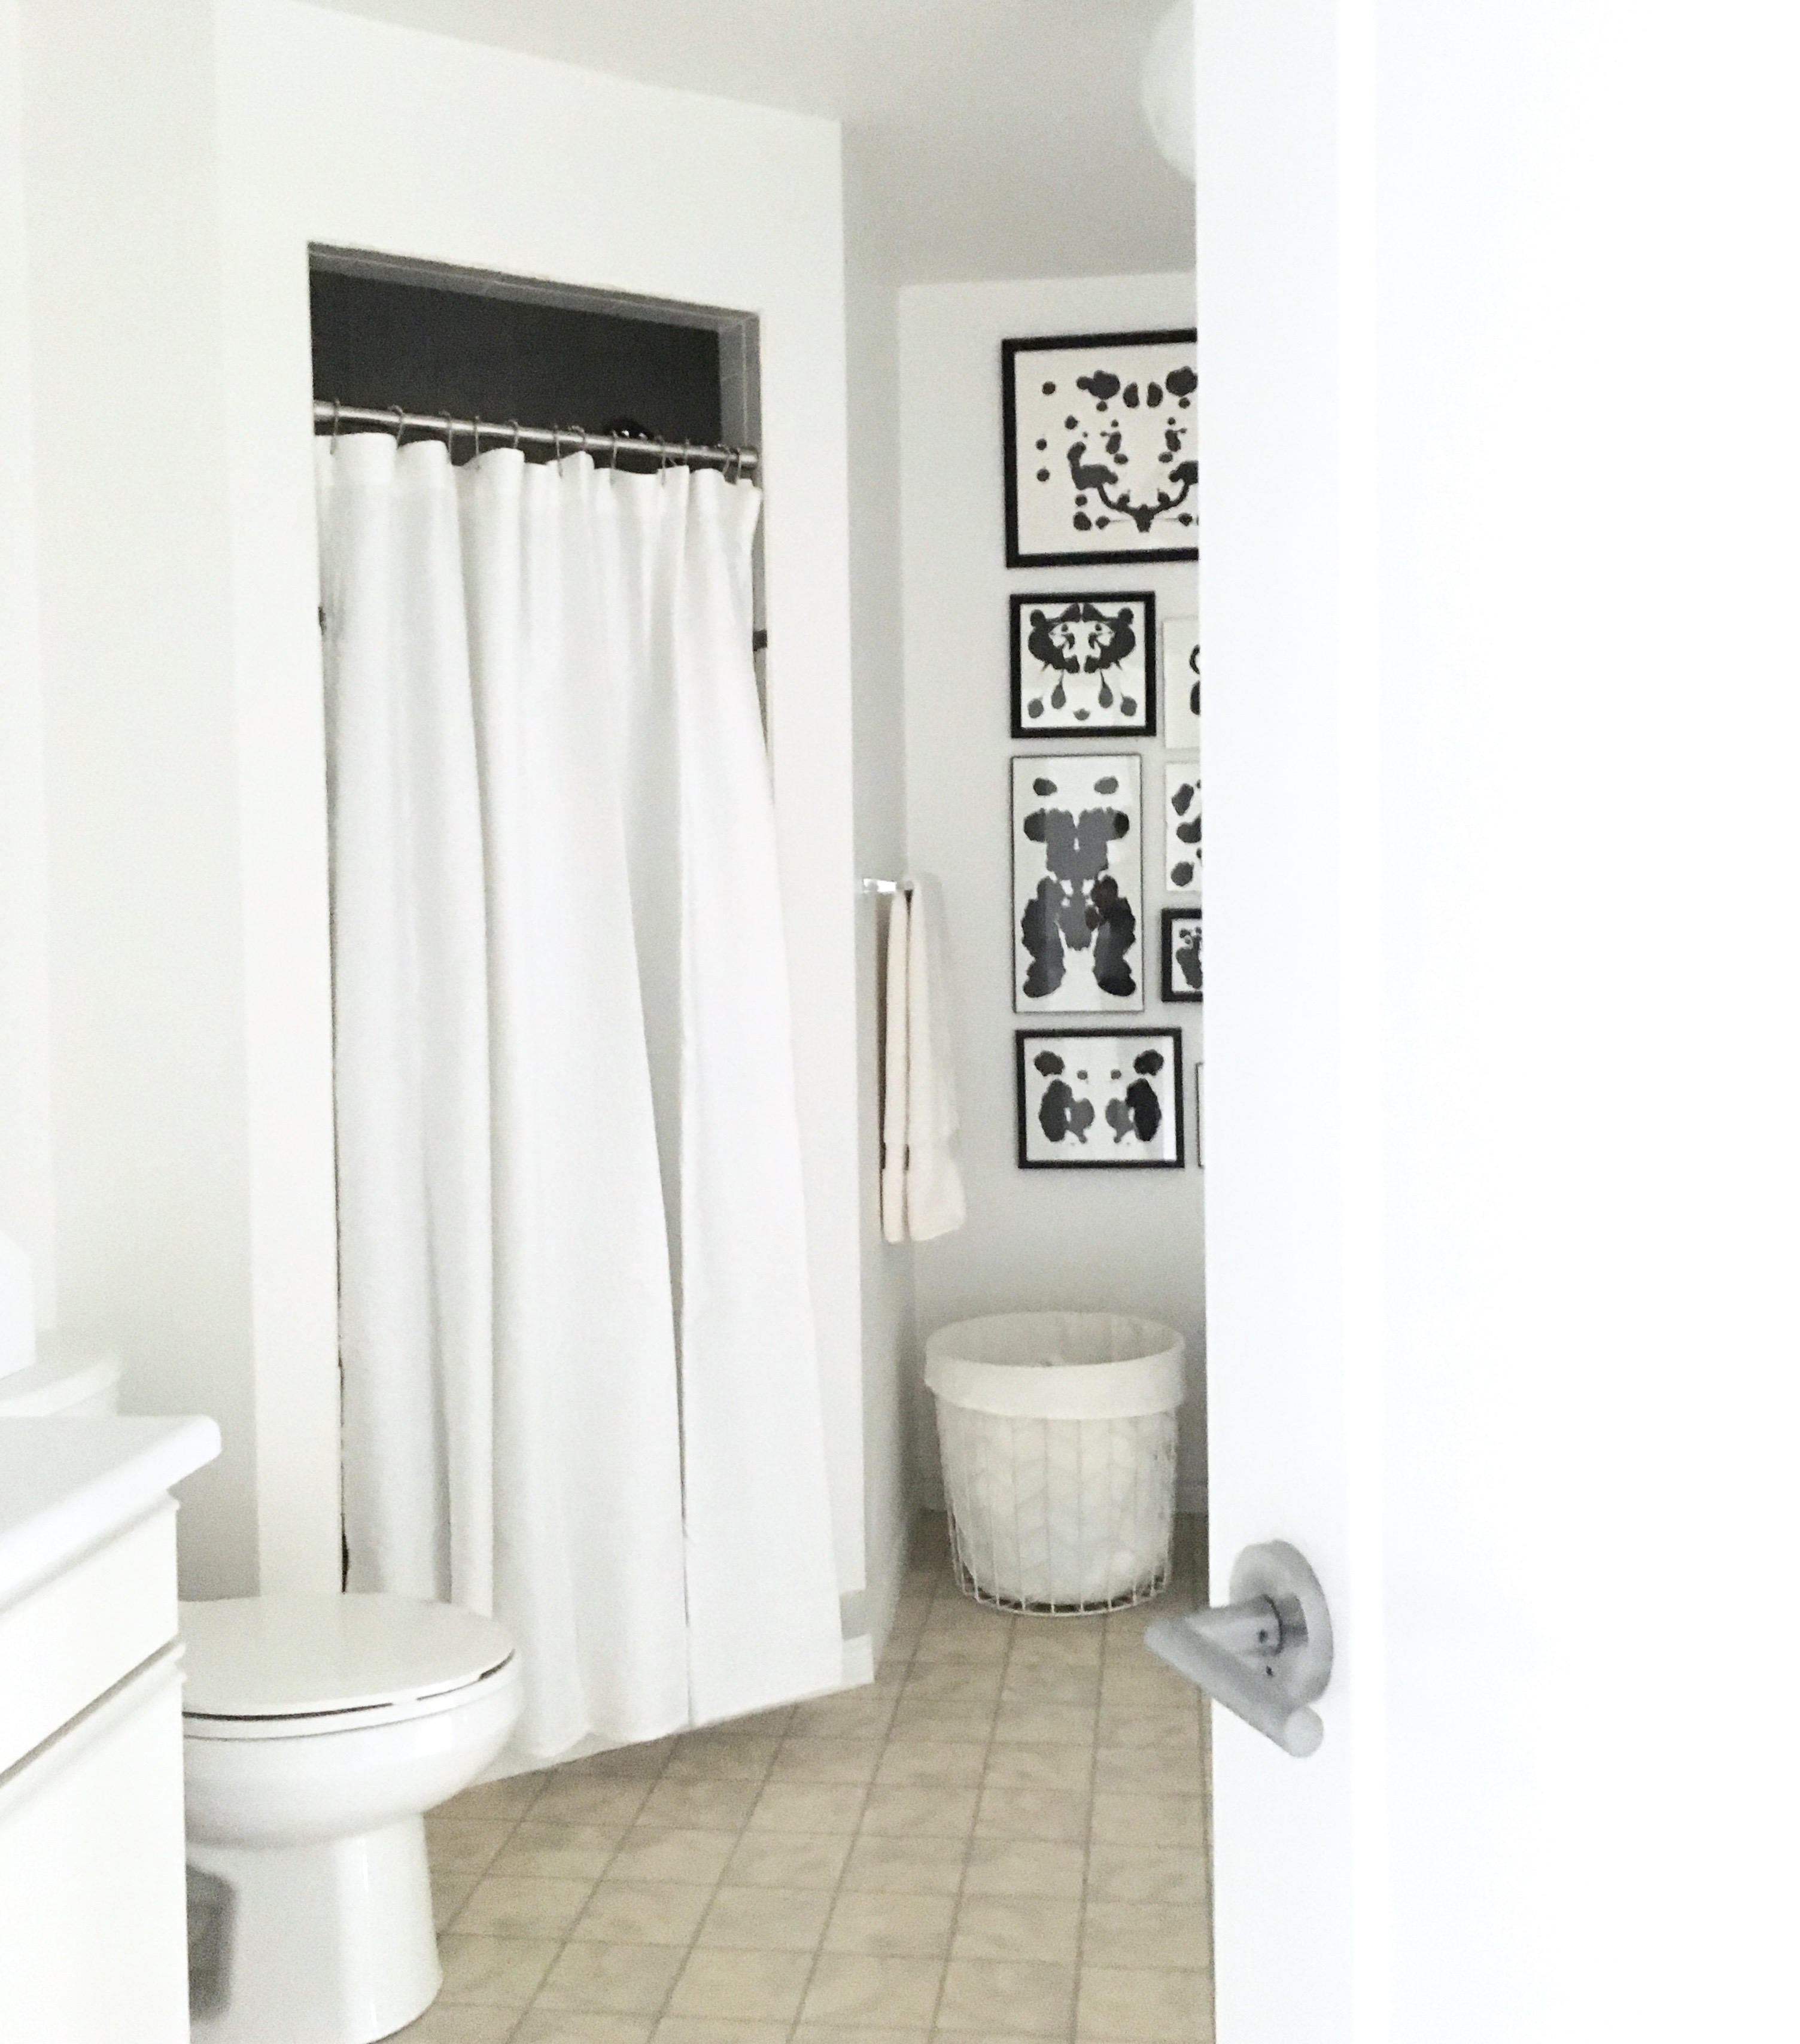
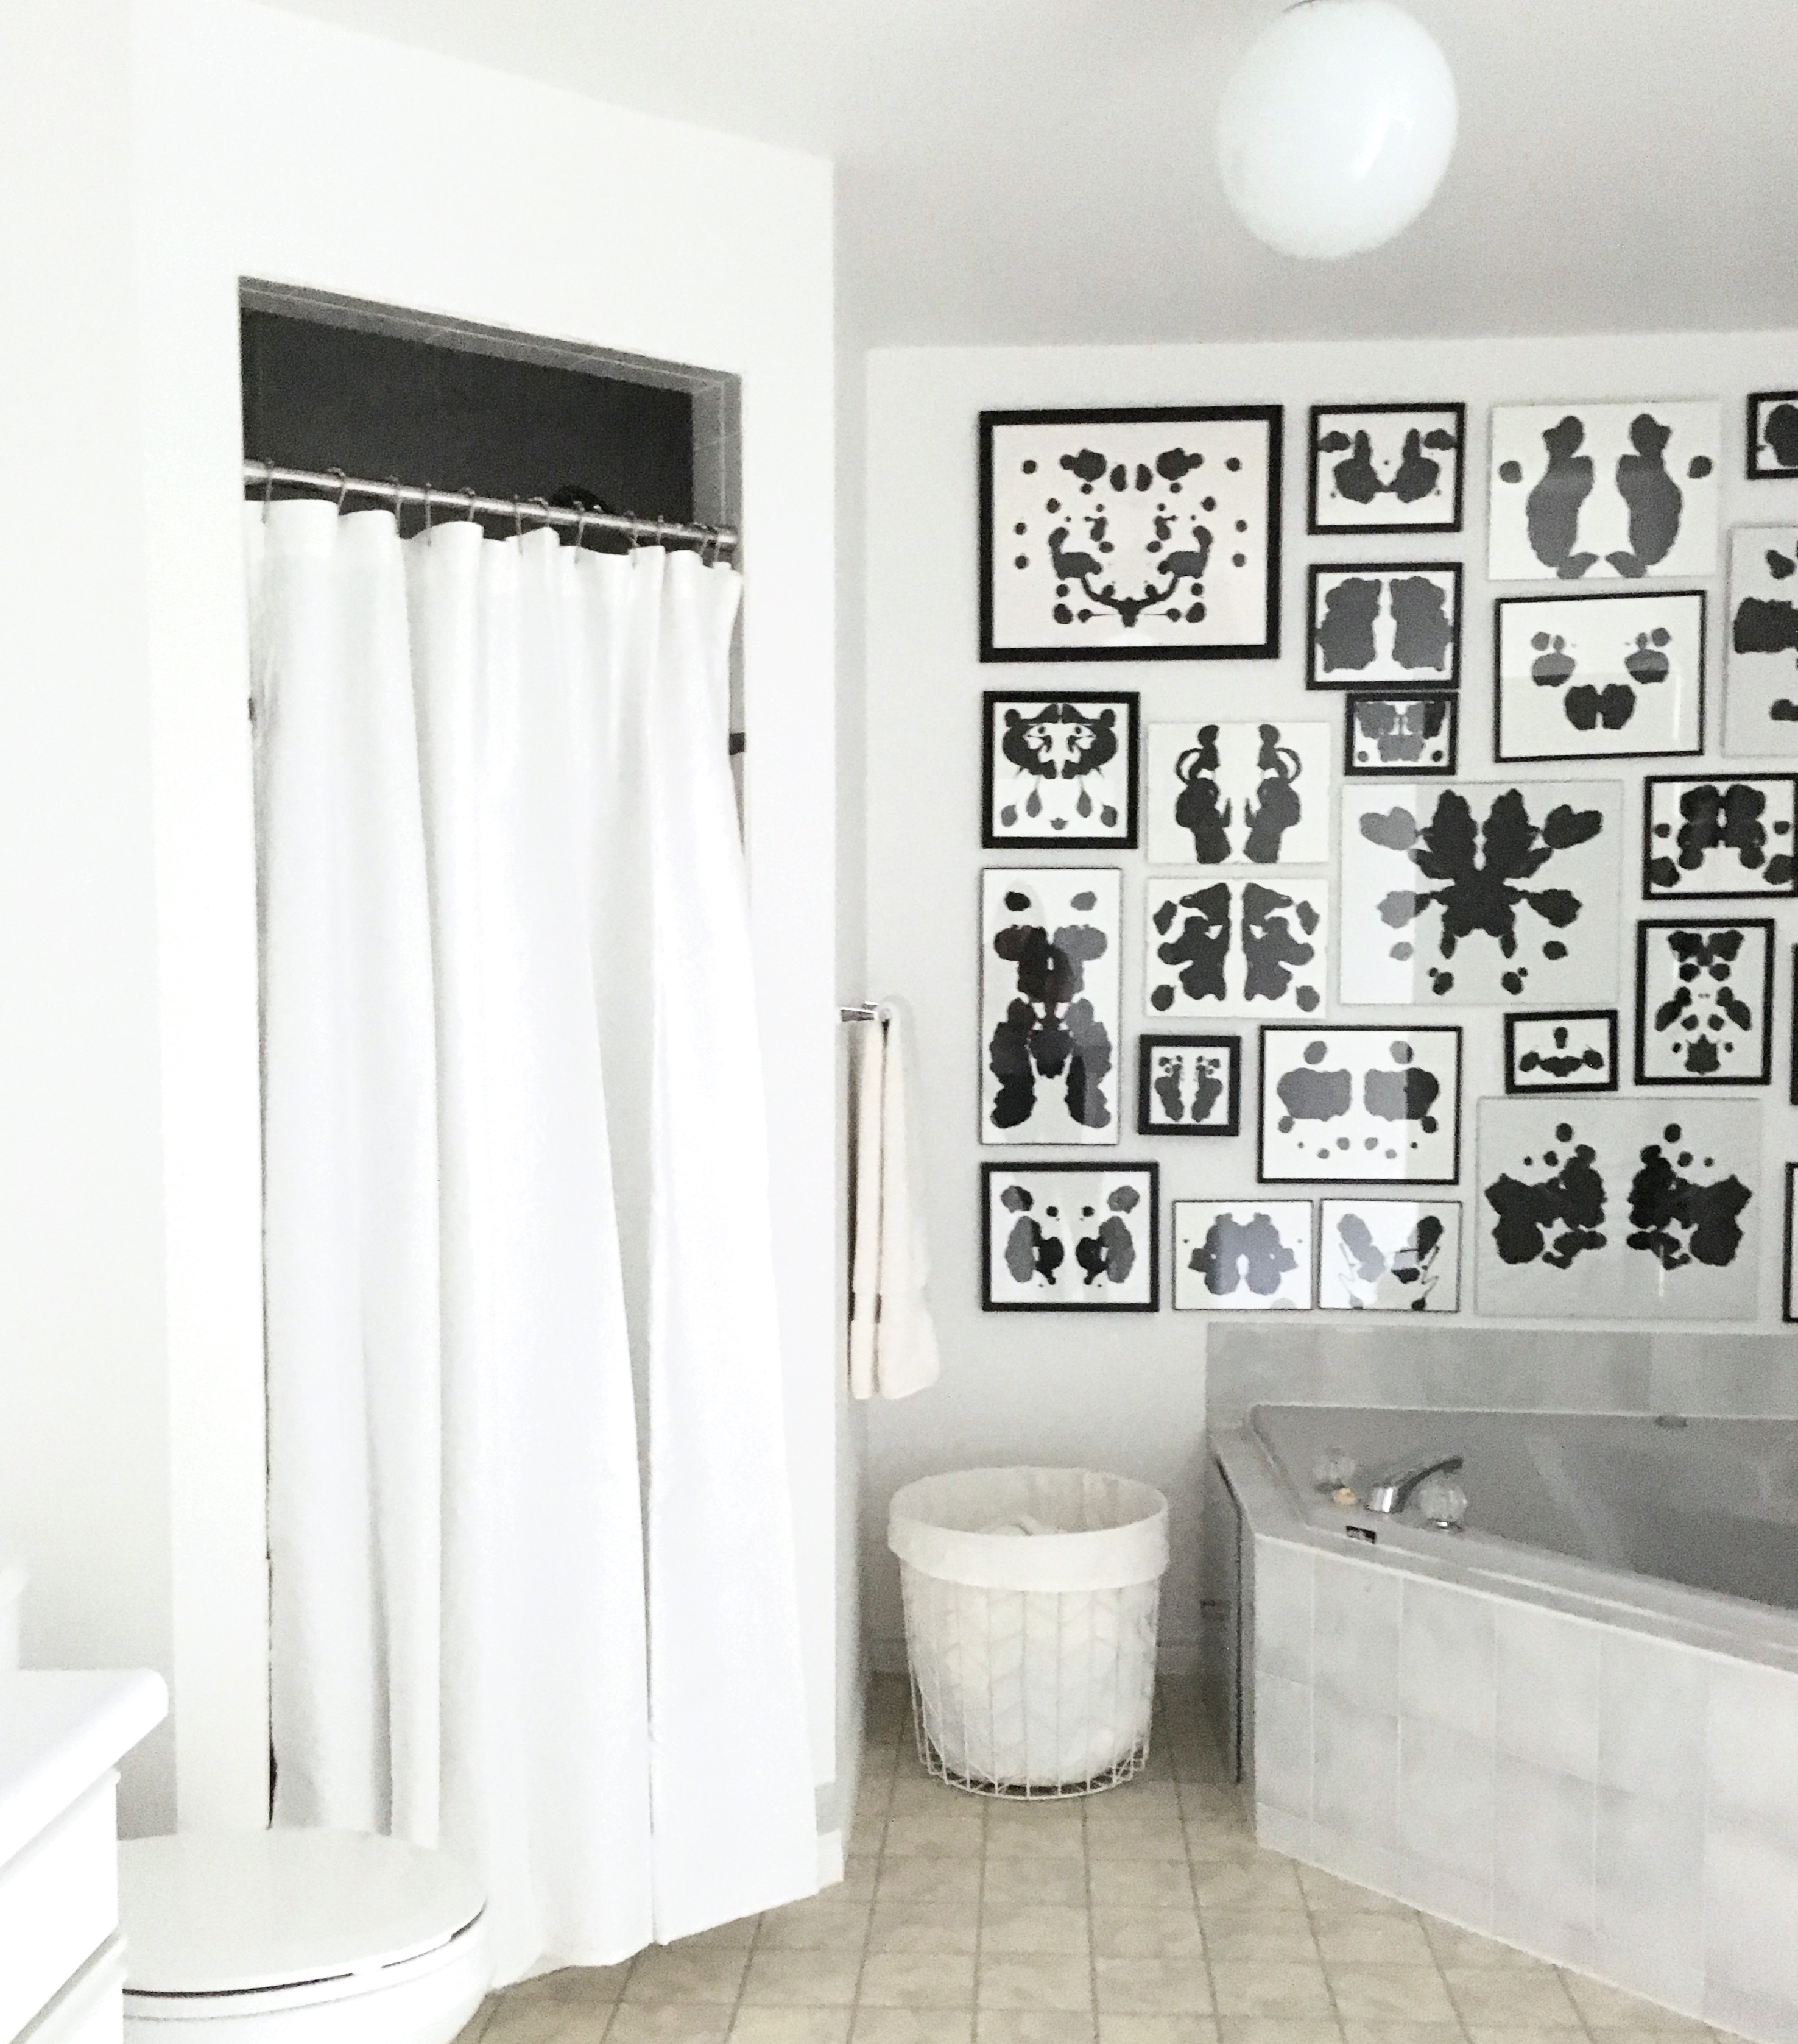
If you’ve ever seen my house in person or really paid attention to my stories here on White Cabana, you probably know that I dislike my upstairs bathroom. It’s huge. It has a corner jacuzzi tub that I rarely use and the smallest corner shower. When I bought my house five years ago, I did a quick reno – removed the shiny grey wallpaper, painted the 80s wood trim on the cabinet, and replaced the counter, sink, faucet, and lighting. I also tried to draw the eye up from the grey tub and linoleum floor by crafting a giant inkblot art wall.
This was a good mini makeover, and it’s still serving me pretty well. And since I’ve spent my renovation budget on other things in my home – painting, tiling, doors, trim, and my laundry room – there has been no room in my renovation budget for the big bathroom.
So I’ve had to continue to get creative. With input from other creative people, of course!
When my sister was over a couple of weeks ago, she encouraged me to rip out the disgusting shower door and replace it with a pretty curtain. Just rip it out. Sure.
Yup. I thought this was a manageable DIY task.
 The Before
So, one morning, when I was still in my pajamas, I took out my tools and started removing a dozen or so screws. I chiseled, hammered, pushed, and pulled the door and frame out of place. It was gratifying.

The Tools (perfume optional)
I then scrubbed the built-up gunk off of the marble step. This made a huge difference. I felt like I had a brand new shower.
I filled all the old shower door screw holes with silicone, hung a shower curtain tension rod, and added a pretty curtain. Done and done.
The After
This was an easy DIY that has made a big difference. The whole project cost about $50 (for the rod, shower rings, shower curtain and liner). Yes, I still dislike the corner shower, but at least I don’t have a dirty door to look at every day. Much improved!
If you see any photos of my home, you’ll notice that flowers often make an appearance. My mom is a retired florist, so flowers have been on my mind for most of my life. On market days, I pick up bunches of flowers that will last throughout the week. Since I don’t have my mom’s skill in floral arranging, I tend to buy flowers of one variety, and each week, no matter the flower, they look beautiful around my home.
If I’m having people over for dinner and lack an arrangement, I grab an odd number of stems from one of my large vases, and I cut them shorter to put into mini vases (I often use the Riviera petits pots). This makes for an easy create-in-one-minute centrepiece.
Another great thing about the single-bloom arrangement is that you can create it with vases/containers you already own, and you can customize it for your favourite colour (for both the flowers and containers).

![]()

via VSCO
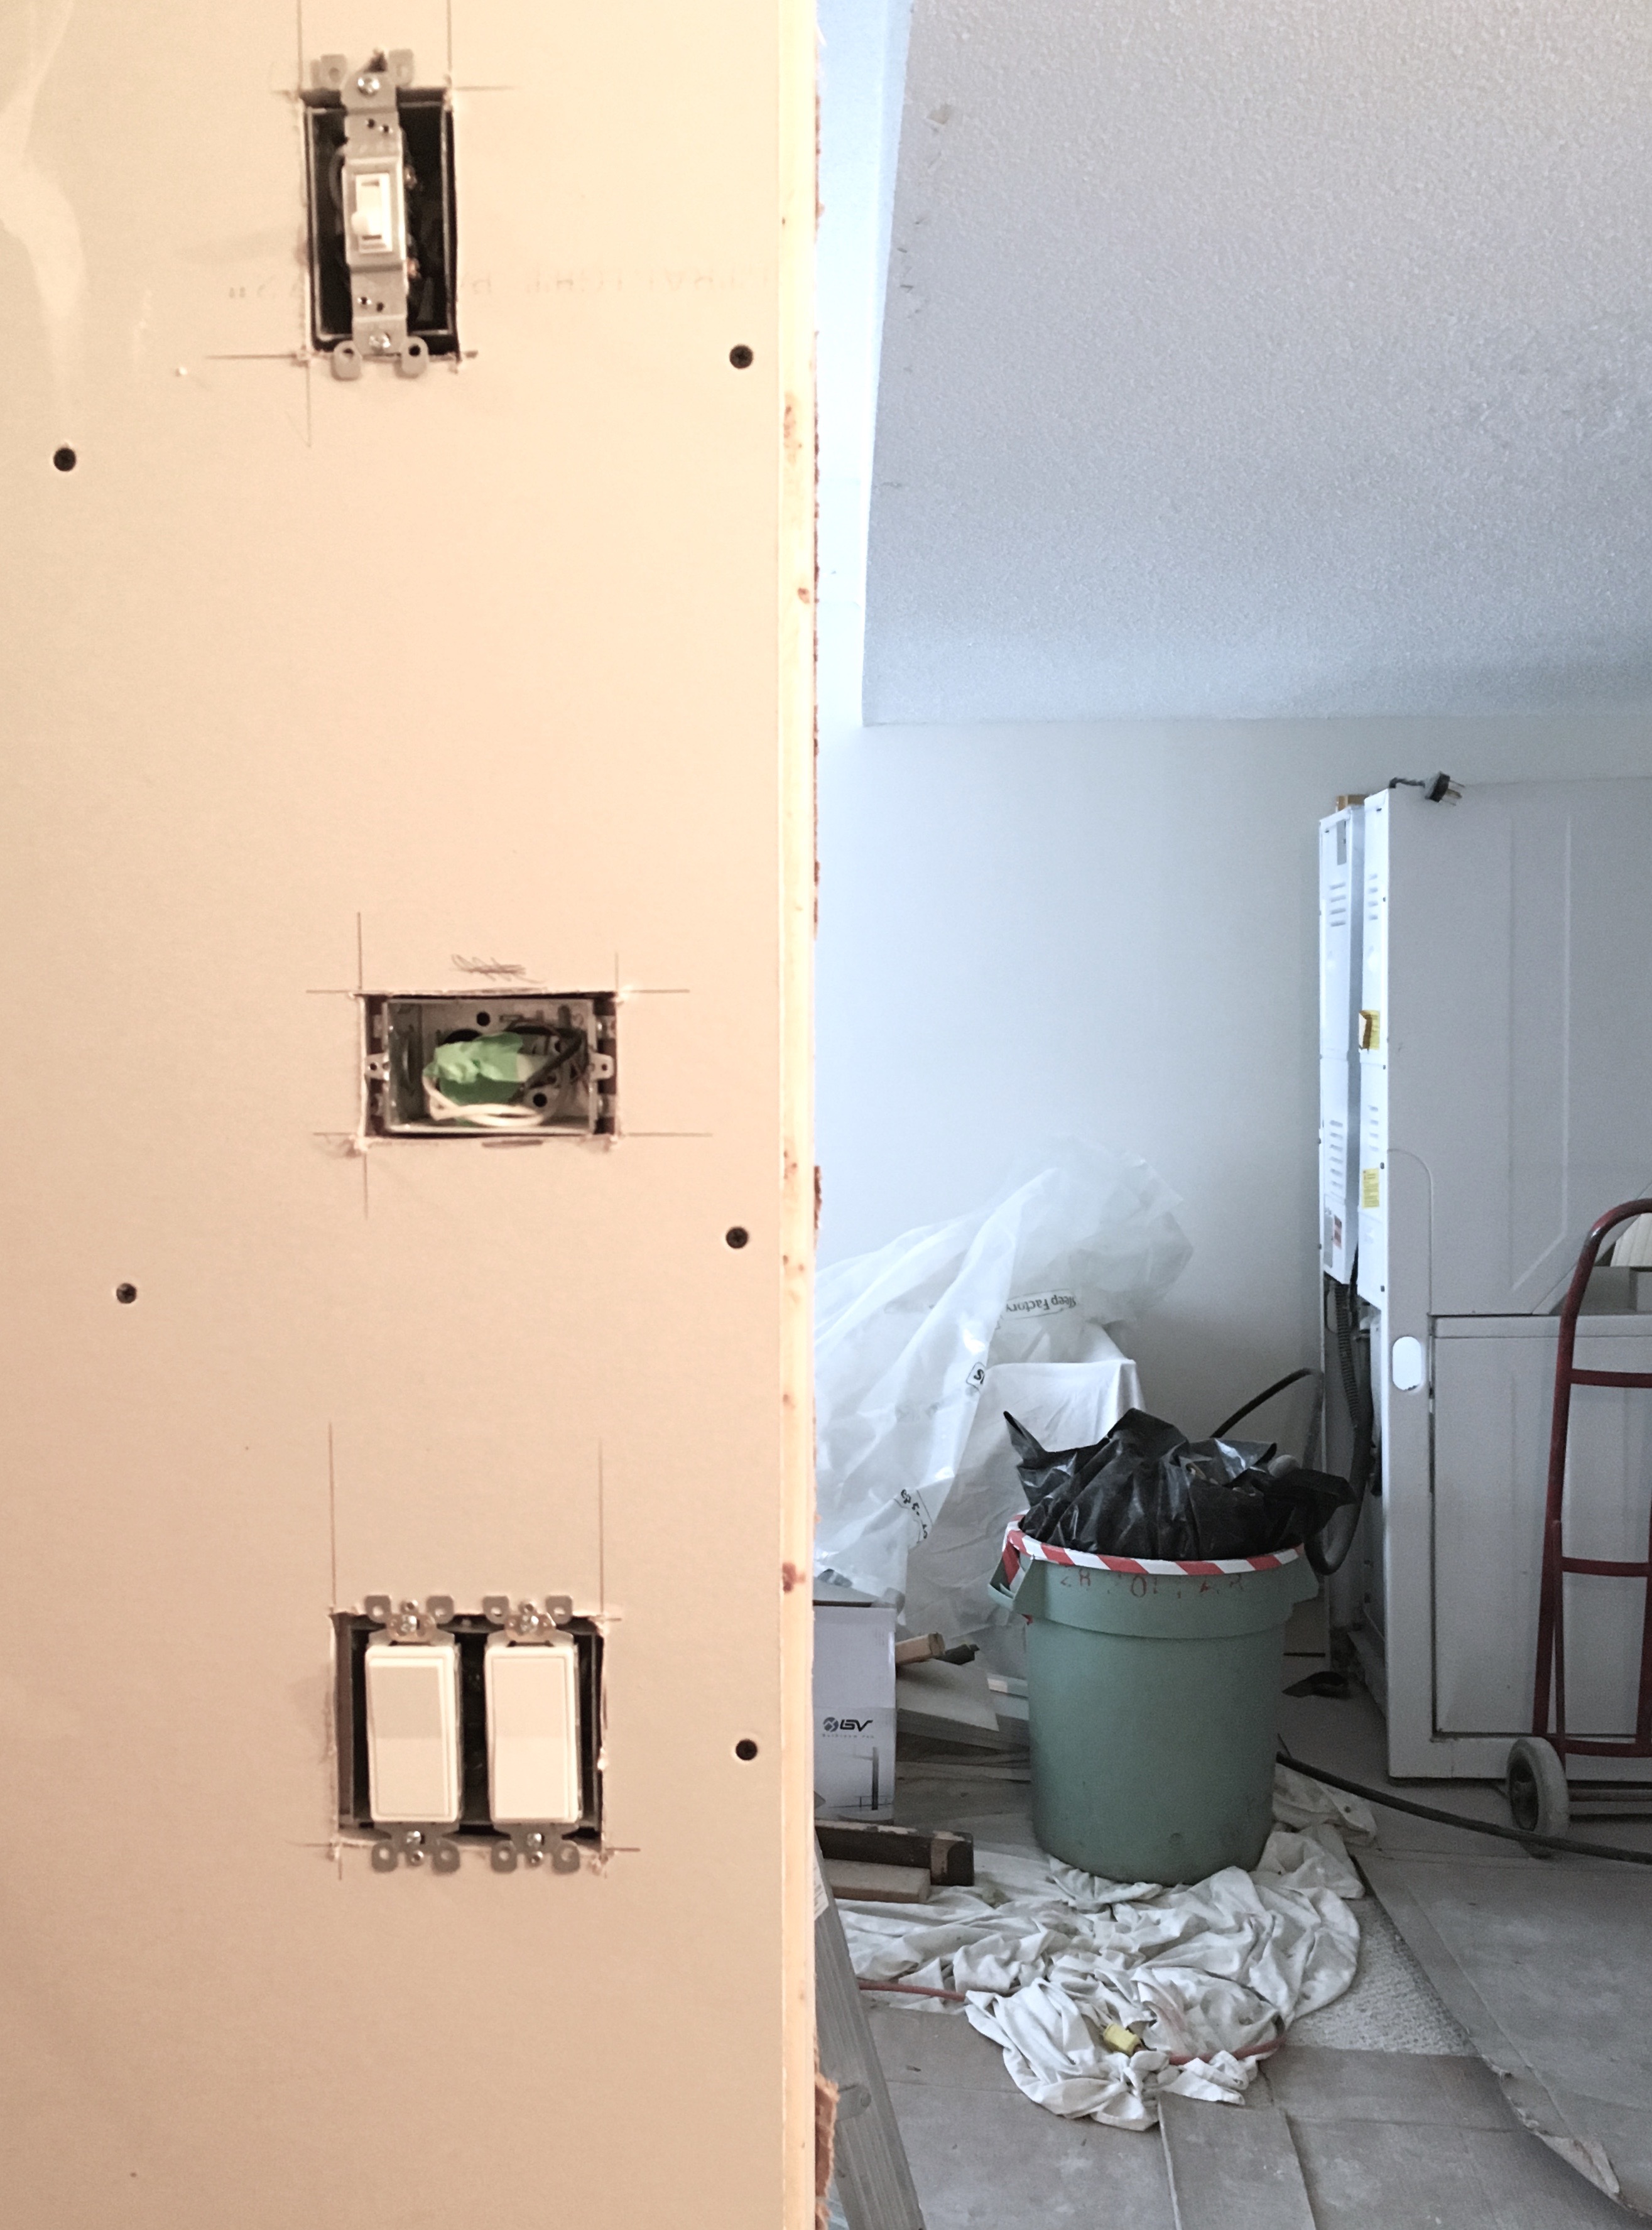
Welcome back to the One Room Challenge. Today marks the halfway point of this 6-week makeover journey, and things are looking pretty good in my new laundry/bathroom…even though the photos in this post (and my week 1, week 2 posts) are full of dirt, dust, and mess!

This week, I’m sharing what happened after the plumber gave my pipes a makeover. He installed a shower, as you may recall, so when he left there was a big trench in my room. The floor needed patching, the walls needed insulating, and there was still a bunch of plumbing to take care of.  the beginning of a beautiful shower

check out those pipes

insulation installation
My drywaller patched up the floor with cement(I keep calling him my drywaller, but, honestly, Chris can do everything!). Once that was dry, my electrician (aka my dad) and my tiler got to work.
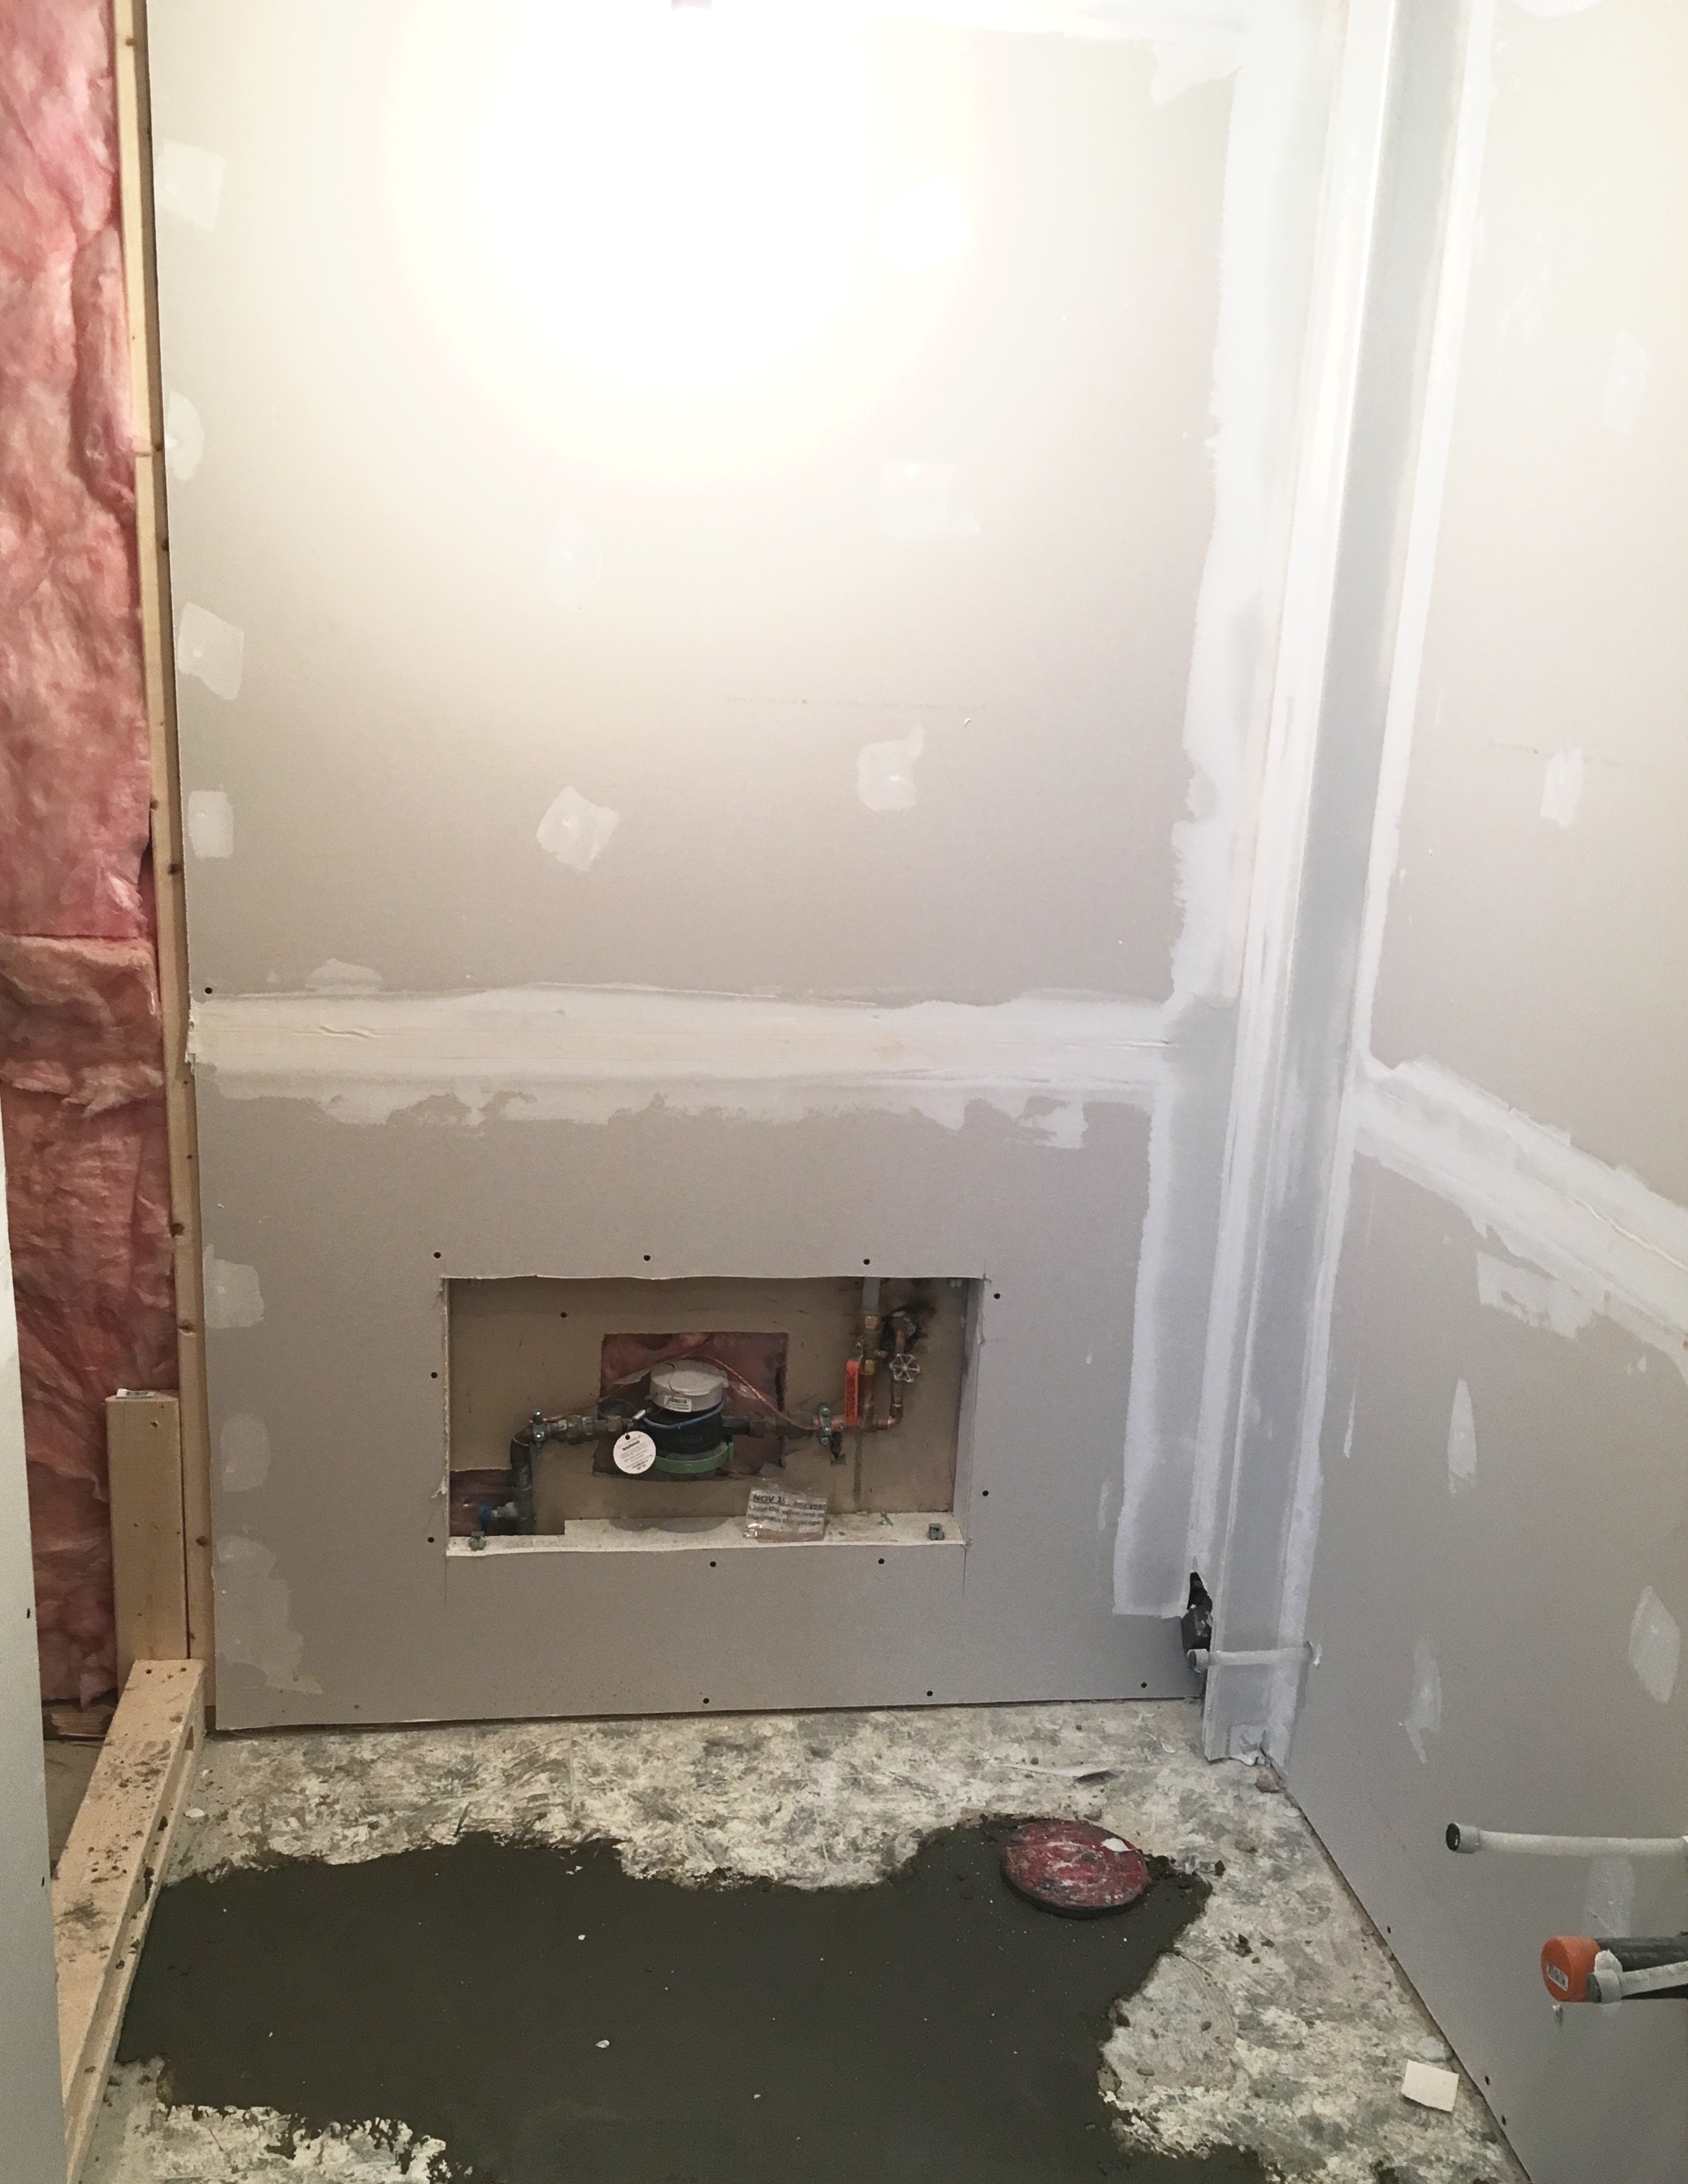
drywall installed
In terms of electrical work, quite a bit needed to get done. Dad installed new lighting, updated outlets, and did the prep work for my floor heating system. He also installed a new fan.
new electrical
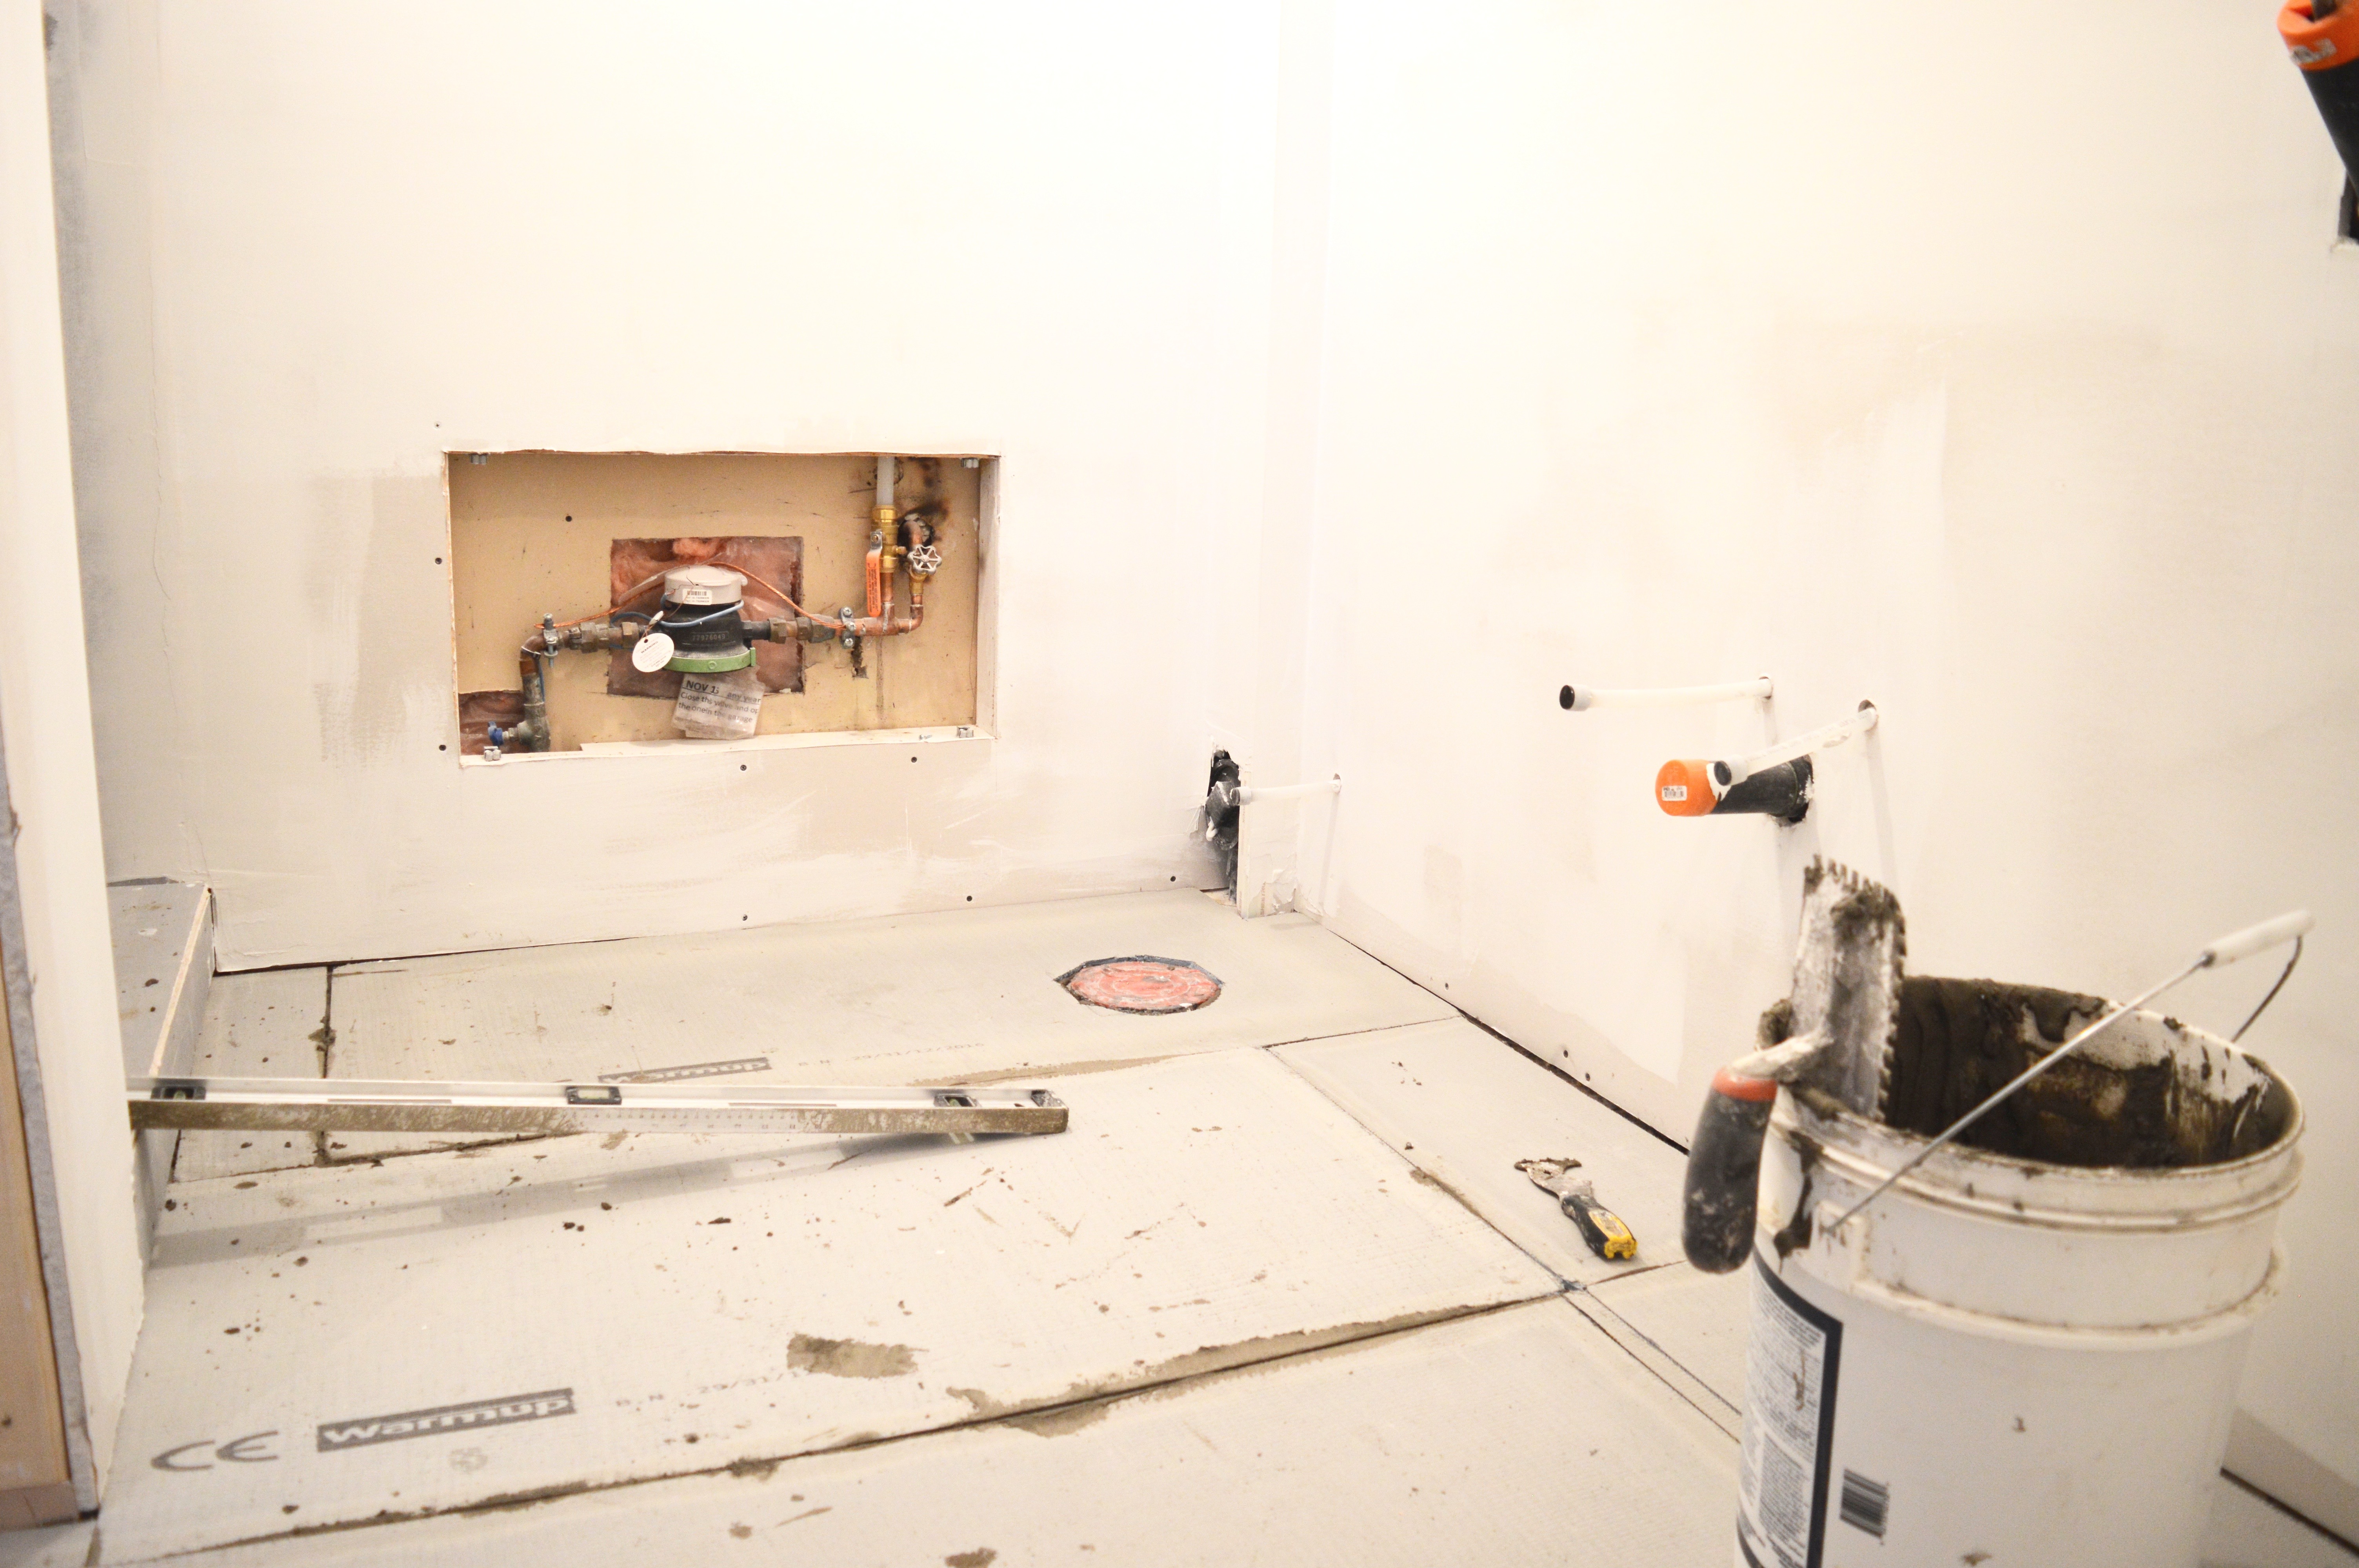
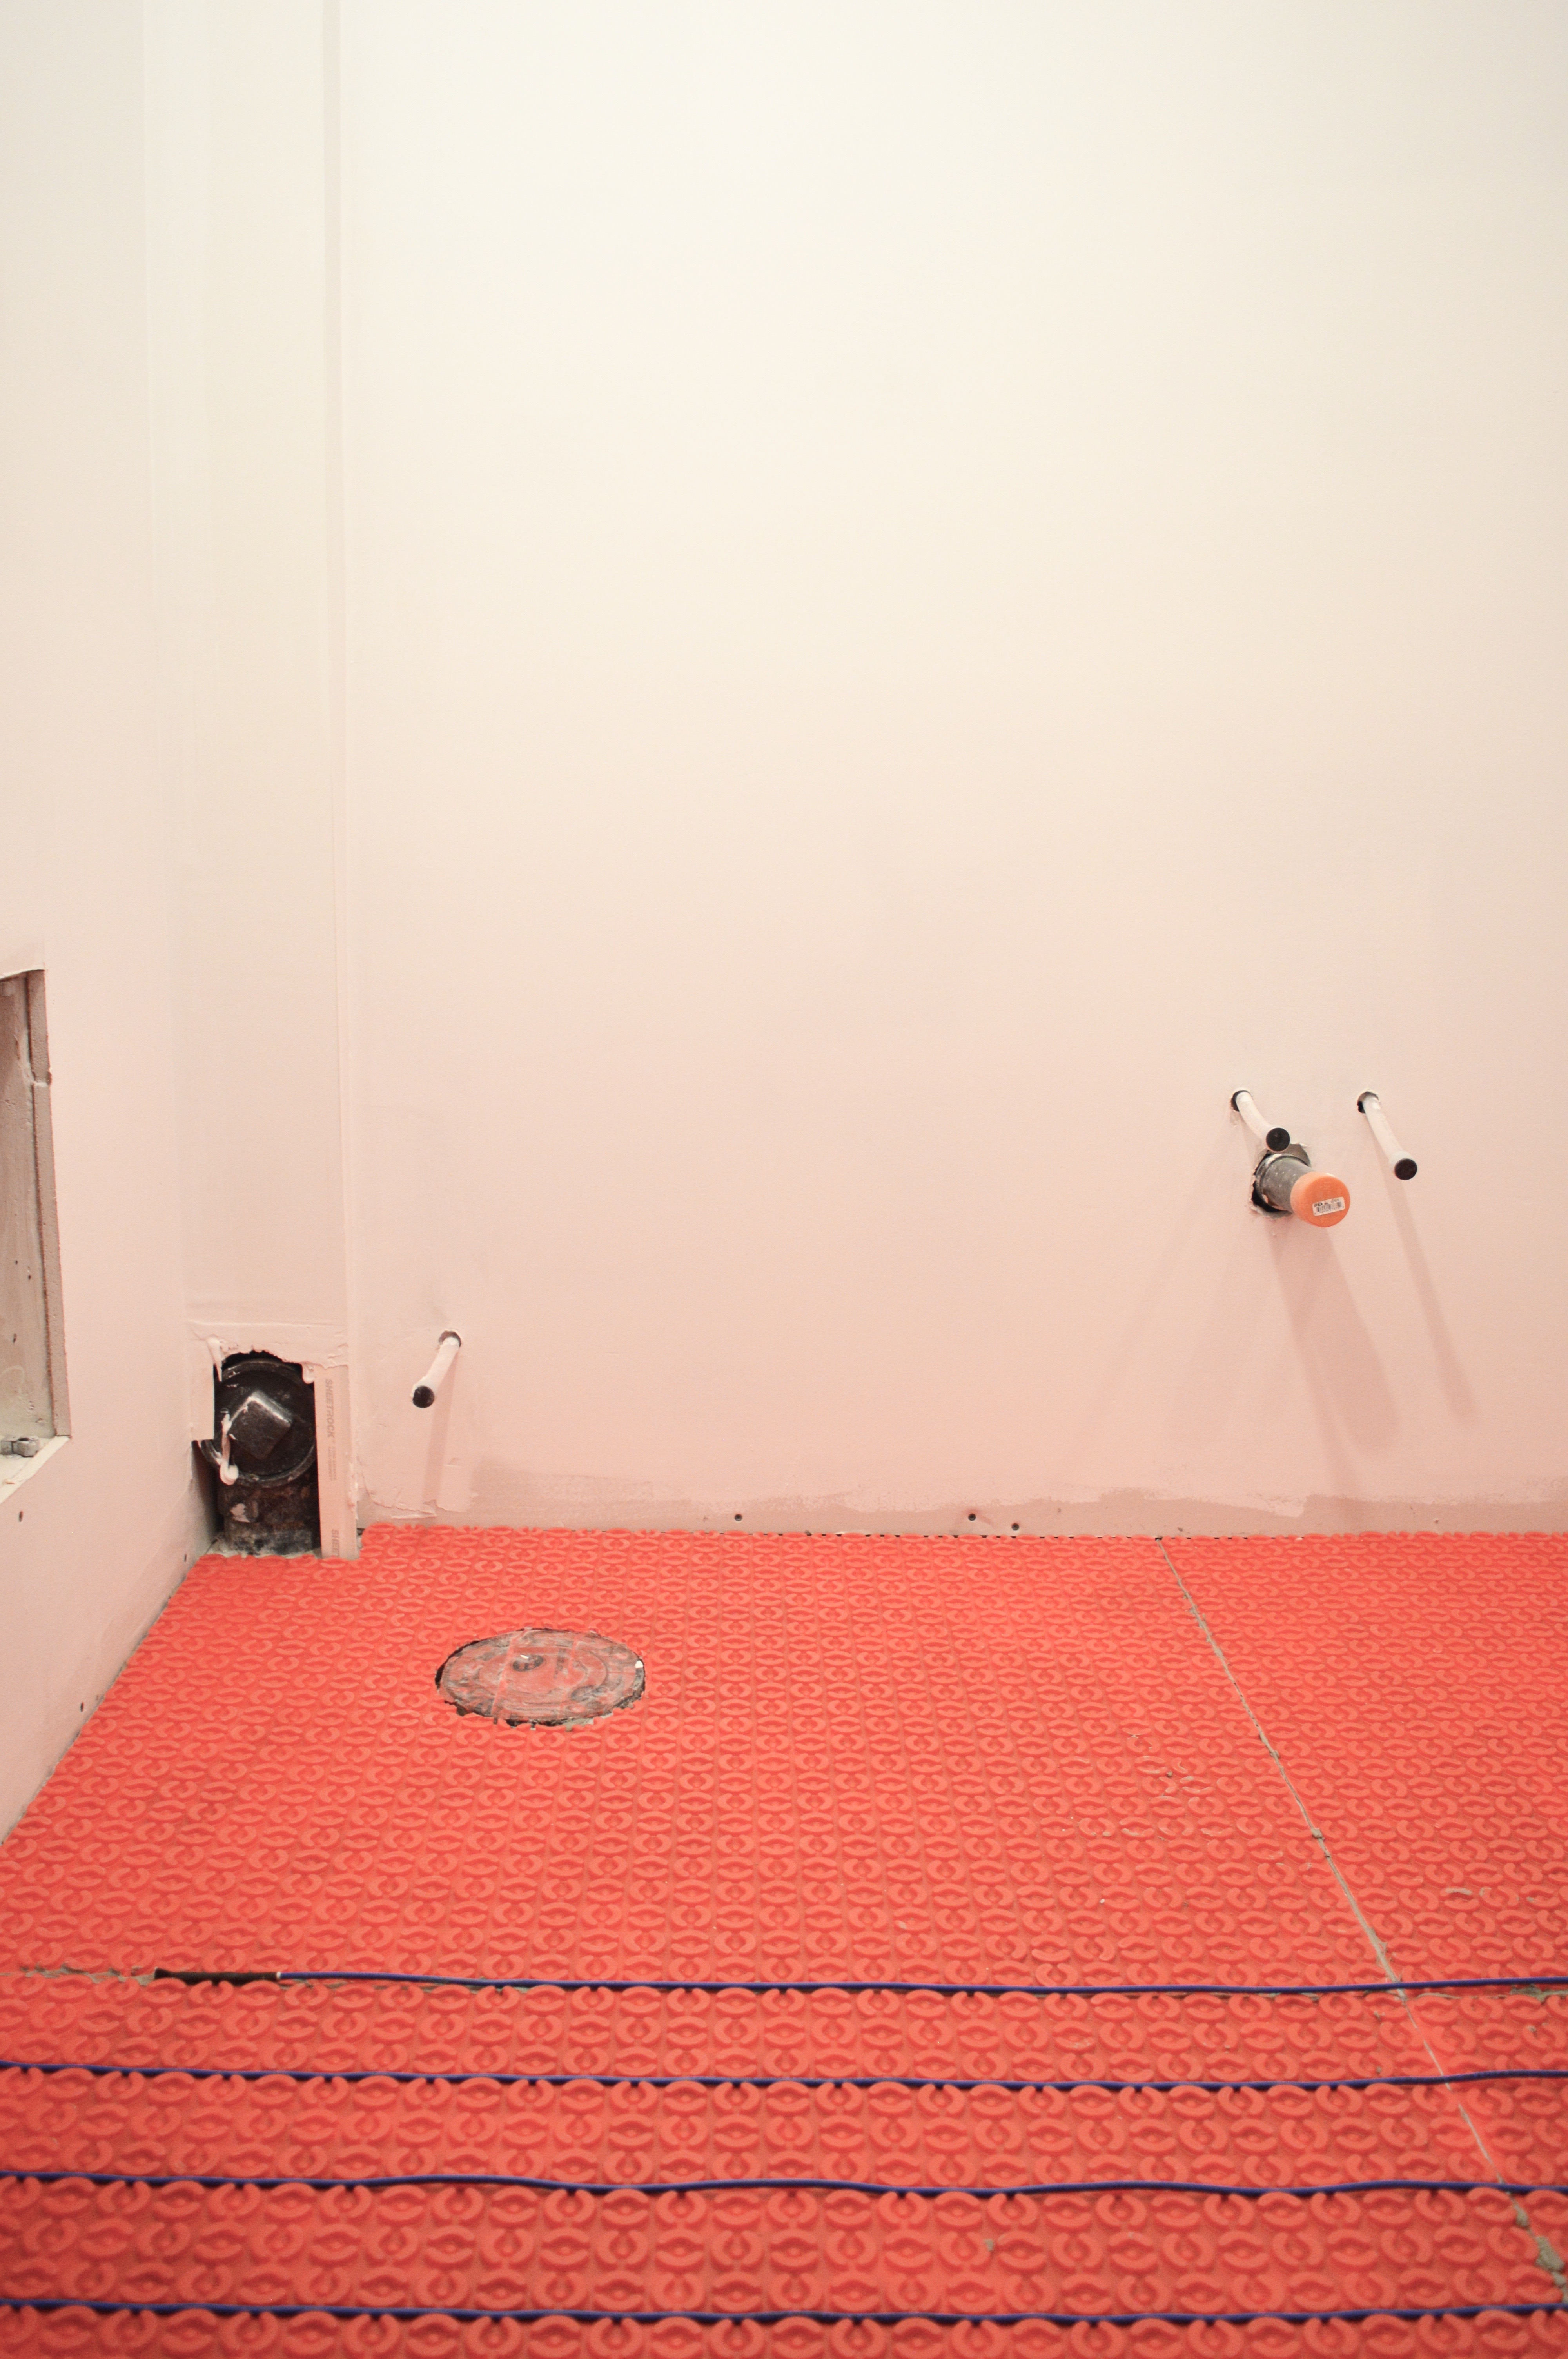
In terms of the floor heating system, I’m very lucky to be working with WarmUp on this project. The people I have been working with from WarmUp have been phenomenal. Really informative and great communicators. I was so pleased that they were as eager to work with me as I was with them!
To get the floor ready for the heating system, my tiler first installed the WarmUp insulation boards. These insulation boards not only prepped the flooring for the heating mats, but these boards will also ensure more energy efficiency.
WarmUp insulation boards installed
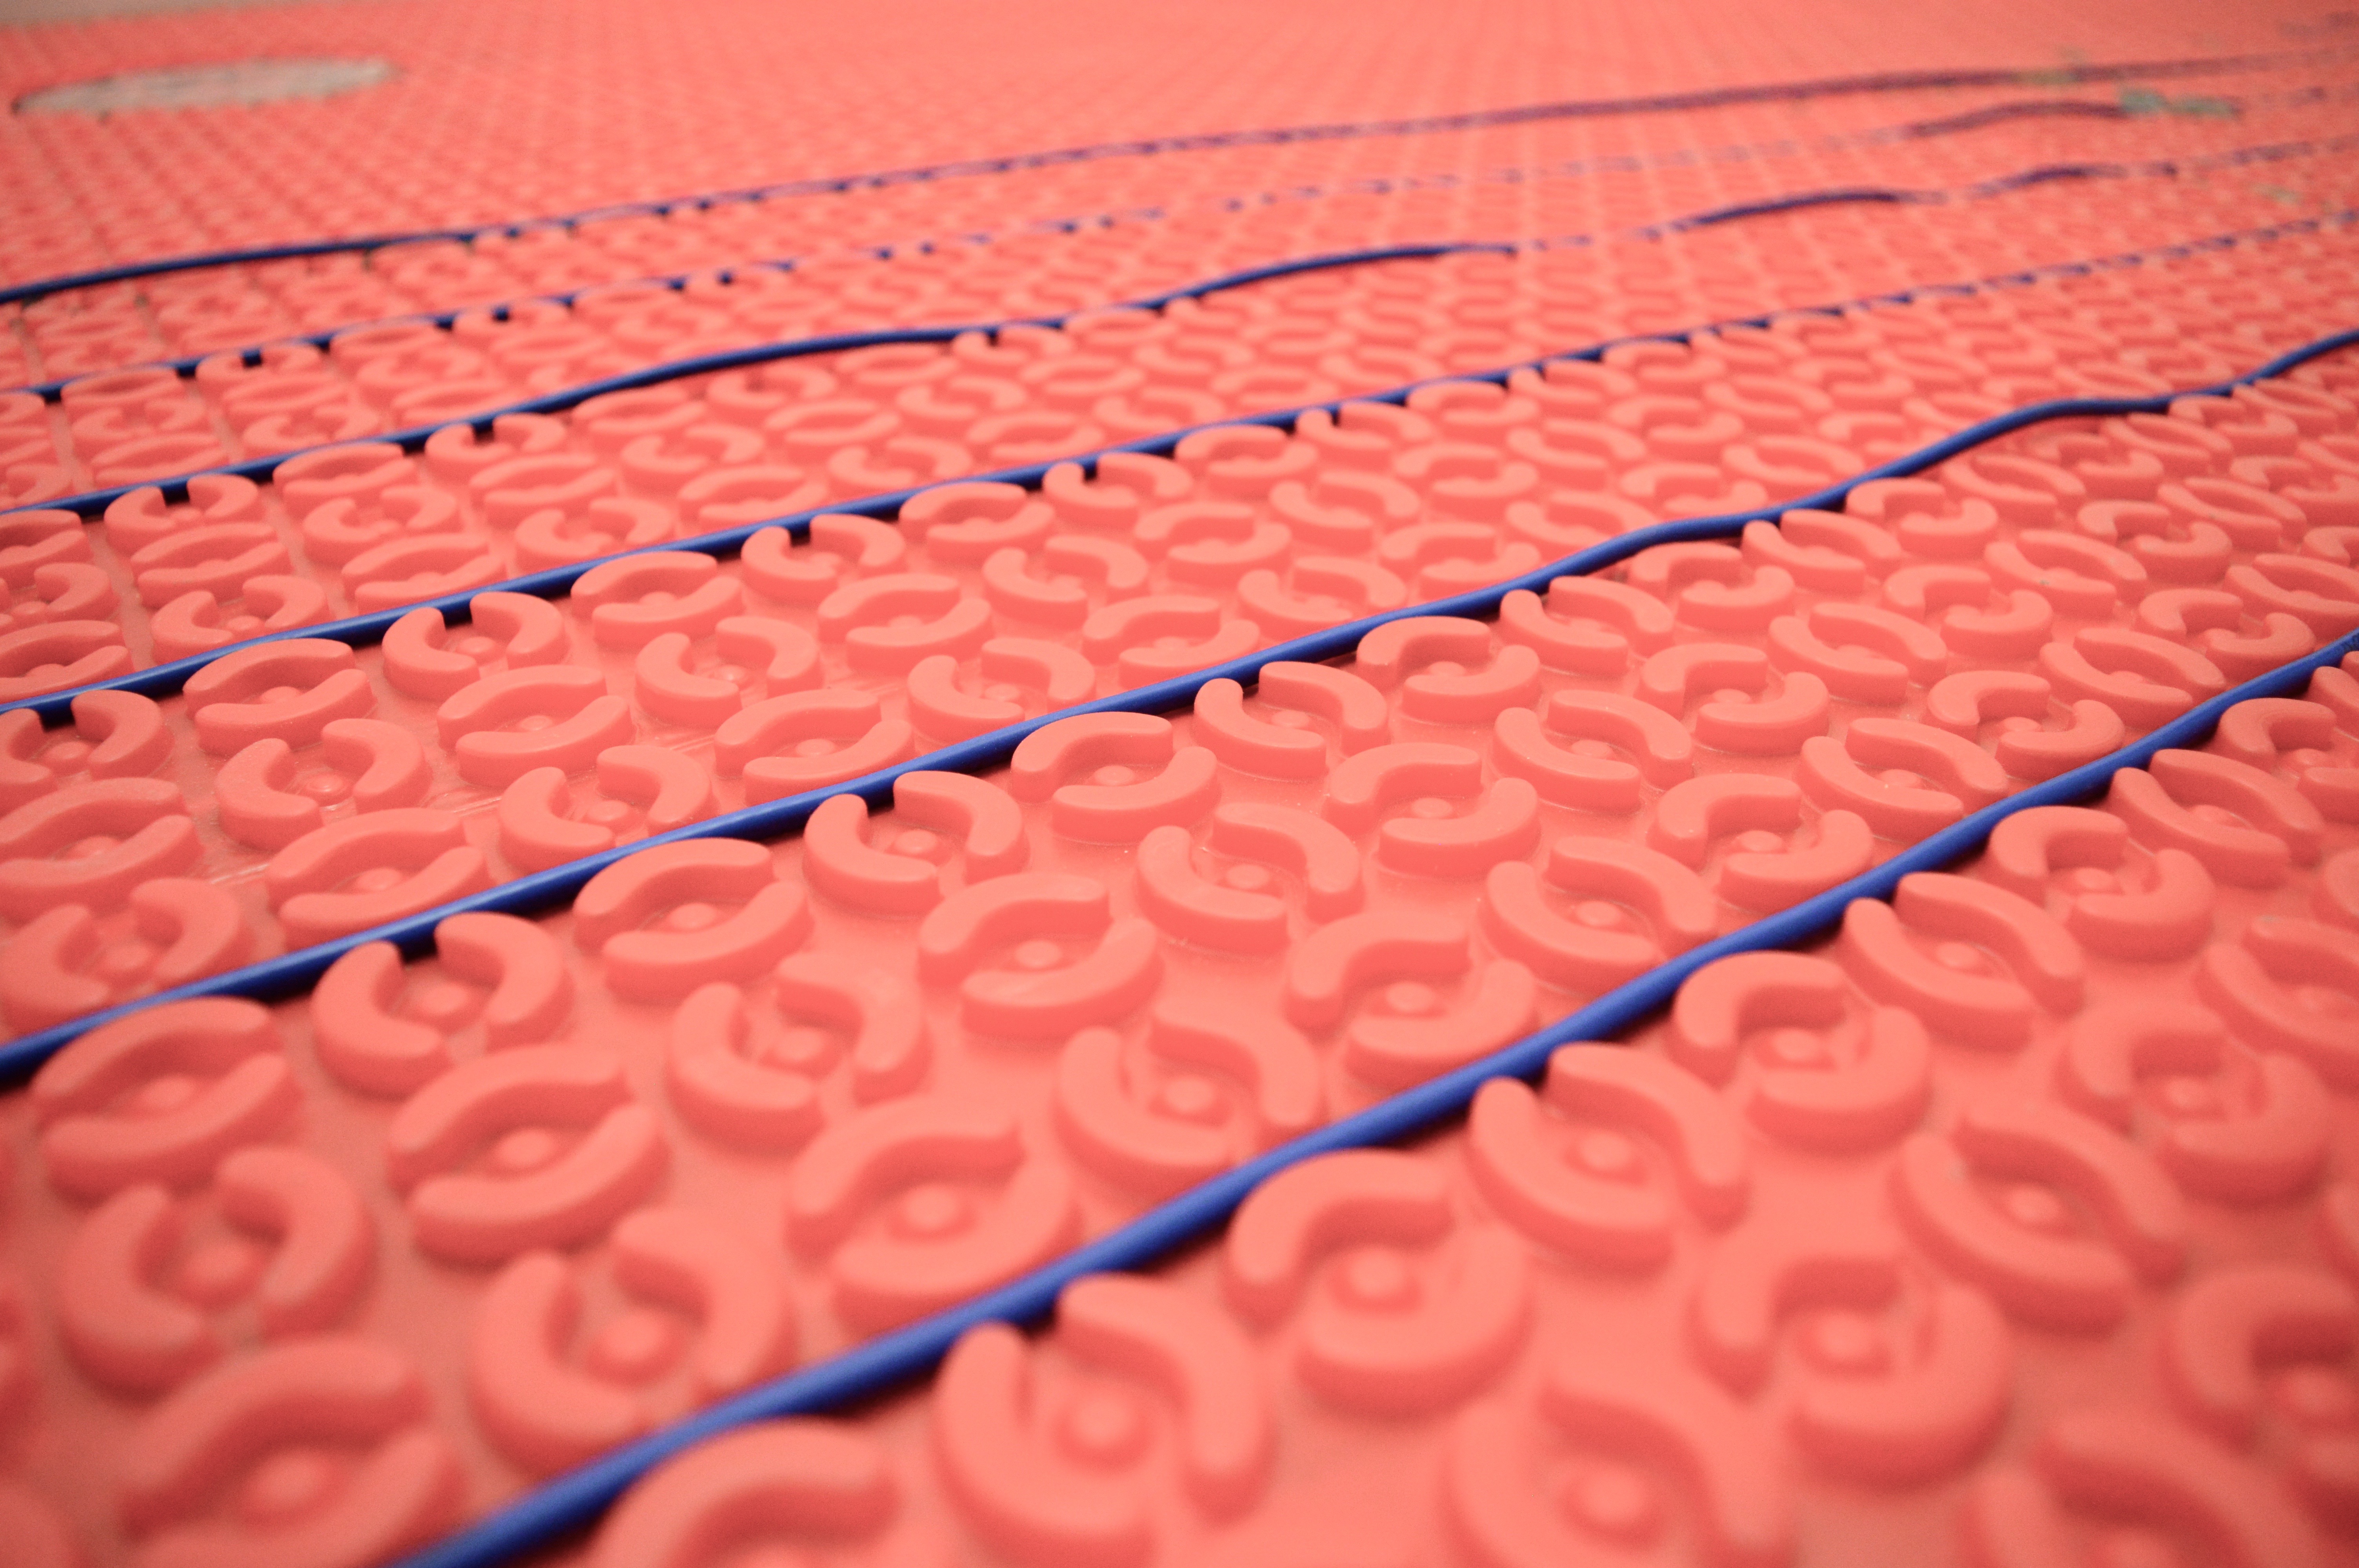
After the boards were secure, my tiler laid down the heating mats – the DCM-PRO membrane.
Dad was then able to install the cables on the mats. The cables were tested before, during, and after installation to ensure the product’s resistance had not been altered. Dad let me know that the installation of these cables was eaaasssy! Good to know, right? He liked the simplicity and straightforwardness of the DCM-PRO system, and he liked the contrasting colours, too, because this meant that everything was really easy to see.
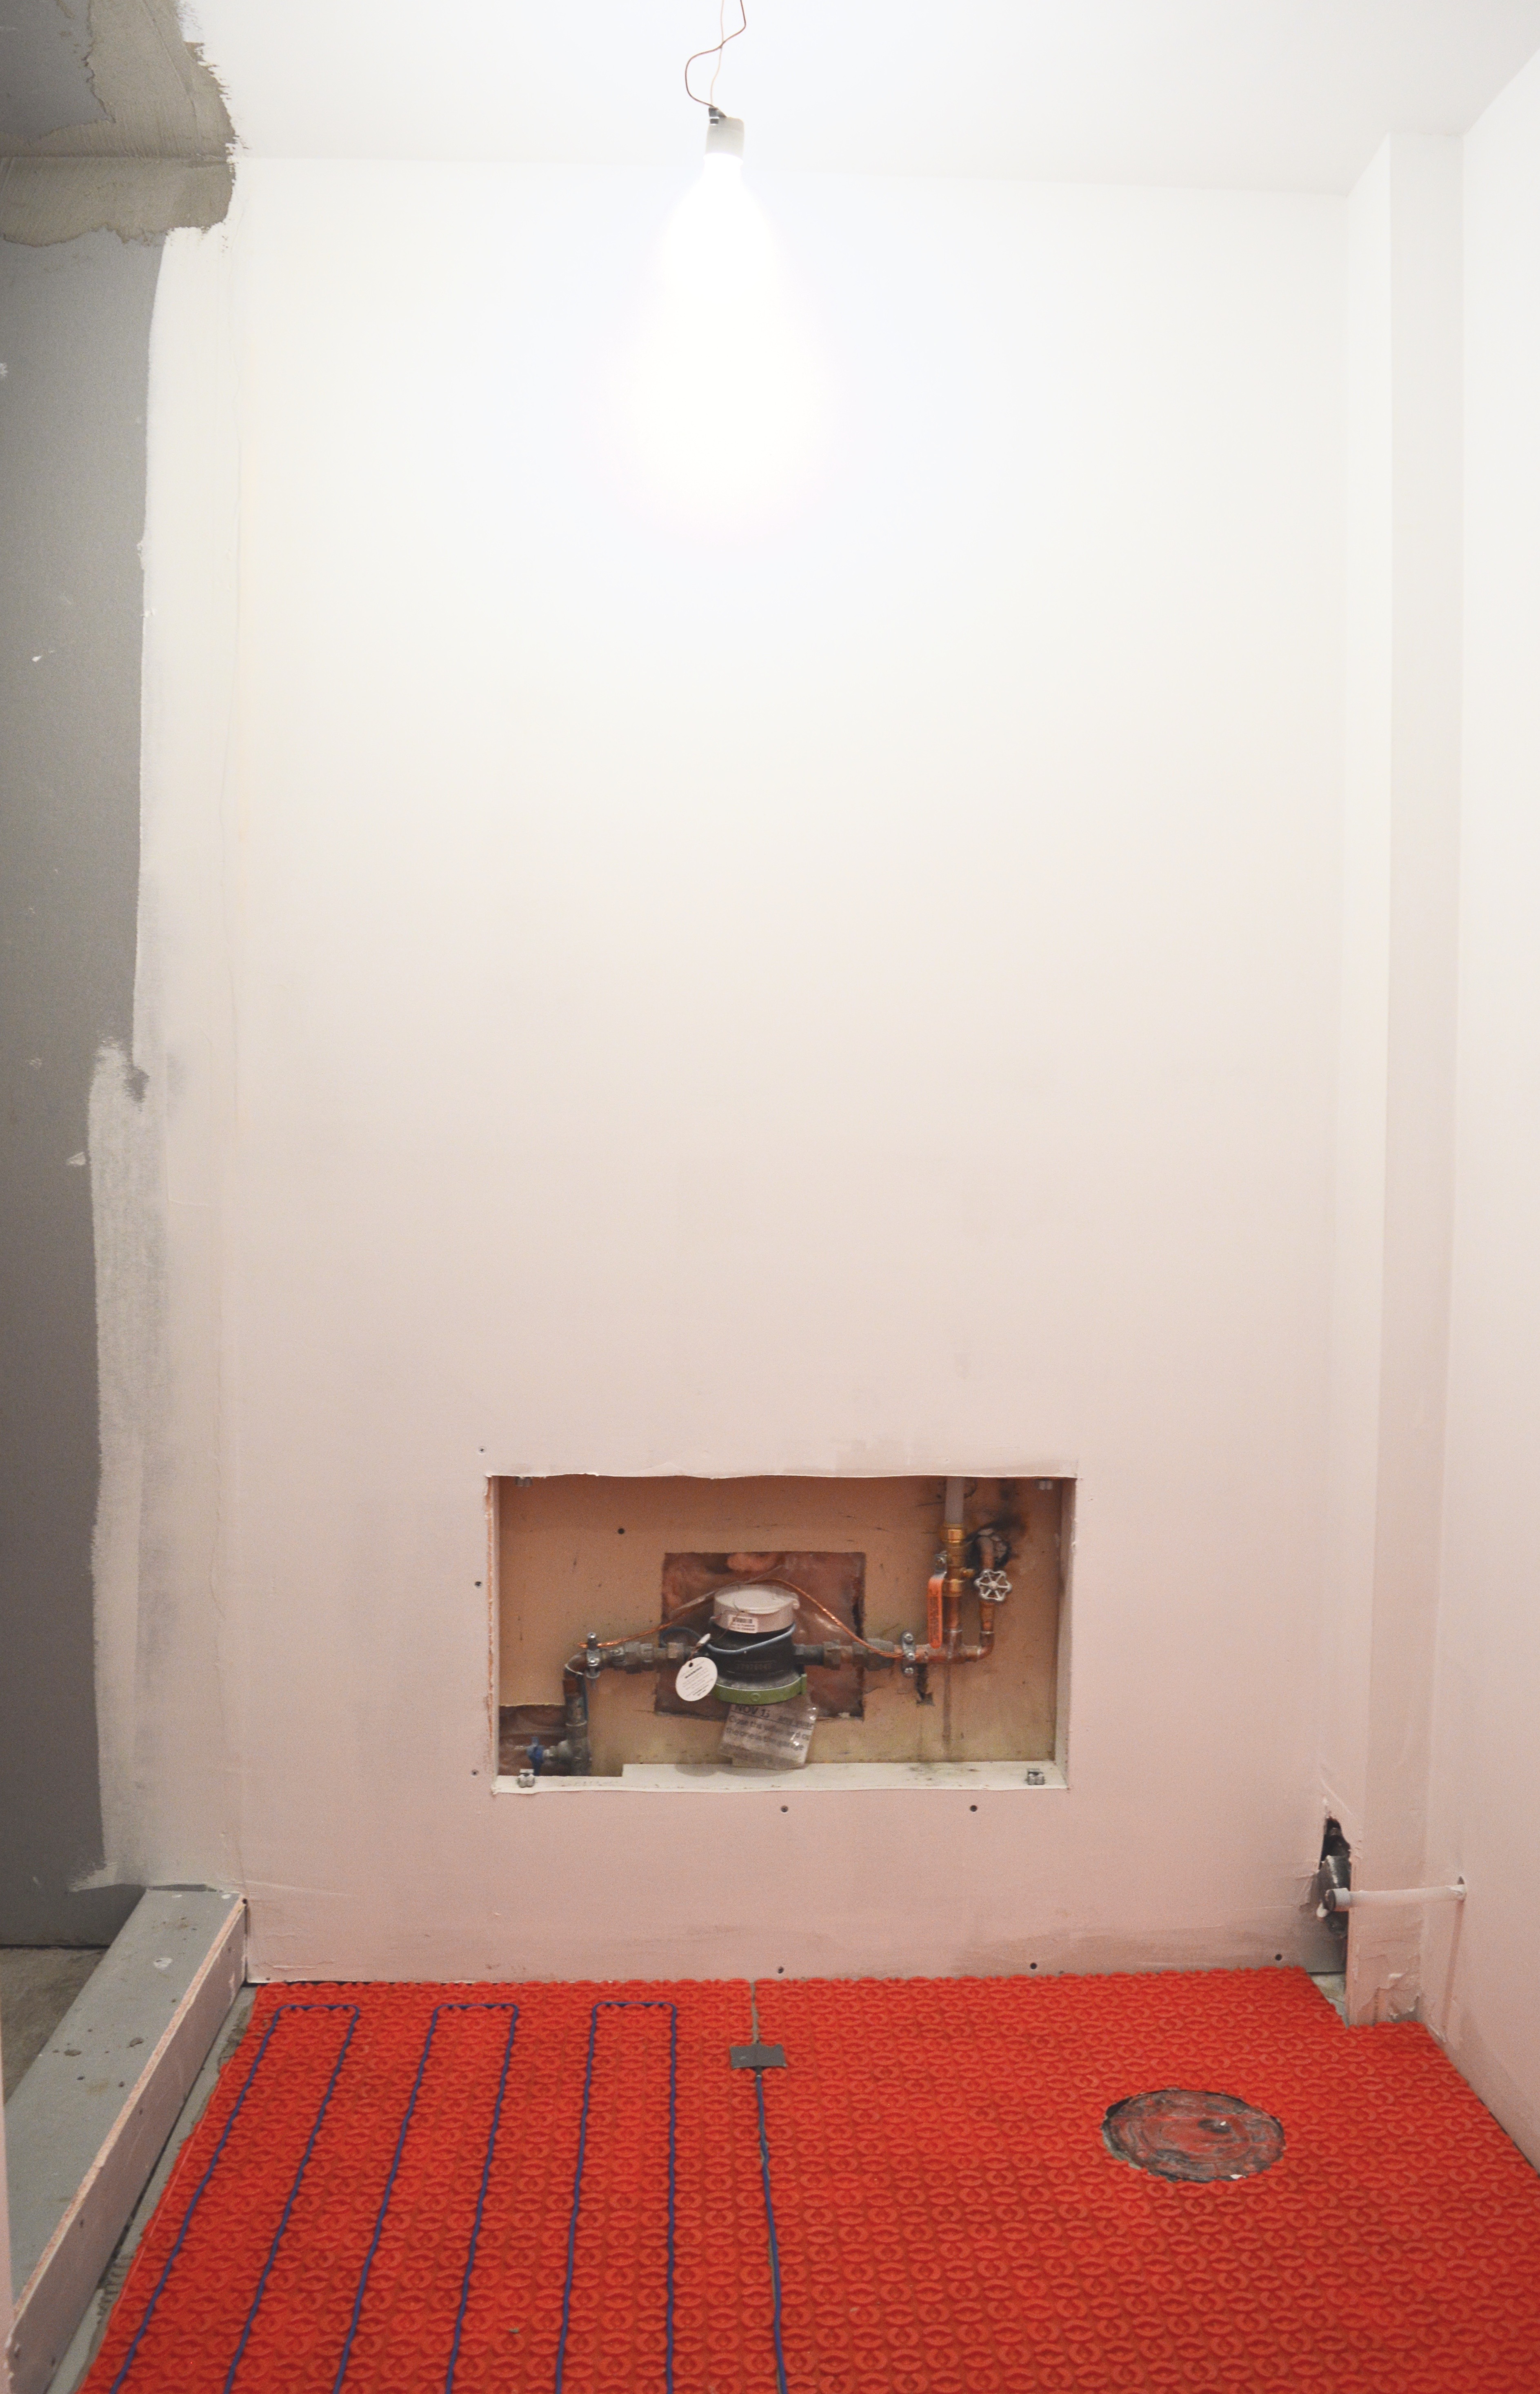
WarmUp floor heating mats and cord installed (no heating on the right side of the photo because that’s where the toilet and vanity will be installed)
Stepping out of the shower onto a heated floor is going to be divine!
After everything was installed and tested, the tiler put a skim coat over the WarmUp floor heating system, so that it would be ready for tiles.
I encourage you to check out what the One Room Challenge guest participants and featured designers have been up to during week 3.
If you’d like to see more of my ORC progress, see my week 1 and week 2 posts. Thanks to WarmUp for supplying my new floor heating system. All opinions are my own.
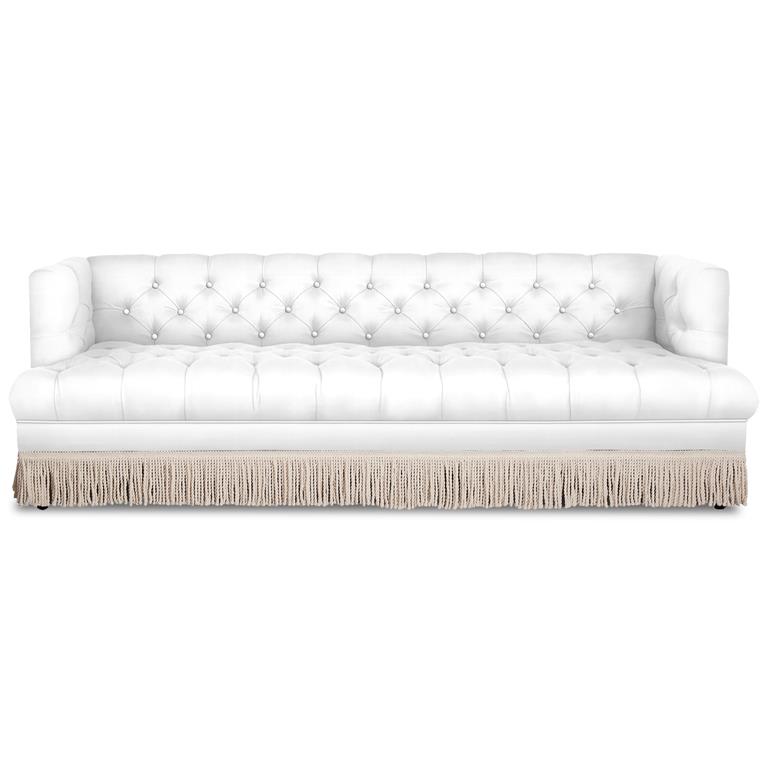
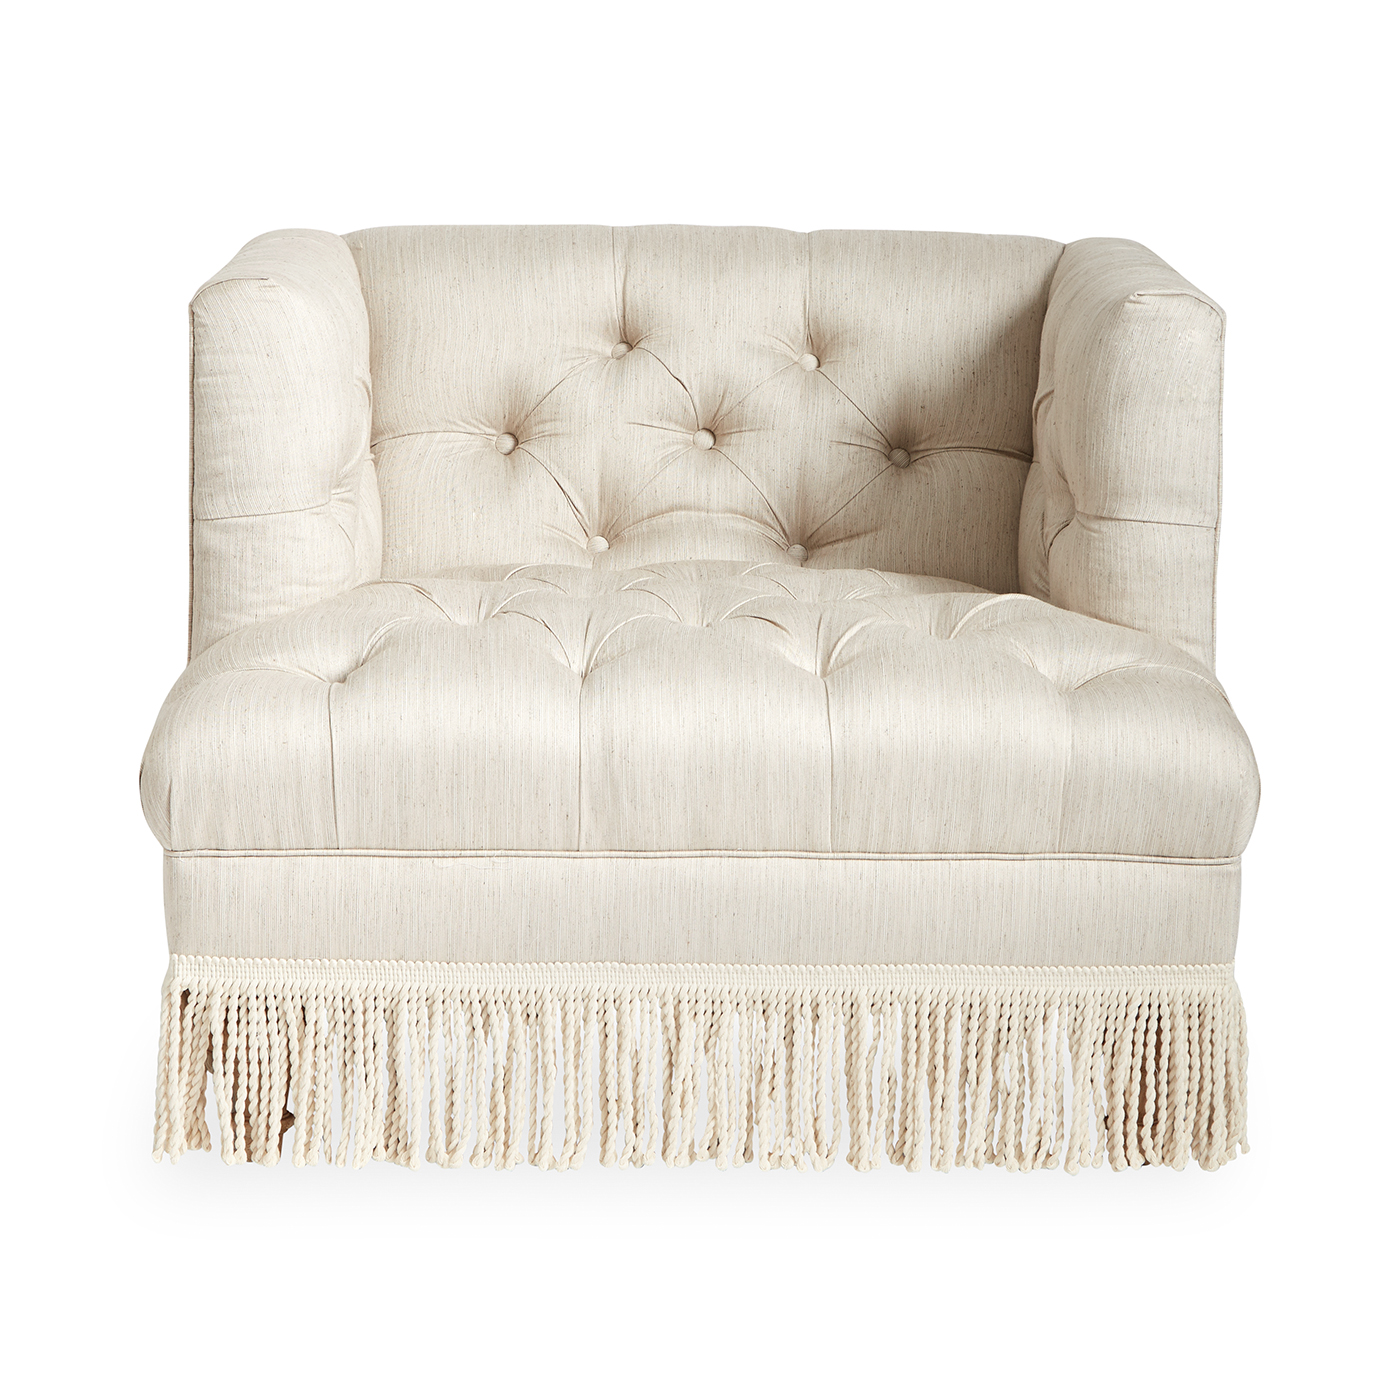
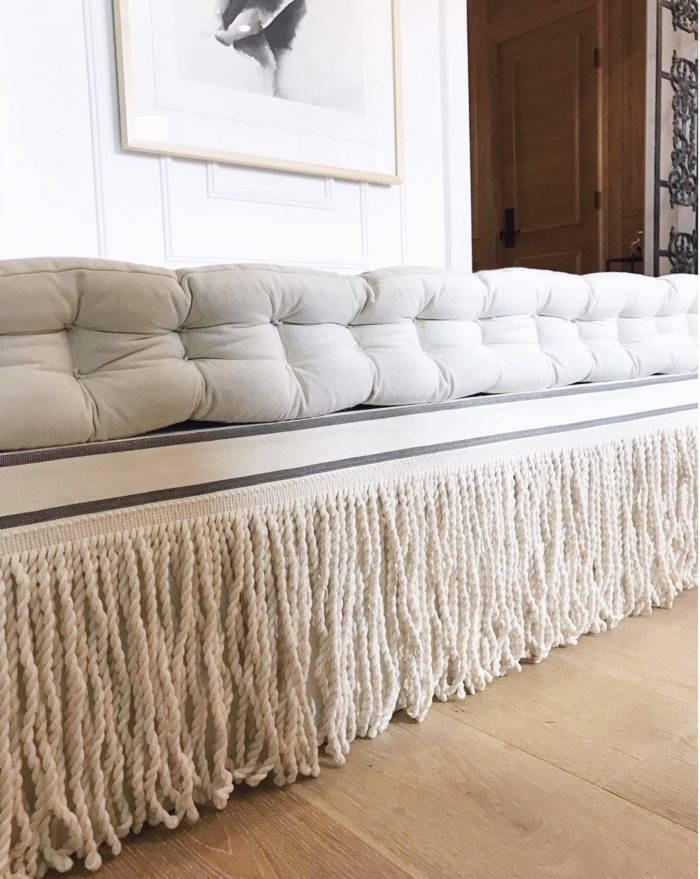
You know that massive fringe we sometimes see on furniture like…
Do you know what it’s called?
It’s called bullion fringe.
And I think we’re going to be seeing it more often in years to come. This type of ornamental trim is very traditional and has been around since the 17th century (according to Wikipedia). This particular trim, bullion, has a twisted texture, and it is generally 3 to 9 inches in length (also according to Wikipedia).
Look at how these bullion fringe pieces look beautiful in modern and traditional decor.


via Fresh Sofa
And here are a couple of pieces that I found in online stores ready for your modern-day homes.
Finally, if you’re more into DIY, check out Christine Dovey’s take on a bullion fringe daybed DIY.
Pretty neat, right? I love how classics work in so many ways!
Final note: Some of you may recall that I’ve recently decided to end my weekly Hotel to Home series. Trivia Thursday is a new series I’ve just debuted. It’s currently in test mode as I’d like to know if you are interested in the series, and if it’s one that I feel passionate about, too. If you have any questions, or would like to learn about something in the design world, let me know!
Among all the other things on my to do list this year, I’d like to try to find the perfect pizza dough recipe. My parents get the best fresh pizza dough from a local bakery near where they live, but I have only been able to find frozen pizza dough here in Waterloo. And it’s okay. Nothing amazing. Just fine.
Recently, I watched Anthony Bourdain’s Rome episode in his show The Layover, and I cannot get over the pizza that I saw in the show. The dough looked just perfect.
I tried this recipe from Ina Garten (side note – Ina and Jeffrey – #couplegoals), but I wasn’t impressed. It wasn’t malleable and, frankly, it was bland.
I put a call out on Instagram, and Deborah from Green Light District sent me over a recipe from Gourmet from 15 years ago. I gave it a go, and it was quite good. Although it was a time consuming process – the rise, punch, rise, punch routine – the dough was soft and easy to work with. It had a nice amount of saltiness, too.
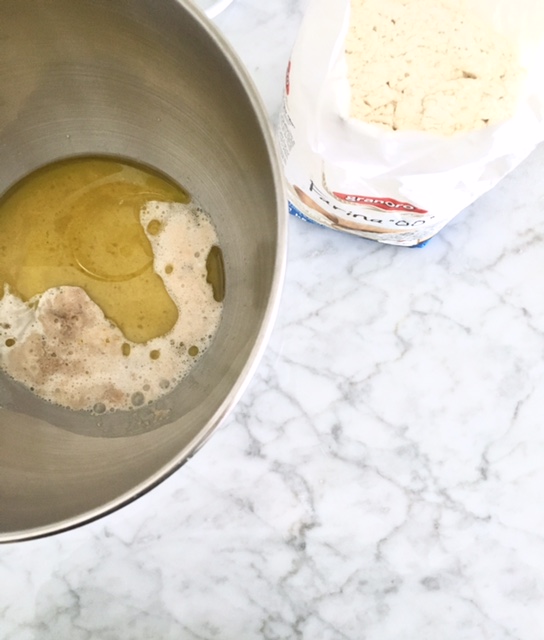
Steps 1 & 2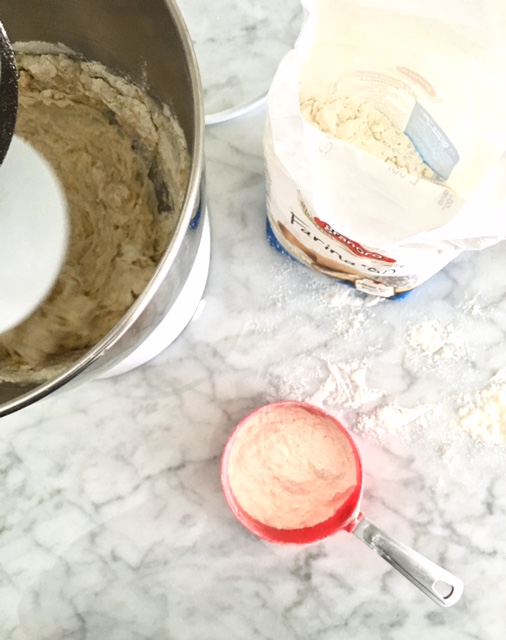
Steps 2 & 3 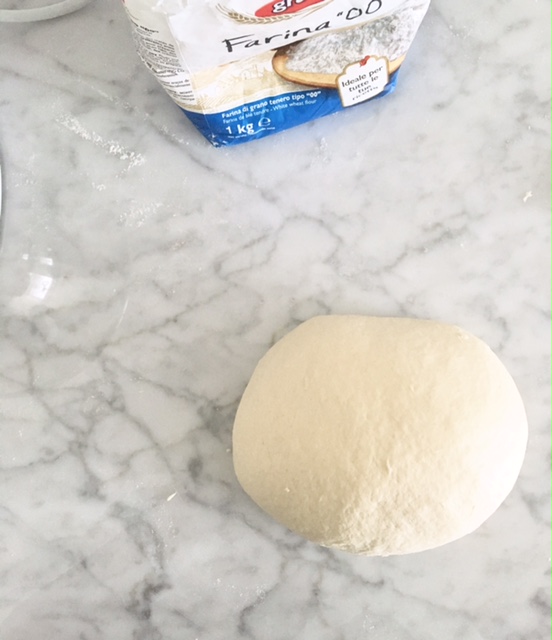
Step 3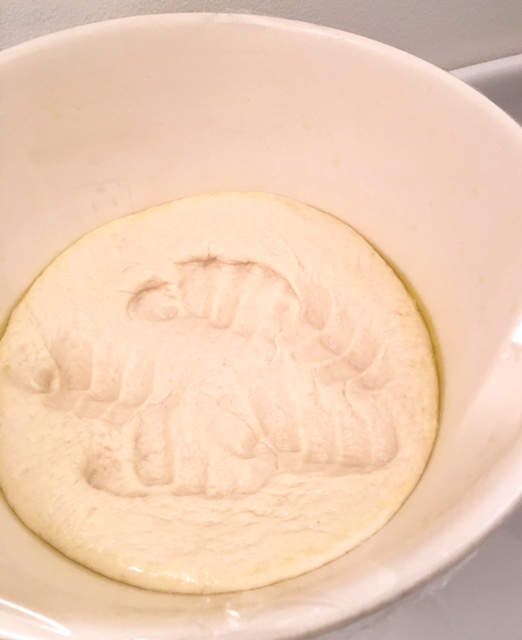
Steps 4 & 5
Final product!
Here’s the recipe if you want to give it a try – with a few of my add-on notes at the end:
Ingredients:
2-1/2 teaspoons active dry yeast
1 tablespoon sugar
1-1/4 cups warm water
1 tablespoon salt
1/4 cup olive oil
3 cups unbleached all-purpose flour (over the years I substituted 1/4 cup or so with whole wheat or other interesting floors like buckwheat)
Cornmeal for dusting the pizza tile
Procedure:
Additional Notes:
What’s your approach to wrapping Christmas presents? Do you plan a theme? Do you use wrapping paper or bags? Is everything colour-coordinated?
As for me, I keep things simple (are you that surprised?). I use one wrapping paper design and just a few bags. I keep ribbons and tags simple, too. My wrapping is basic, and Pinterest certainly makes me look like the worst wrapper ever.
Just look at these five beautifully wrapped gifts. Wouldn’t you love to receive one of these? I think I may consider improving my approach to wrapping next year.


The Cross Design via Erica Cook
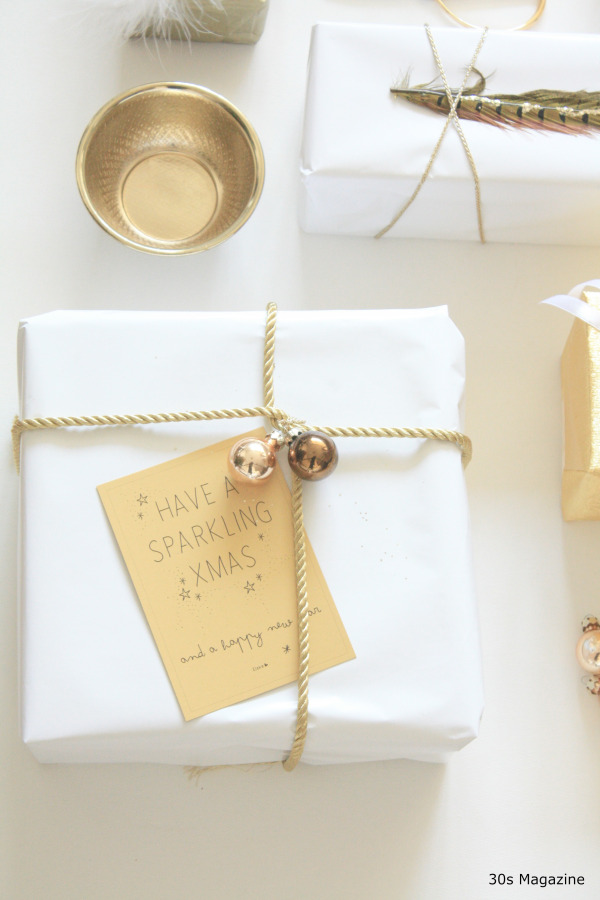
via 30s magazine

via Homey Oh My

via Style At Home
After a very eventful weekend (attending fun Halloween event for the Red Shoe Society, antiquing at Aberfoyle and Southworks with Rox-Anne, getting pampered at the Langdon Hall spa, and feasting on an incredible 10+ course meal with Chef Jason Bangerter of Langdon Hall and Chef Jackie Lin of Shoushin), I have a bit of catching up to do work-wise, blog-wise, and life-wise. Don’t be surprised if posts are light this week.
For now, here’s a cute (not spoooooooky) easy Halloween DIY:

Happy Halloween!
My family has never been an all-out-for-Halloween-decorations type of family. Growing up, we always had a couple of pumpkins to carve (usually one for me and one for my sister). A couple of times, we created scarecrows for the front yard. That’s about it. Halloween decor doesn’t quite do it for me, and while there are incredible ways to cover up the orange, I’m still not motivated to do much more than carve a pumpkin in terms of decor (for Halloween or fall, actually).
That said, two photos on Instagram recently caught my attention. They veer toward the Halloween Chic category (I’ve stolen the term from my sister…not sure if others use it).
The first floral pumpkin from Sarah Gunn is simple but dramatic. I just could not stop staring at it when I first saw it on her Instagram feed.
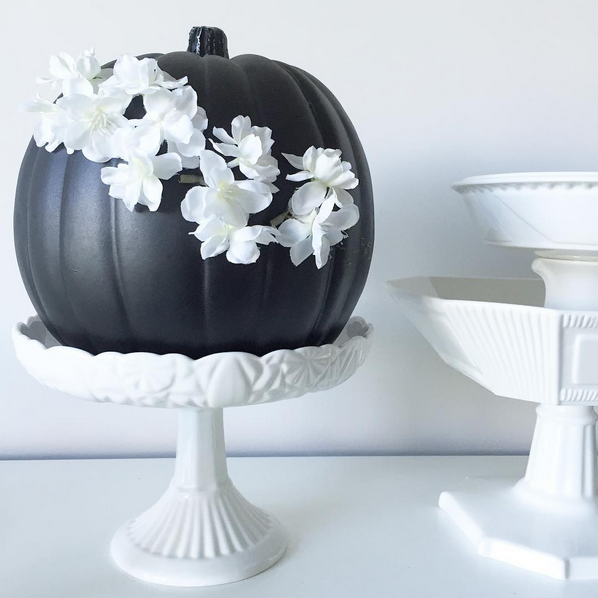
via Sarah Gunn Style
The second googly-eyed pumpkin (see it there in the corner) by Jordan Ferney of Oh Happy Day is part of a googly-eyed theme I can handle. Honestly, I actually laughed out loud when I saw it. So funny! (I saw large, sticky googly eyes at Dollarama last week in case you’re looking for them.)

via Oh Happy Day
If I ever throw a Halloween party, one of these two options may very likely be the decor.
How many times in a day do you say “OK”? Would it be better to save the speech and wear a tee or pin instead to express your opinion?

Okey Dokey DIY tee, via Almost Makes Perfect

OK pin, Maria Ines Gul
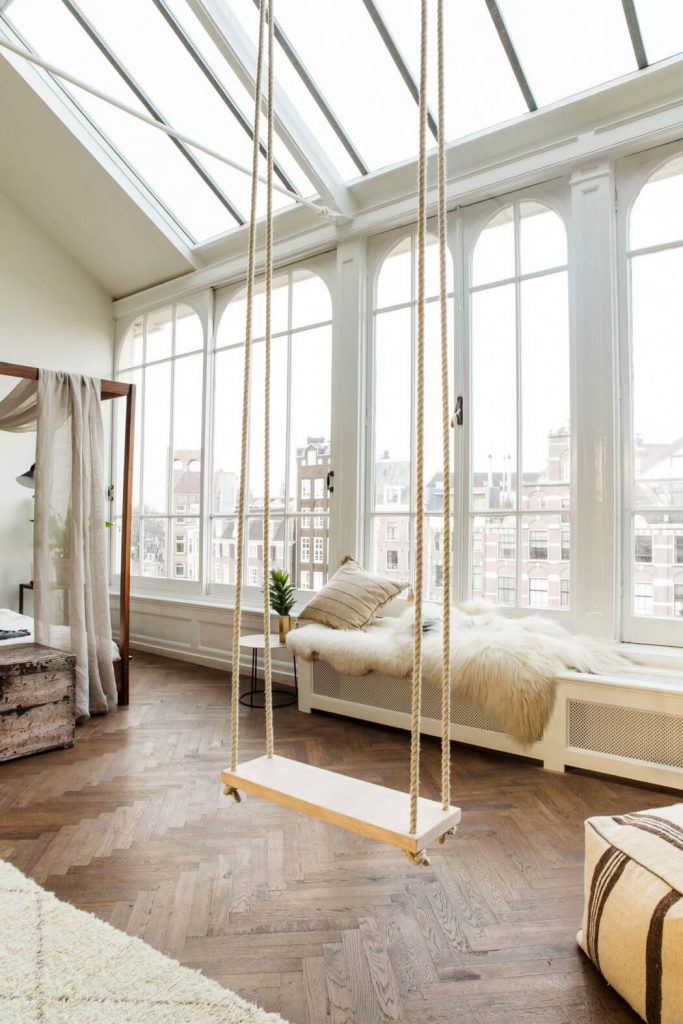
Lots of people talk about bringing the outdoors in. A lot of the time, they’re talking about plants and colour schemes. But today I’m talking about something else that is traditionally an outdoor item – the swing! Yes, the swing. Have a look at these five spaces and tell me if they don’t make you want to have one of your very own!
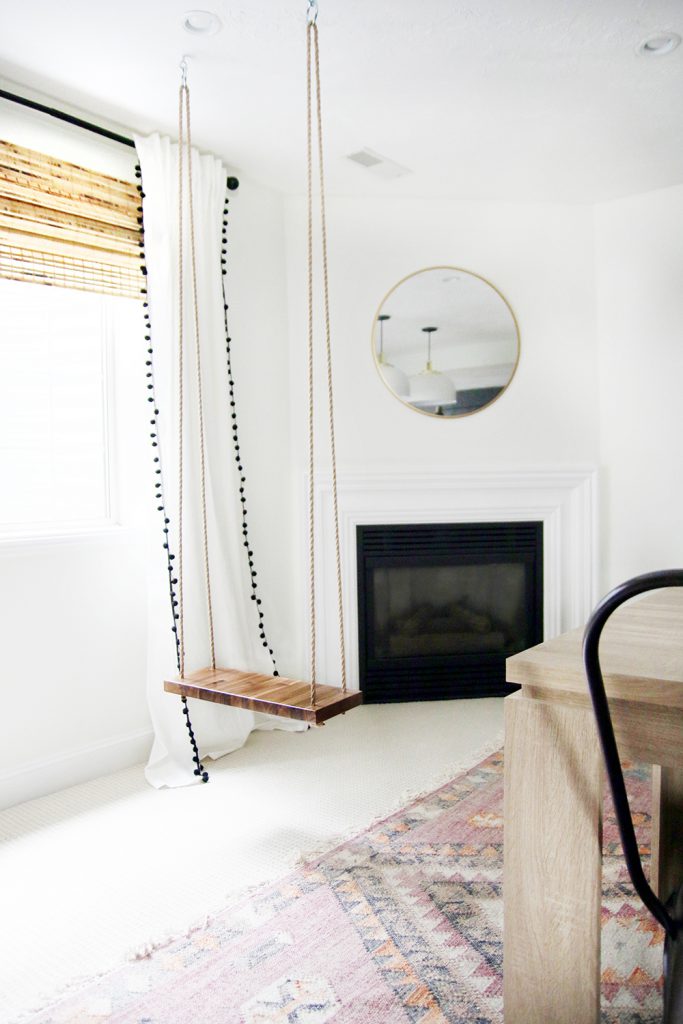
DIY swing by Chris Loves Julia
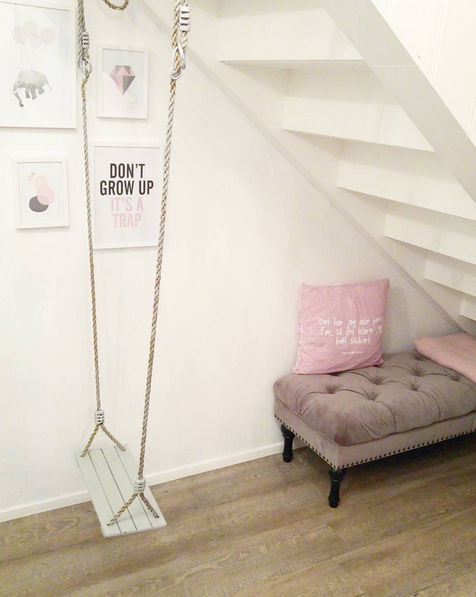
via SBH Interior
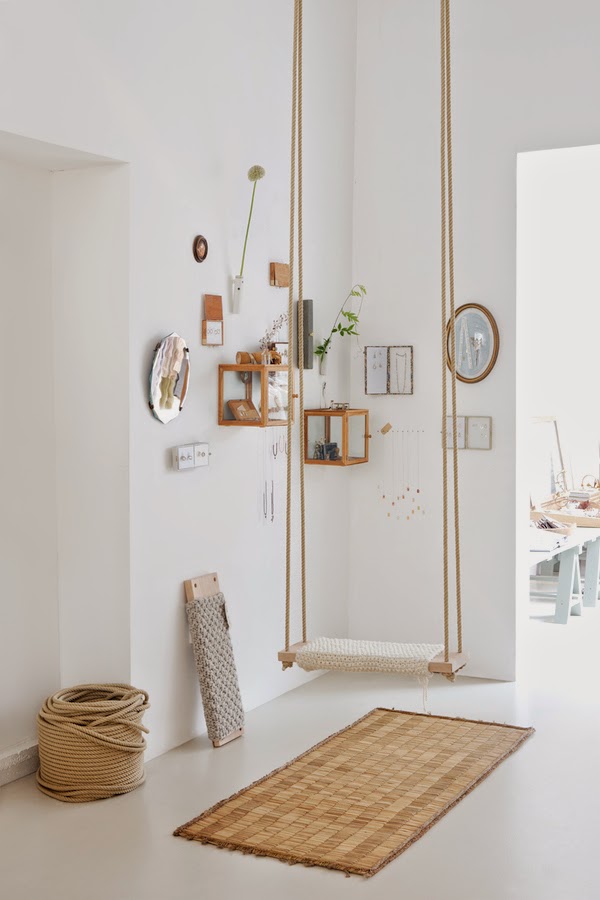
Sukha Amsterdam via Vosges Paris
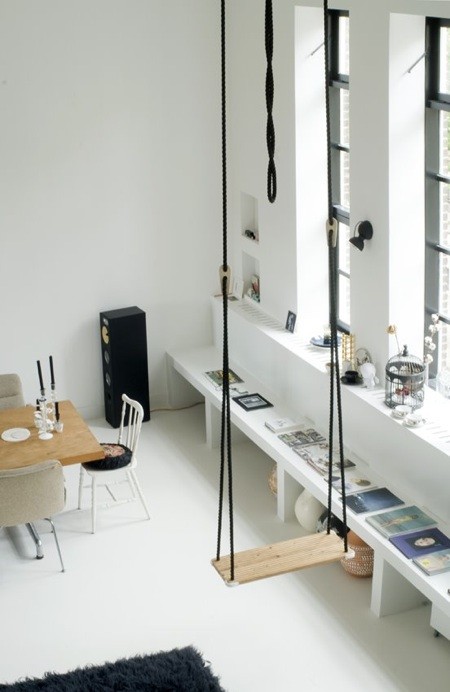
via Remodelista
Have a wonderful weekend, everyone!
Months and months ago, I received some gorgeous polka dotted fabric from Minted (remember when I was deciding between these two colour options?), and a month or so ago, my chaise was finally reupholstered. It’s about time I share the dramatic before and after photos on the blog!
Here’s the dreary before photo:

before
Drum-roll, please…


after
Cute, right? The grey and white polka dot fabric (organic dot by Itsy Belle) really lightens up this part of my living room. It’s amazing how dark furnishings just sucks the light. (Note: The background of the fabric is a true white rather than the greyish colour that seems to show up on the Minted site on my computer. I much prefer the fabric in real life than in the online swatch version.)
Thanks to Minted for supplying the fabric for this makeover. All opinions are my own.
Today’s splattered pairing is right up my black and white graphic loving alley!

splatter desktop wallpaper, Design Love Fest
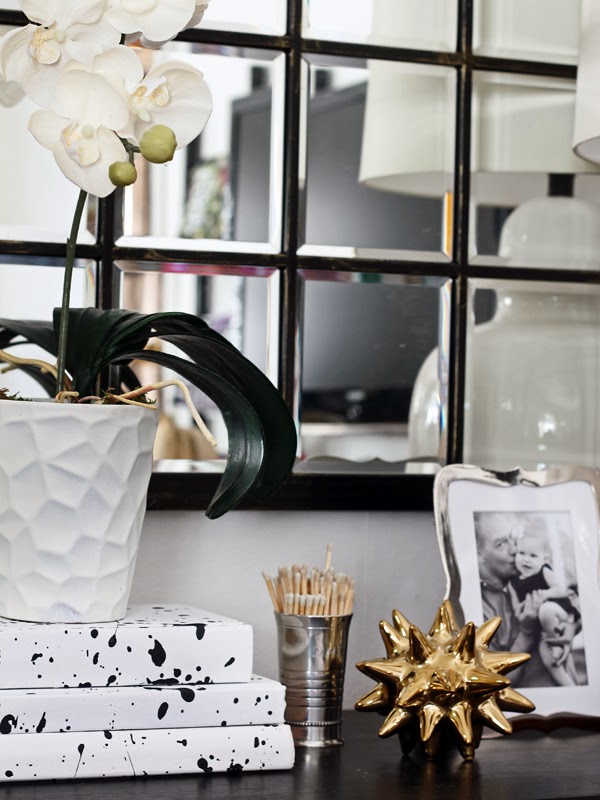
splatter DIY book covers, Hunted Interior
When Minted launched its fabric collection a couple of years ago, I was intrigued. I ended up ordering some sailboat fabric for my parents’ Florida condo, and I was impressed by the quality…and the print, too, of course!
When I added “recover chaise” to my 2016 to do list, I looked into Minted’s fabric collection to see what could work for my chaise and living space. Minted’s search options are great so I easily narrowed down my search (dots, white, black, grey); doing this made my online shopping experience less overwhelming.
When I narrowed things down, I let my Instagram friends weigh in on my two options.
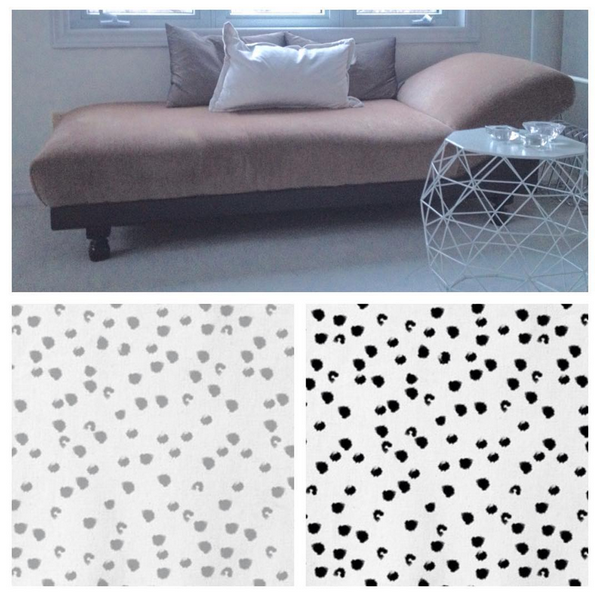
grey or black – what’s your vote? (fabric info: organic dot by Itsy Belle Studio, $32USD/yard)
What did I end up ordering? The grey!
The fabric arrived a couple of weeks after I placed my order, and it’s beautiful. It looks even better in real life than it does in the photo above! The background is crisper white rather than a shade of grey/cream. The fabric is thick enough to use for my chaise upholstery, and the print is going to modernize my chaise. The grey is going to work well with my existing (rotating) pillow collection, and it’s going to keep my living space bright and airy. Photos will come eventually, not to worry!
Here’s a peek into Minted’s fabric collection. Just about every fabric you see here is available in a variety of colours.


hand drawn scallop by Hooray Creative

stacked stripes by Lehan Veenker

scattered arrow by Aimee Guzman


the pelican beach by Jeanna Casper

moderne dalmation by Erika Firm
Thanks to Minted for sponsoring this post. I’m grateful for Minted‘s long-time support of my work and this blog! All opinions are my own.
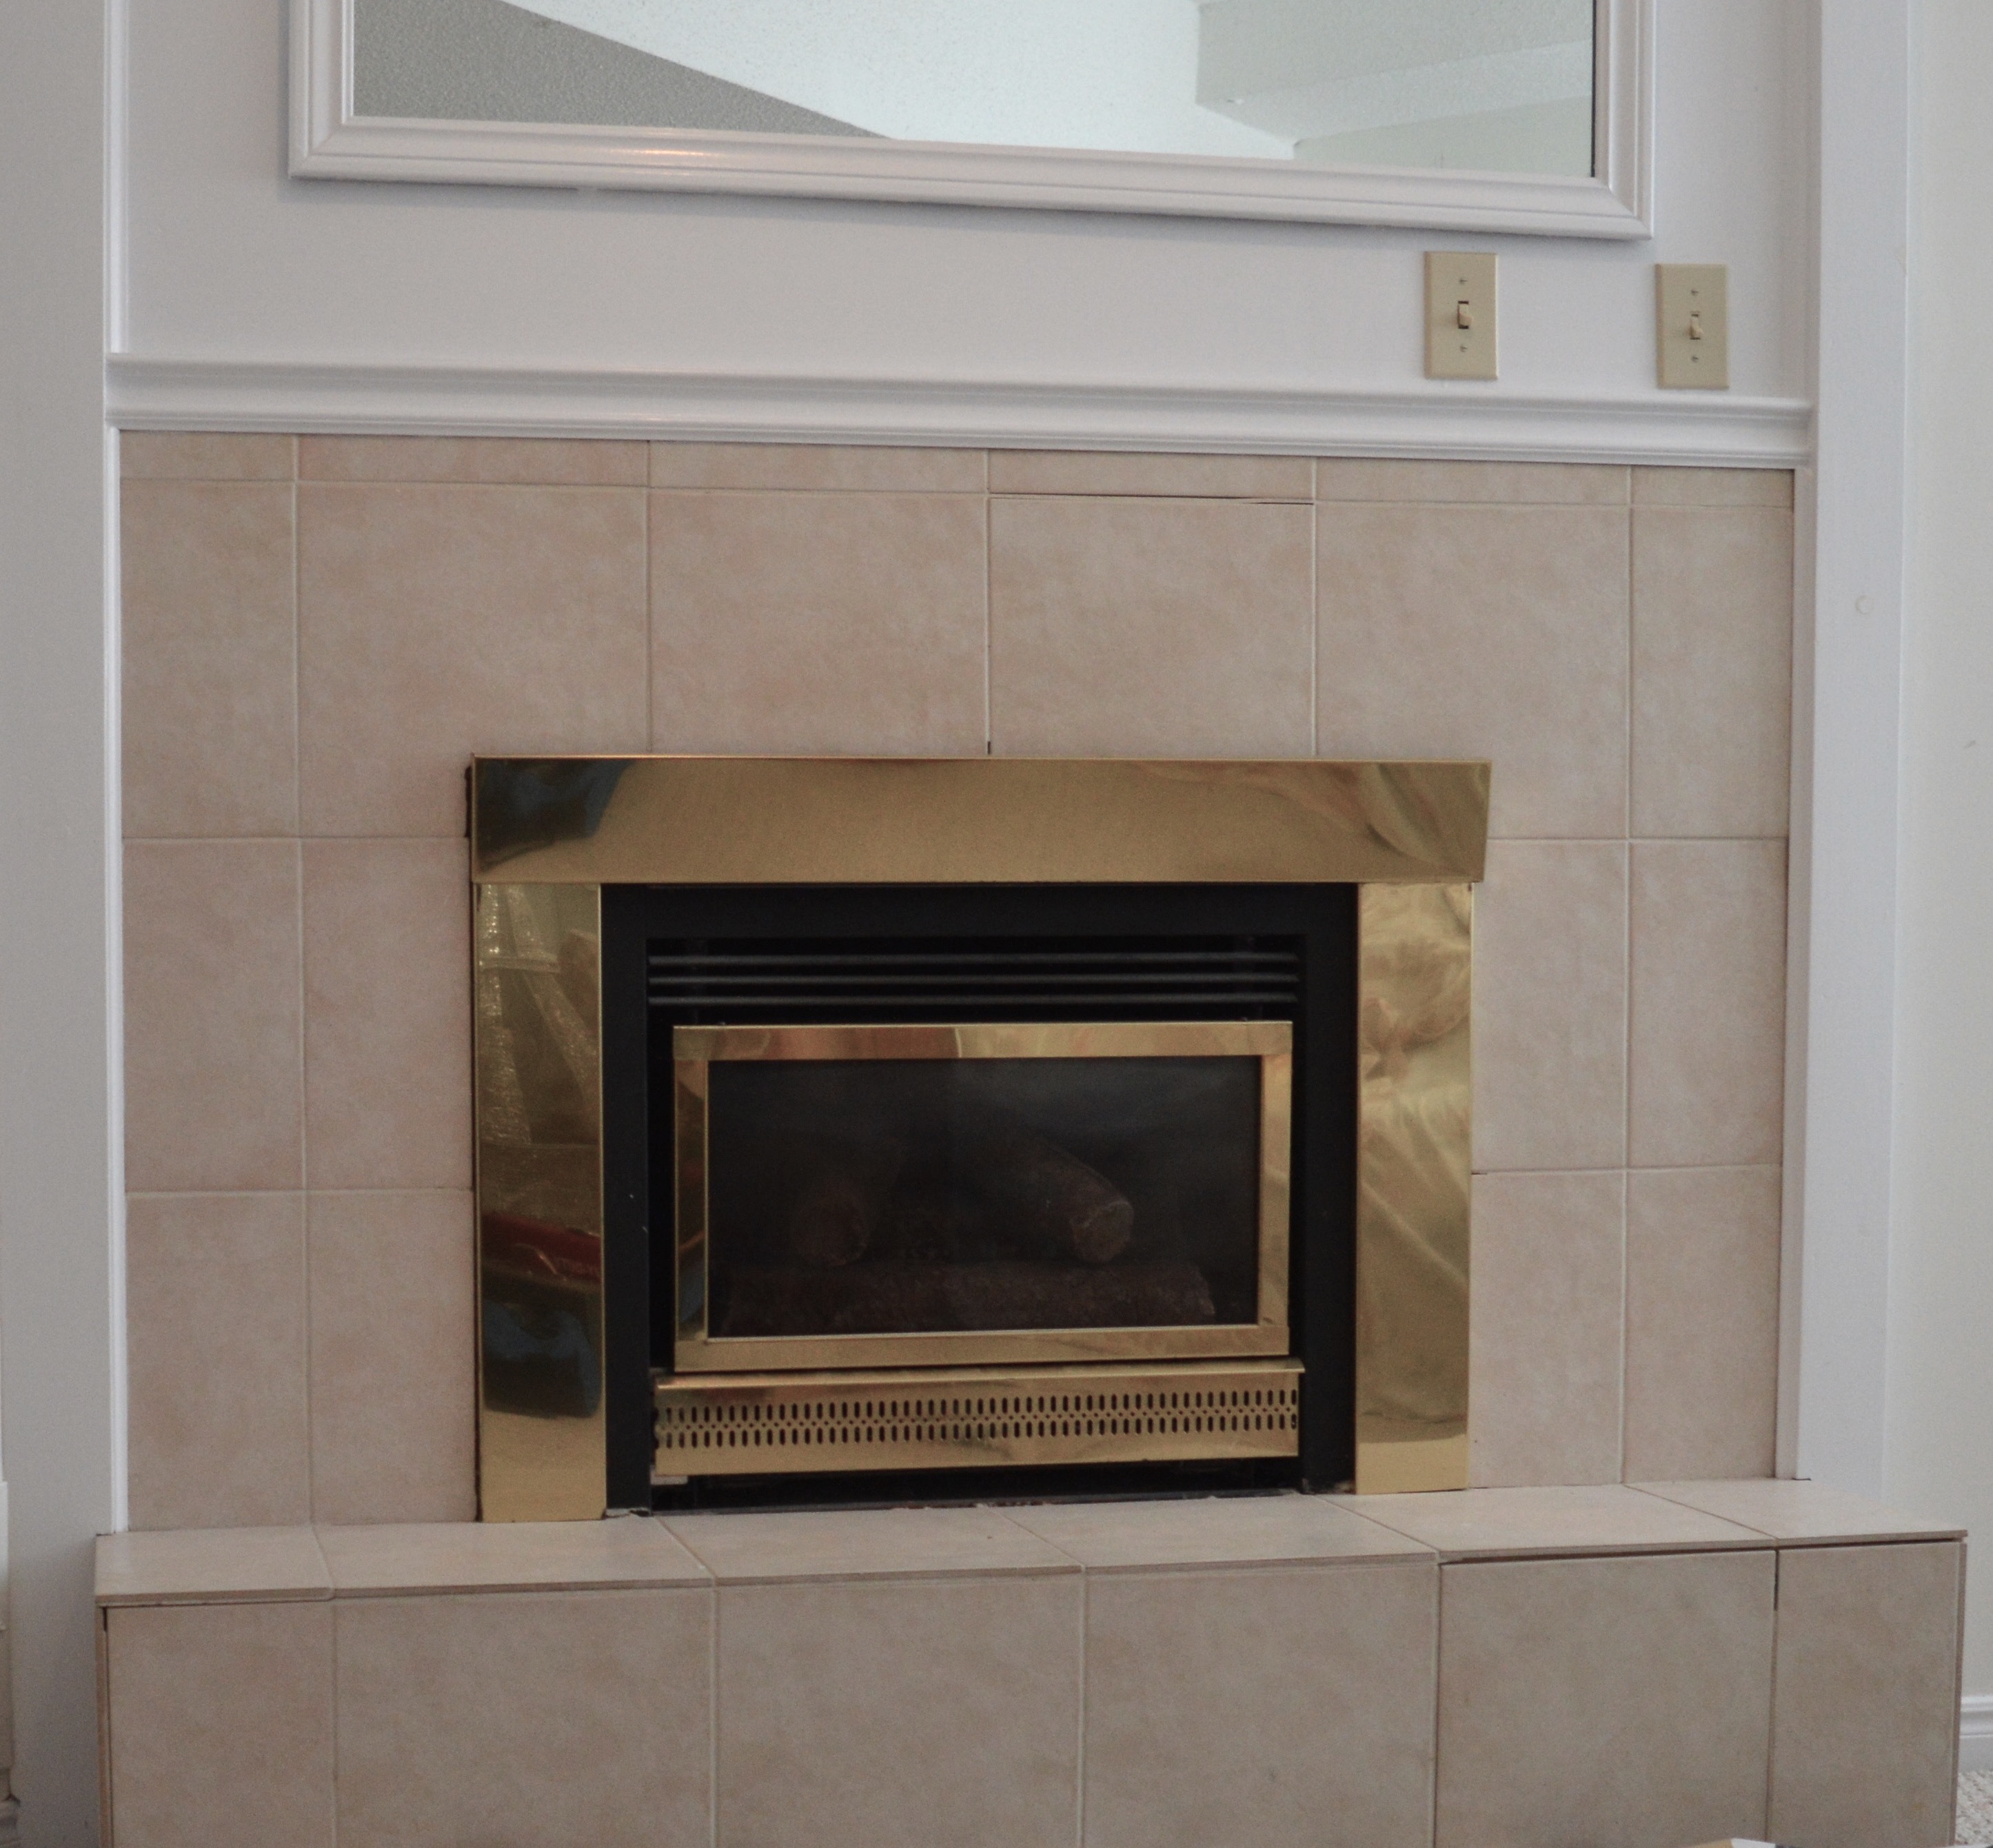
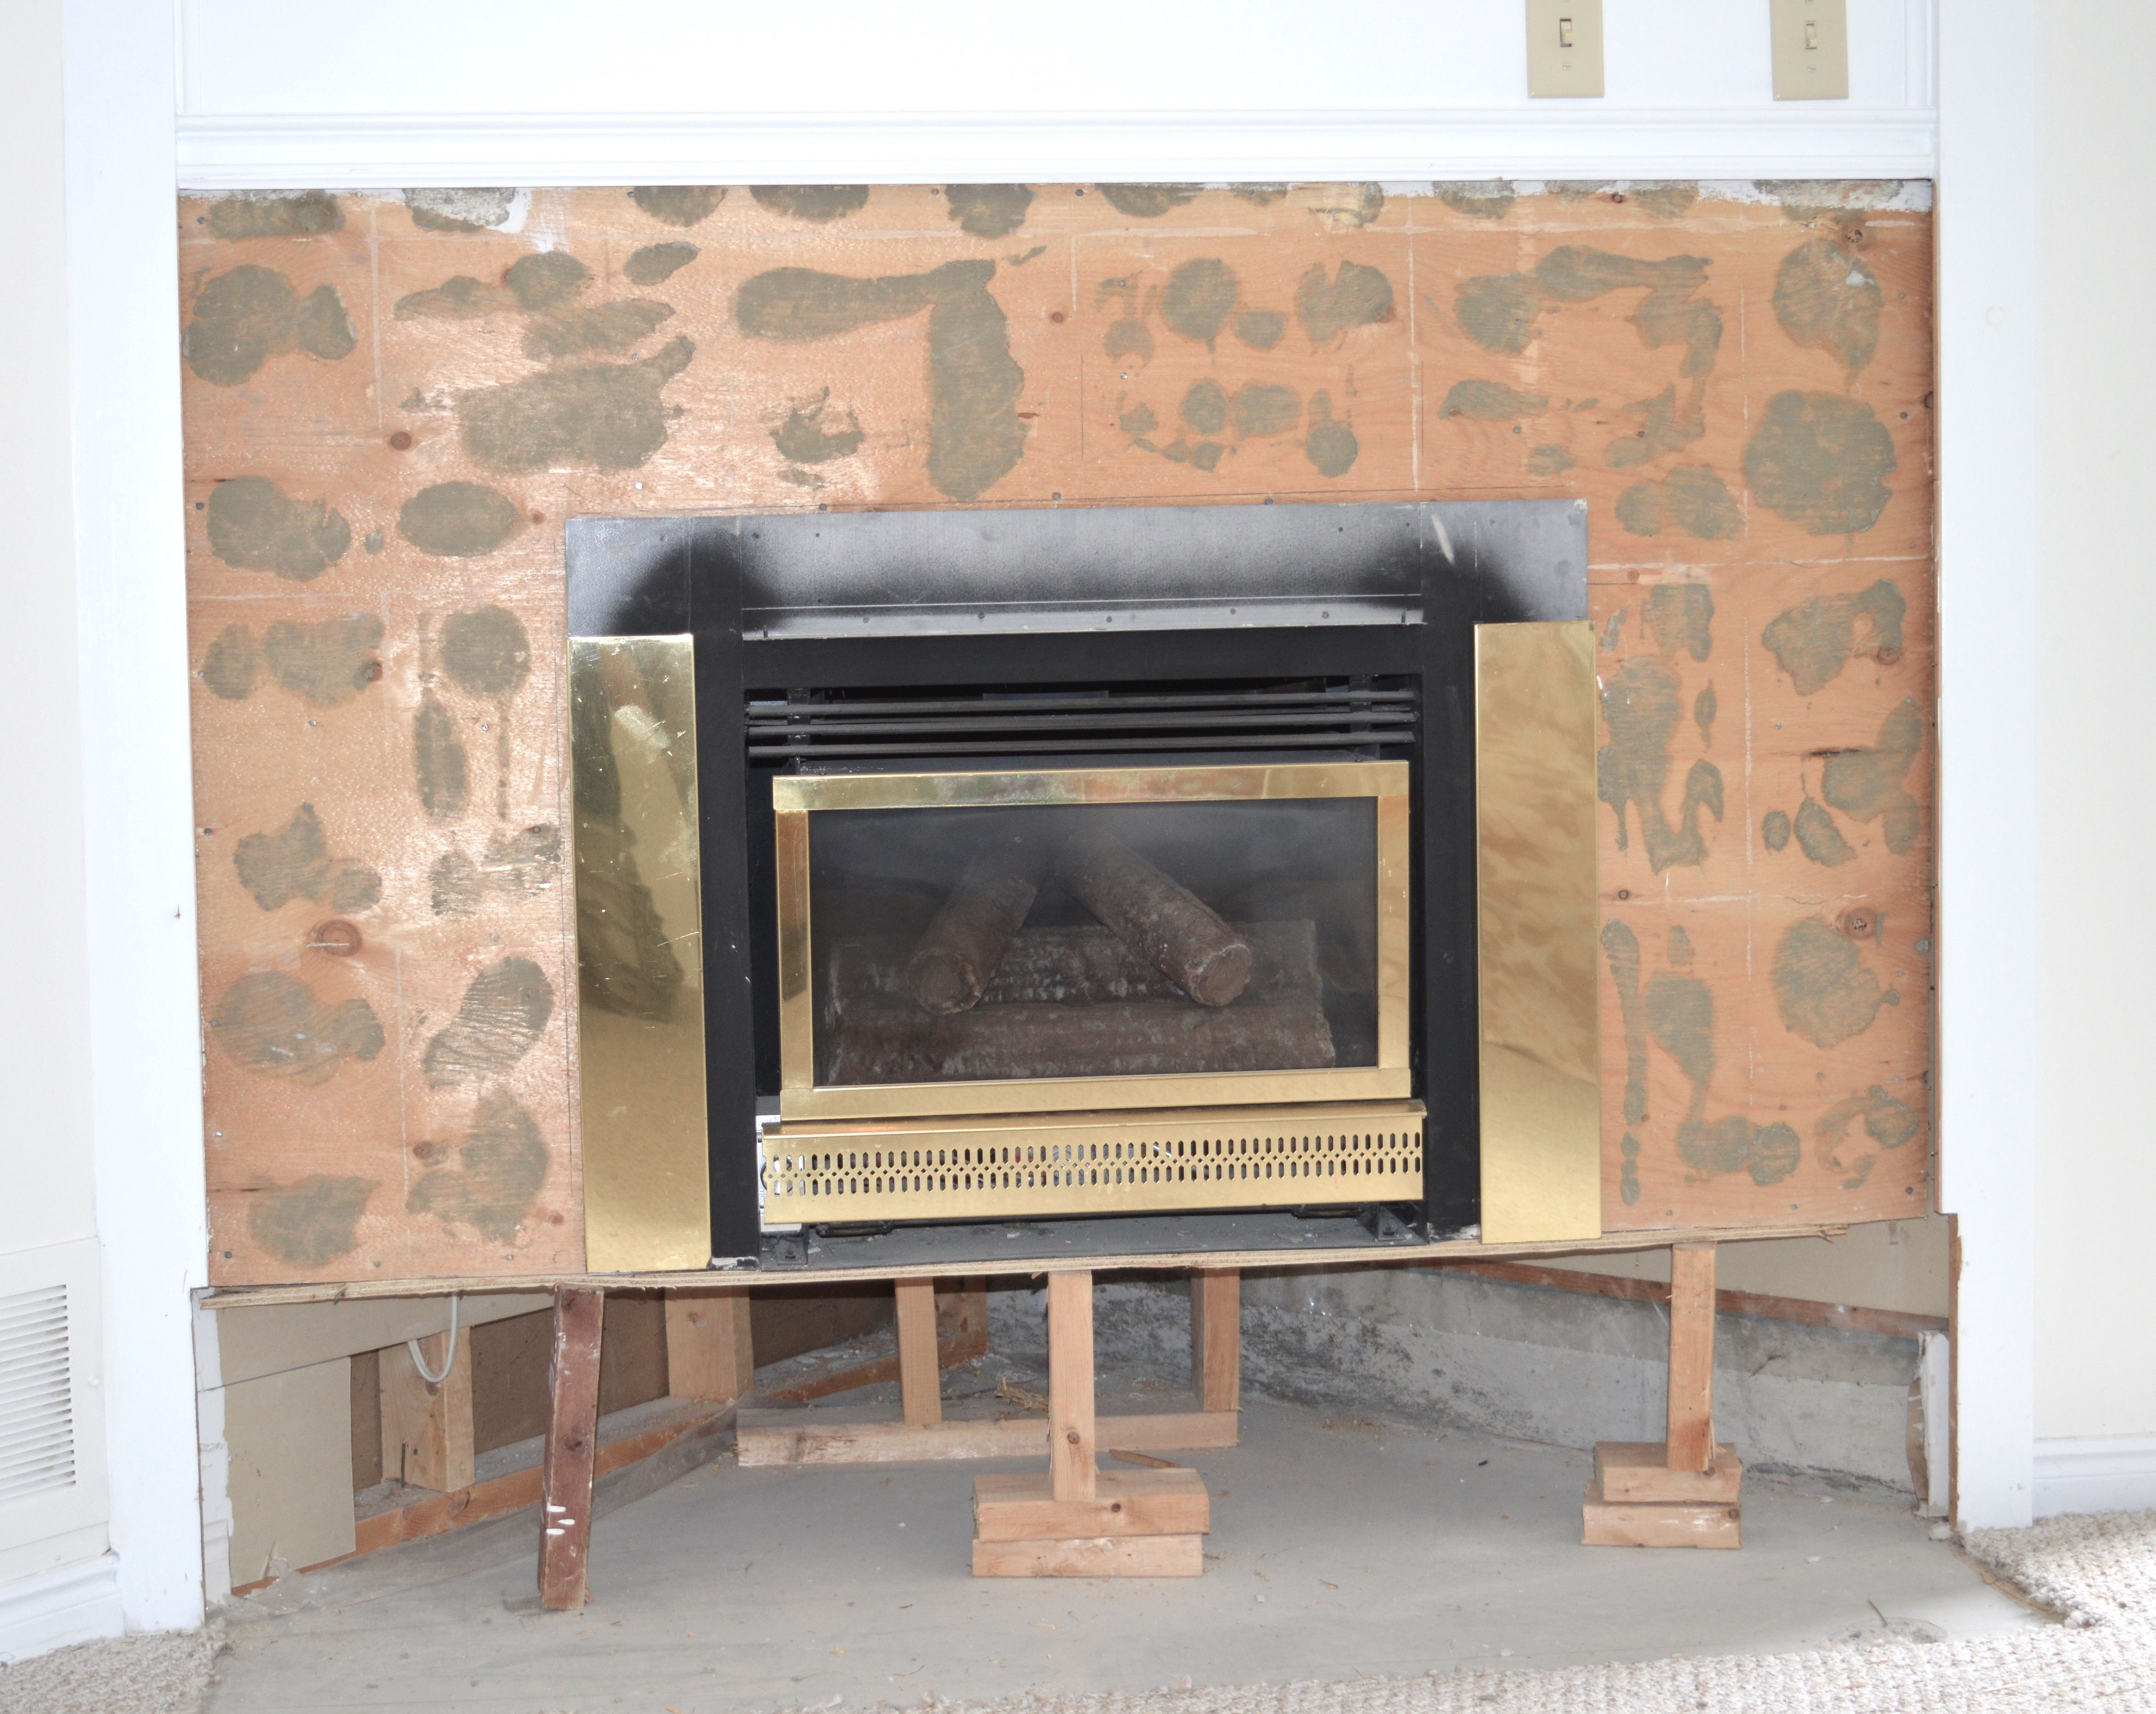
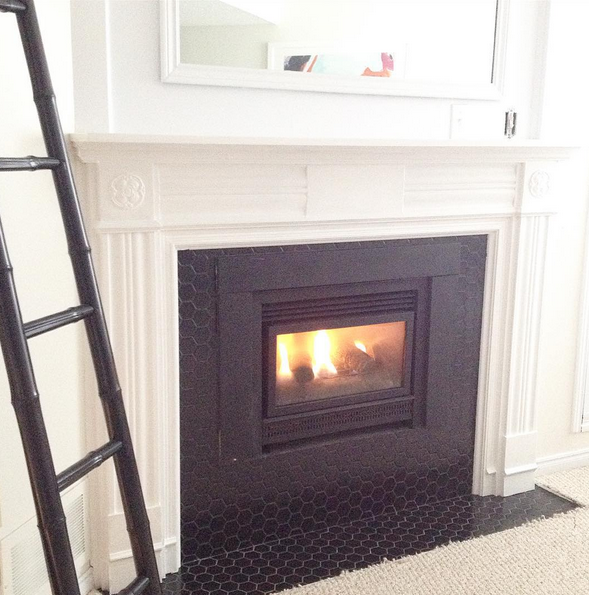
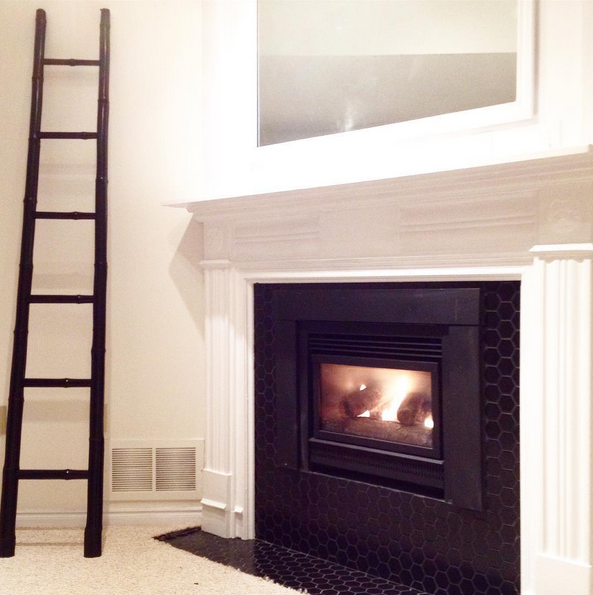
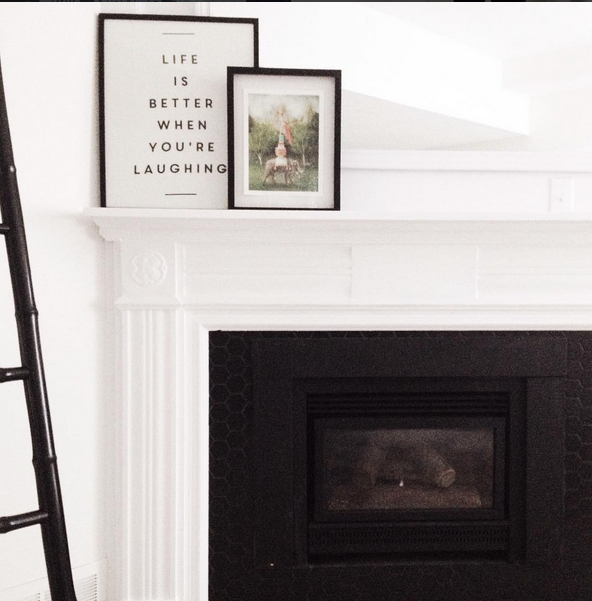
I was so happy to see a gas fireplace in my house when I first toured it with my real estate agent 2.5 years ago. After I bought it, moved in, and planned my various renovation projects, the fireplace was on the reno list, but it wasn’t a priority.
Over the last few months, however, I tackled this fireplace makeover*, and I’m so pleased with the results. Shall we walk down memory lane together?
Here’s the before photo of the fireplace. It was always in perfectly good working condition, but the tile was old, the 80s gold did nothing for me, and the step riser took up space in the smallish-size room. 
 The plan?
1. Get rid of the tile and the step.
2. Paint the gold.
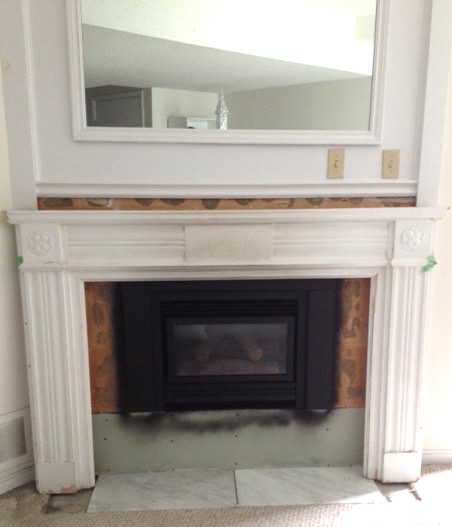
3. Install a beautiful mantle.
4. Install a tile surround.
Thankfully, things went according to plan with this project!
My dad carefully removed the step and tile and ensured that additional supports were installed before adding more plywood/drywall to the surround.


 My mom’s incredible detective skills resulted in a gorgeous mantle frame that was just about the perfect size for my space. My resourceful and handy parents took care of the few adjustments (and adding more trim).
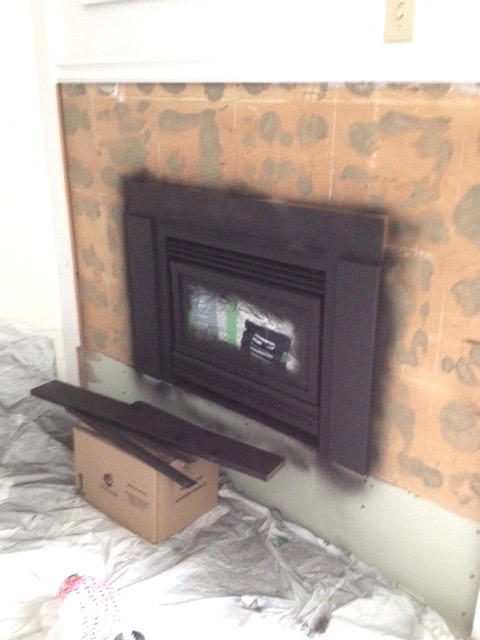
 The painting and tile work was my responsibility. After taping around the fireplace screen, and covering my room’s floor with tarp, I painted the gold using high-heat Rustoleum spray paint. I completed a few light coats to ensure good coverage.
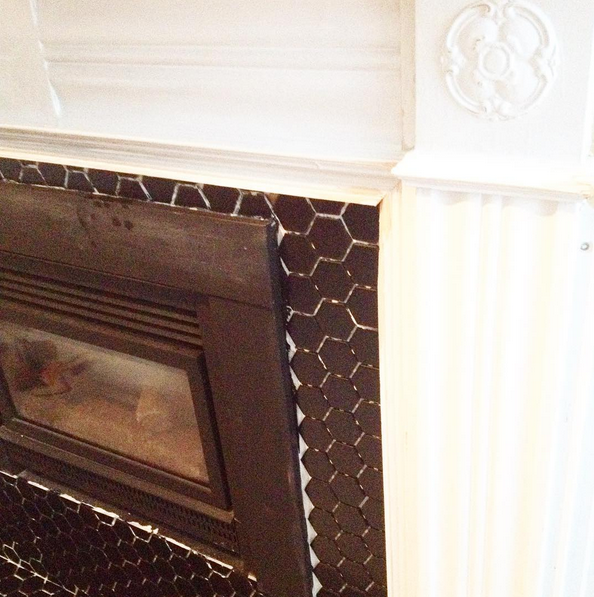
 Once the mantle was installed, I was able to get on with the tiles. I sourced 2-inch matte black hex tiles from my KW go-to tile team at Twin City Tile. I had my heart set on black from the get-go, but I did contemplate white hex and marble for a bit, too (you saw a bit of marble in one of the photos above).
 via Instagram
In the end, I’m definitely glad I went for a black hex tile surround as the fireplace blends in, and it’s all very sleek.
 via Instagram
Before painting the mantle, I sanded the heck out of it (thankfully I have the Black & Decker matrix with sander attachment, so this process went fairly quickly). I did all the sanding before I installed the tiles, by the way. I then put on three coats of white door and trim paint to freshen and brighten up this old mantle.
 via Instagram
 via Instagram
And there you have it – a step-by-step recap of my fireplace makeover.
* Thanks again, Mom and Dad, for your help!
If you’d like to see more of my house, check out my house tour or read the articles in the Uptown category.
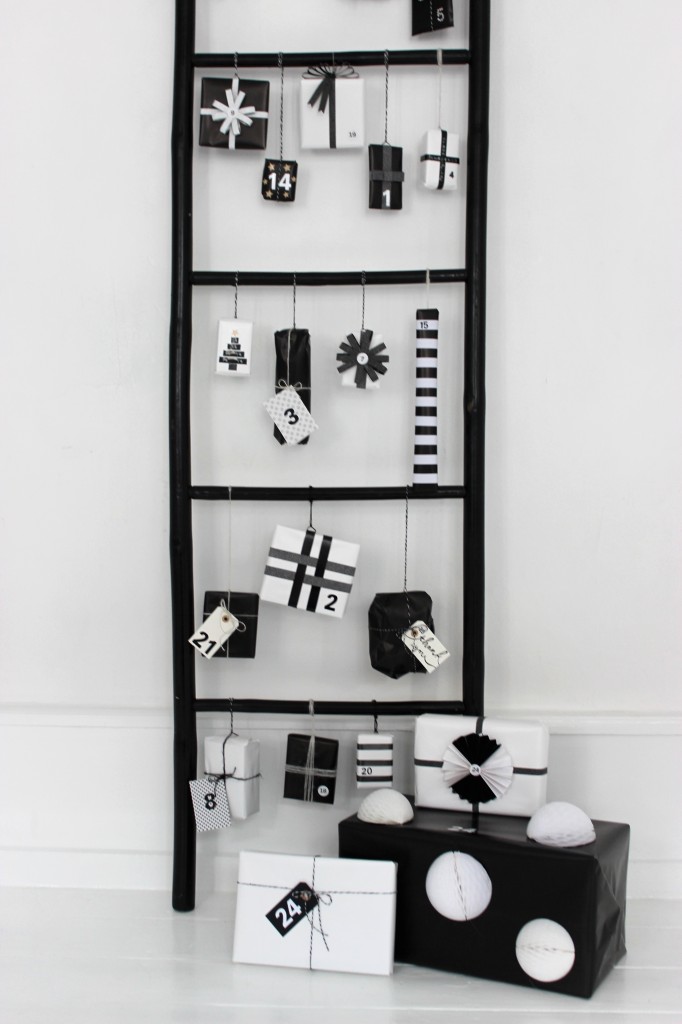
Last week, I shared five black and white Christmas trees. This week, I’m sharing five paper Christmas trees. Who will be doing a bit of DIYing this holiday?
 DIY paper Christmas trees in black and white, Therese Knutsen
 DIY paper Christmas trees in black and white, Seventy Nine Ideas
 DIY pop-up Christmas card, Maurice & King
 via Creativ
Have a great weekend!
Tomorrow is December 1st! Eek! Have you begun decorating for the holidays? Besides the wreath on my front door and ordering my Christmas cards, I haven’t yet decorated*. I’m eager to decorate, though, as I love when my house is full of the smell of a fresh Christmas tree and the look of twinkly lights.
One of the first pieces of Christmas fun that many people go for is the classic advent calendar. When I was a kid, we always had simple chocolate advent calendars, but these days, there are so many ideas for more involved and creative calendars.
I love the last one, and it could be easily recreated in your preferred colour scheme. I think red and white would be really pretty.
See more advent calendars here, here, and here.
*I’ve been busy with this project.
If you’re a regular reader, then you know that my parents have helped me with just about every reno project I’ve done at my home. They are both very handy people. Dad’s great with electrical, plumbing, and BBQ cleaning projects, and mom is a genius sewer, stylist, gardener, and painter. I’d be dumb not to cash in on their talents. (Mom, Dad, I hope you’re amused by this introduction.)
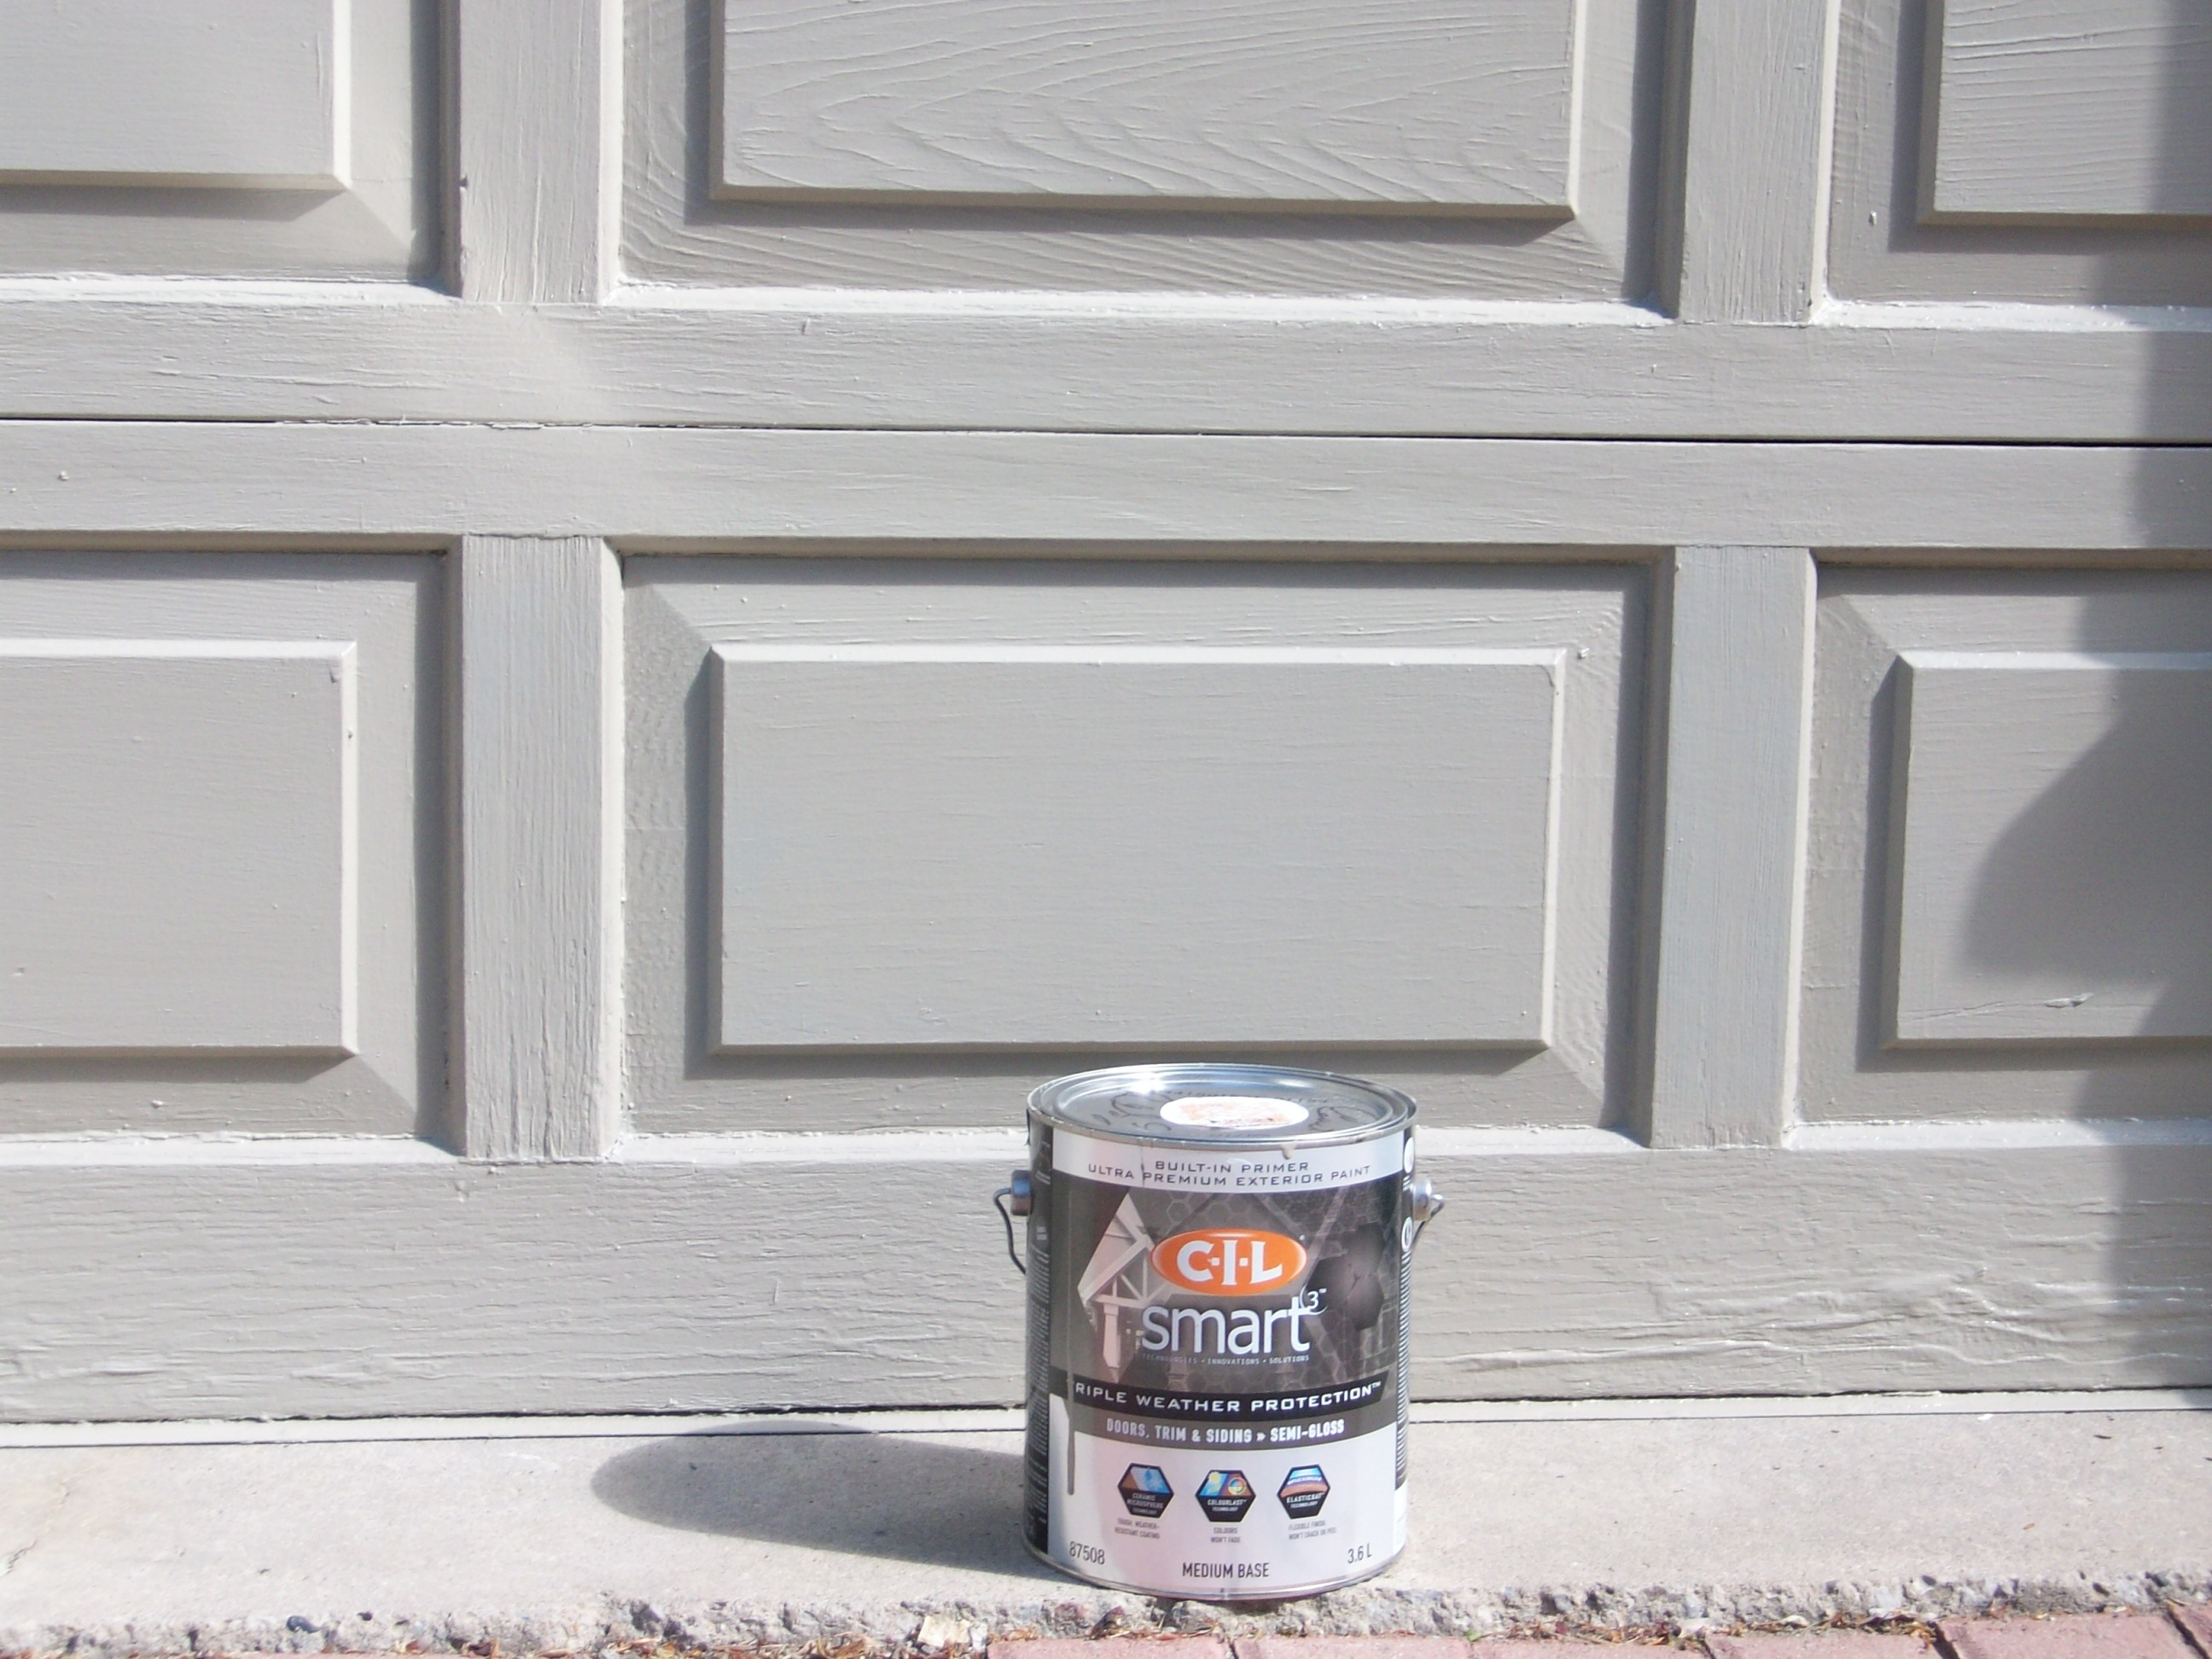
So it goes without saying that if they have a project that needs me, I’m happy to help. Most of the time this means that I’m moving a piece of furniture. But recently, my help came in the form of painting. I worked with CIL and helped my parents paint their garage doors. The doors weren’t in terrible shape, but since my parents recently replaced all their outdoor eaves and trim, the existing door colour didn’t work.
We opted for this CIL exterior doors and trim paint:
 CIL Smart3 Triple Weather Protection Doors and Trim
I picked up the paint at my local Home Depot and had it colour matched to a piece of the eaves. Perfection!
My dad took the lead on the painting. Since this was an outdoor painting project, we waited for the weather report to call for a few days of warmth and sunshine. CIL suggested (via Twitter) that the ideal temperature for exterior painting is 15°-20°C. (I’m pretty sure that those temps are good for the paint application and the painter’s fingers!)
We didn’t need to begin with a separate primer because the CIL Smart3 already has a built-in primer (cue the confetti!). Dad liked working with this paint; he reported that there were no bad smells, no splattering, and that the application was very smooth.
Here’s a look at the after:
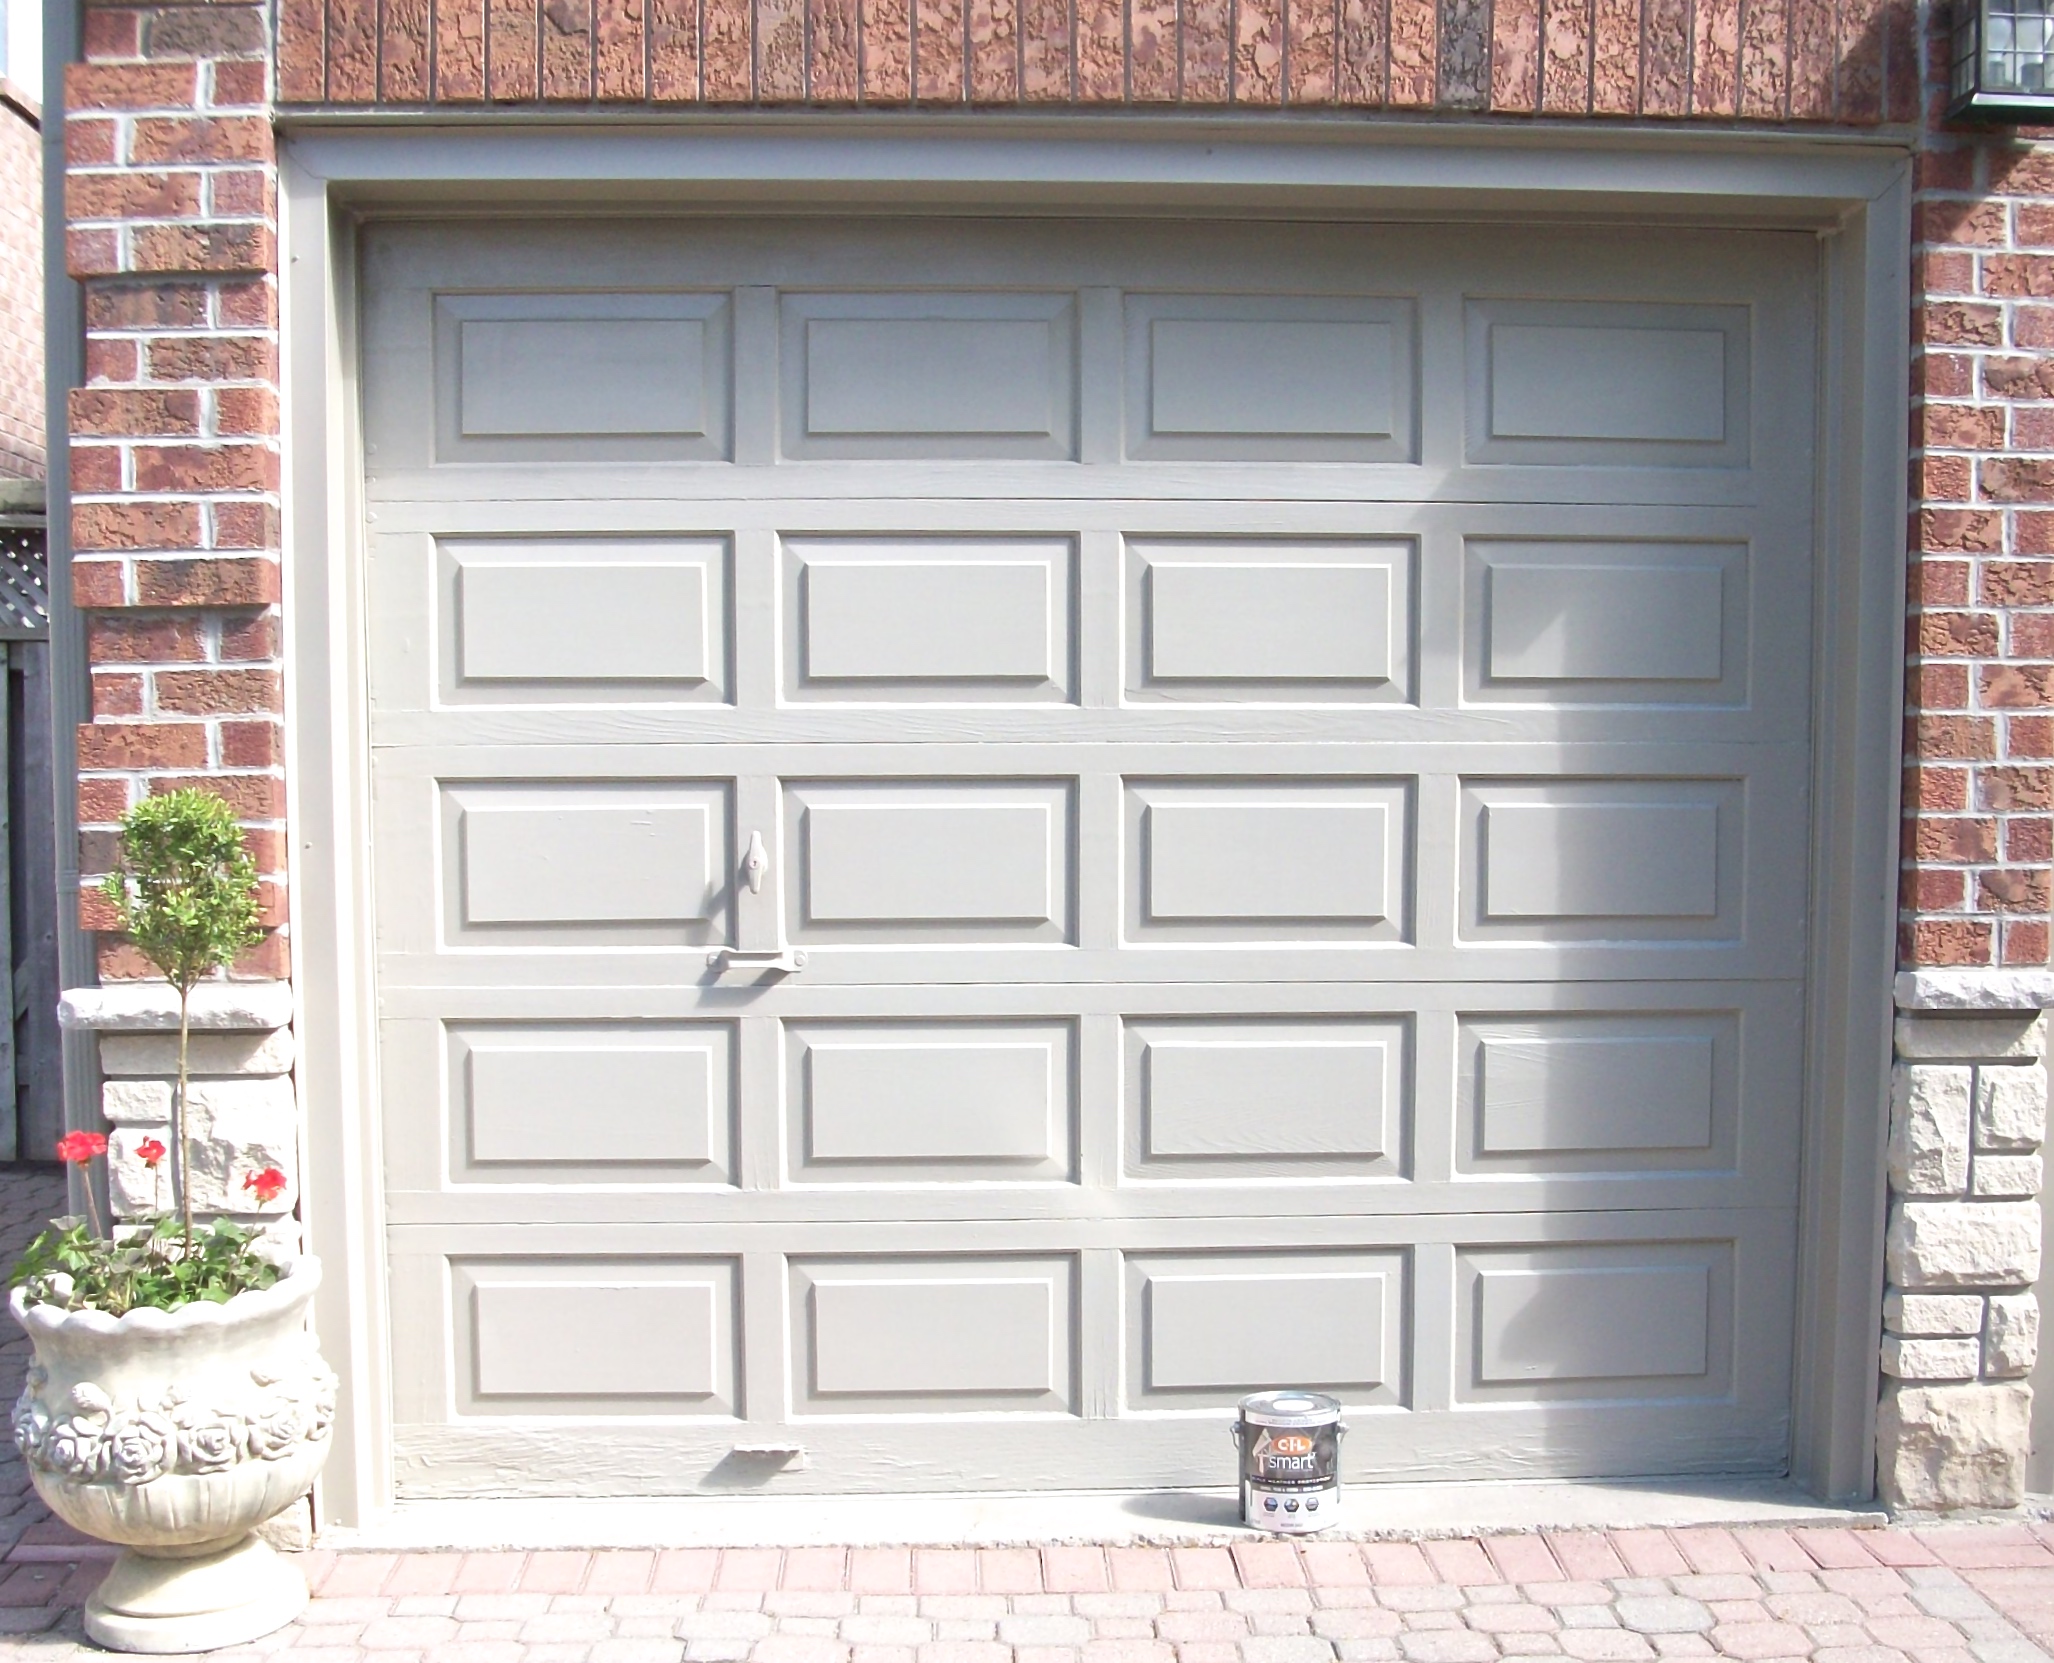 The garage door is a taupe-grey-stone colour that is a perfect match to the eaves and trim. The colours of the whole house are now much more cohesive. It was an easy weekend project that made a big impact to the home’s exterior.
Thanks to CIL for sponsoring this post. Photos by Jordana and Dad.
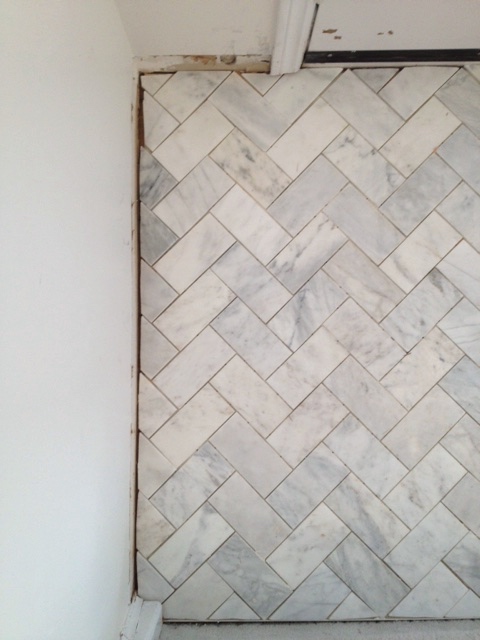
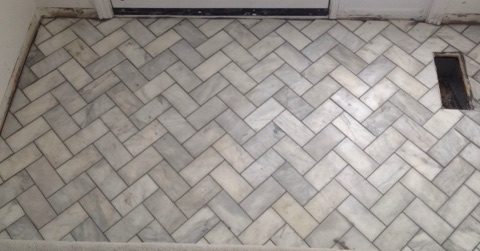
As you may recall, I decided to install a marble floor in a herringbone pattern in my small foyer. The project is just about complete, and I’m so so so thrilled with how it has all turned out. I’m extremely happy! Here’s a bit of a how-to for you in case you’re considering doing this type of thing yourself.
My herringbone floor is my third tile project. My first tile project was my hex tile floor in my powder room. Then, I tackled my kitchen backsplash with large white subway tiles. For foyer floor, I picked up a gazillion marble tiles from the ReStore about a month after I bought my home. I knew they’d look great in my foyer.
My first two tiling projects went very smoothly, so my confidence to tackle the marble was fairly high going into the project. I have found tiling to be quite interesting. It’s sort of zen-like because of the repetitive installation process, and it’s also like solving a puzzle because of how all the pieces need to fit neatly together. It also includes a bit of baking skills, I’d say, because of the mixing of mortar and grout. Just work with me here, people!
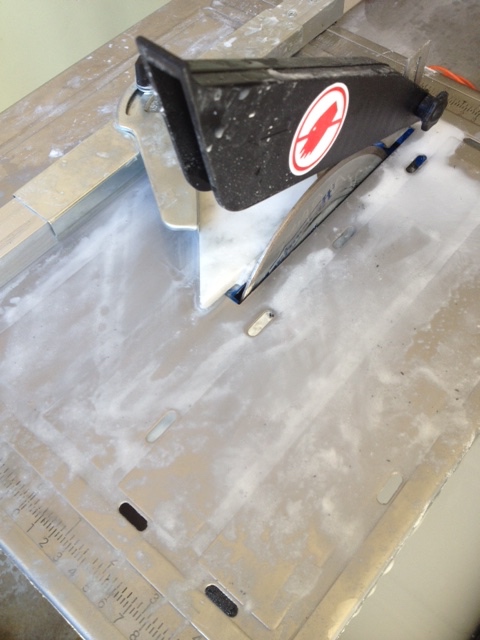
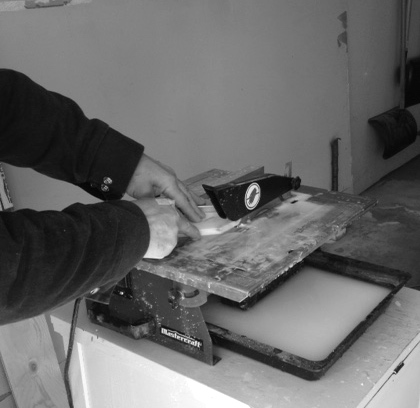
While I was mostly confident that I could tackle the foyer tile installation, I was also hesitant because I knew I’d have to use a wet saw for the gazillion cuts involved because of the herringbone pattern. I didn’t even own a wet saw when I began this project!
I didn’t take photos throughout the process – it’s hard to do when my hands are a complete mess! – but here’s what I did do.
1. Get educated: I read this article and watched this video.
2. Upgrade tools: I bought a wet saw from Canadian Tire (it was on sale for less than $100 one week).
3. Prepare work area: My dad ripped out the old linoleum for me (thanks, Dad!), and we both installed a new piece of plywood (5/8″, I think it was). Installing the new piece of plywood caused us both frustration because of the tight space.
4. Prepare marble tiles: I cleaned and sealed the marble tiles pre-installation.
5. Play with patterns: I tested out different patterns just to be sure that herringbone was my favourite.
6. Organize tiles: I sorted the tiles by colour variation so that I could install more light than dark tiles (that was my preference).
7. Measure, measure, measure: I did a lot of measuring in order to ensure that my tile placement was straight. Because I didn’t have a wet saw when I began the project, I didn’t begin the way the article suggested (with the cut triangle piece against the straight edge). If I ever do a herringbone pattern again, I would definitely start with the triangle cut/piece, so that there would be fewer tiles cut.
8: Plan layout: I dry-fit the tiles (again).
9. Mix mortar and install tiles: I mixed the mortar, spread it out, and started sticking the tiles down on the floor. Hooray! I went slowly to be sure that I wasn’t screwing up the pattern, and I used tile spacers (the smallest ones I could find). I also laid down a white plastic edger thing to protect the carpet stairs and to make my edge as neat as possible.


 I left all the edging (which included the cut pieces) for another time (post-wet-saw-purchase).
10. Cut tiles: I bought a wet saw and convinced my dad to come help me with all the cuts (it didn’t take much convincing…everyone loves a good power tool). The tag-team effort made the process go much more smoothly and quickly. After we learned about the best way to cut the marble tiles to avoid chips (see the video link above), things progressed well. I measured the heck out of every piece (measure twice, cut once, right?), while dad was on cutting duty. We also used the measuring attachments that came with the saw (e.g., the angle guider attachment) as they made the cutting easier.
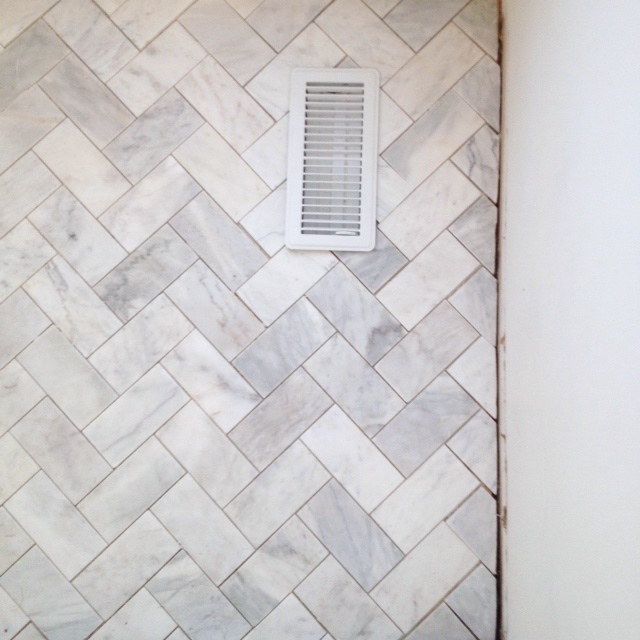
This could have been a one-person job, but it was much faster to have two people do it. We made about 60 cuts for the edging and the space around the vent. The cutting took us maybe 4-6 hours.

 11. Mix more mortar for individual pieces: I labelled every cut piece of marble and its matching space on the floor, removed all the pieces, vacuumed the floor (again), mixed up another batch of mortar, and then installed the cut pieces individually. (This step could have been avoided had I had the wet-saw from the very beginning.)
 12. Grout and clean: After wiping the marble floor and vacuuming (again), I mixed up some grey grout, and spread it around the floor. I followed the instructions on the back of the grout package, and spread it out using one of those rubber-like grout spreaders (what are they called?). After the grout was set/dried for just about 2 hours, I took another chunk of time to wipe off the excess grout, so that there would be no grout residue on the tiles. This step is essential, and it is essential to do it carefully and precisely.
13. Re-install the baseboards: Once the tile work was done, it was time to reinstall the baseboards. Easy. A few nails later, and they were done.
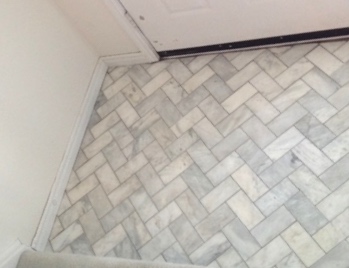
Here’s the space now:
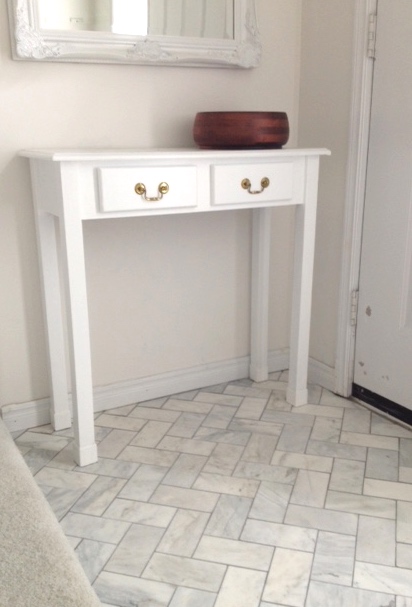 It’s just about complete. I need to caulk around the baseboards and then repaint them. I used the existing baseboards (to save time and money), but they need a fresh coat of paint.
Would I do something like this again? Heck ya! If I do marble again, I’ll need to upgrade my wet-saw blade (I think it’s done now). If I do herringbone again, I’ll definitely start with the triangle cut. I already have my next tiling project in mind!
Before I tackle my bathroom renovation, I thought I would get a smaller project out of the way – my foyer. It’s a small space, and all I have to do is install some marble tiles. Yup, that’s all. This project, however, is likely going to take a few weeks. It’s funny how the seemingly small projects take an extraordinary amount of time.
My dad was kind enough to rip up the old linoleum (bye bye linoleum!). I then used my newest gadget – a handy dandy jamb saw – to trim the door jamb frame and the frame around the stairs. (Sorry, I don’t have photos of the process, and I can’t even find a photo of the exact jamb saw I bought online. It’s Dewalt brand and it was $14.99 from the Home Depot.)
We then cut and installed a new sheet of plywood. This step was essential as it provides clean base to install my tiles. Since the space is small, installing the plywood was a real pain in the arse. After a bit of cursing, some deep sighs of frustration, and lots of discussion about the best installation approach, we got the plywood in, and it’s a nice fit, too!
Now comes the fun part – tile installation. I honestly love installing tiles (tile project 1: powder room floor; tile project 2: kitchen backsplash). I think I like it because the adhesive mixing and spreading reminds me of icing a cake, and installing the tiles is like a giant puzzle.
I bought marble tiles (for a crazy good price at the ReStore last year), and I spent a bit of time in between other weekend chores dry fitting them in different patterns. Dry fitting is an important step for me on this project because I really want to be sure of the pattern and the tiles that I’m going to lay down (e.g., I’m going to avoid using the darker shades).
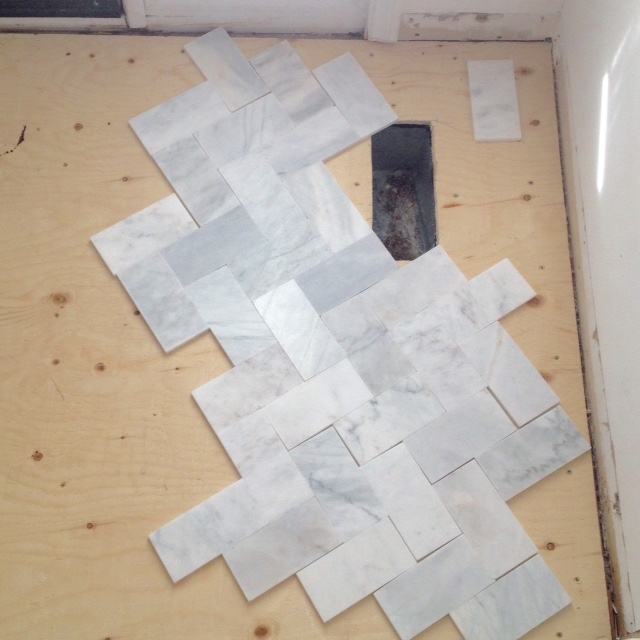
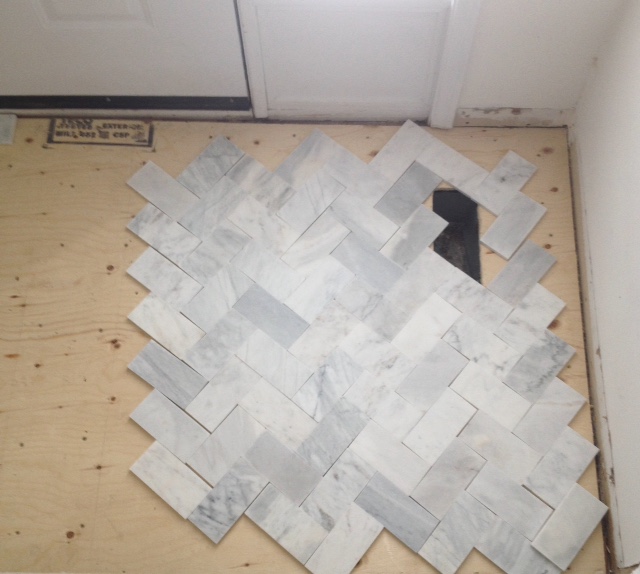
I started with a herringbone pattern where the lines are perpendicular to the door.
 Option 1: vertical/horizontal herringbone
All I could see in this pattern were the vertical and horizontal lines, and it was not making me happy.
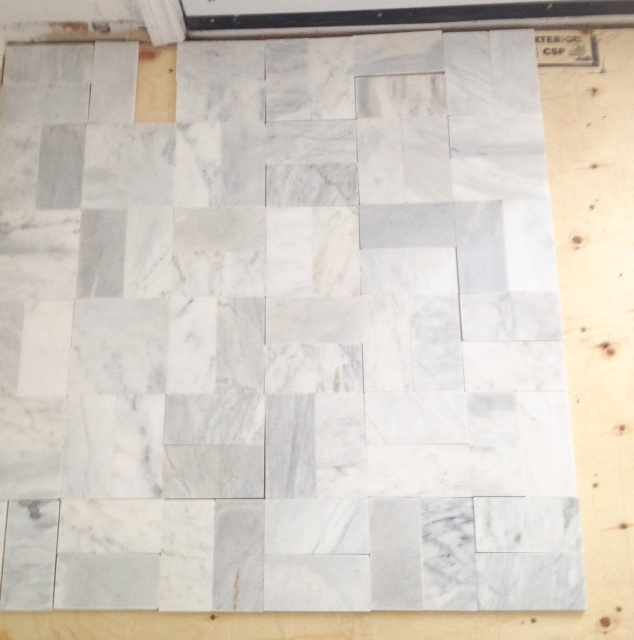
I then tried out a classic brick pattern.
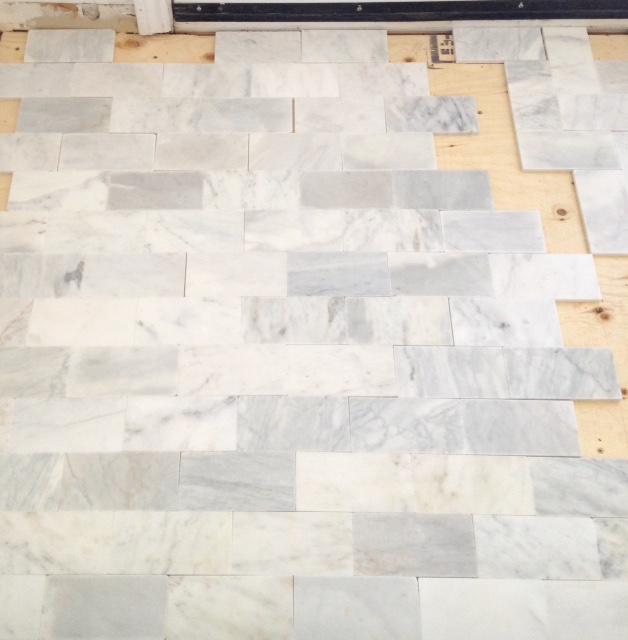 Option 2: Brick
I think it’s pretty, and, like several Instagram friends, the variation in each piece of marble stands out. I’m not against the brick, but it seems sort of normal and expected. This pattern would definitely limit the number of cuts and reduce tile waste.
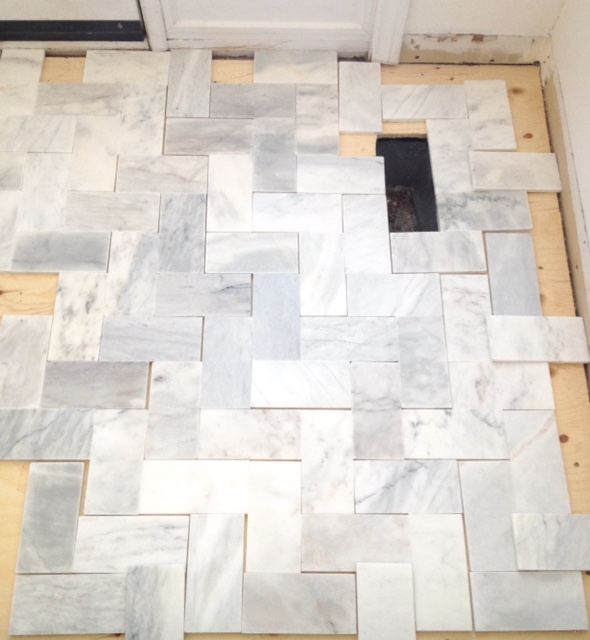
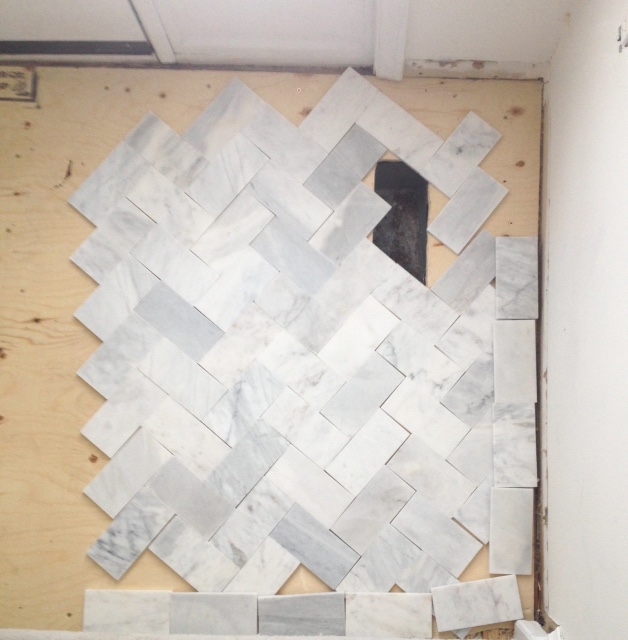
Back to the herringbone – the horizontal/vertical lines were annoying me, so I switched the layout so that the herringbone V pattern (or zig zag) would be perpendicular to the door. Do you see what I’m talking about?
 Option 3:Herringbone V along the width
This looked instantly better in my opinion, but I released the photos to Instagram and let my friends weigh in. I LOVED reading everyone’s comments! Most people still opted for one of the herringbone patterns over the brick.
A few friends (and my mom via phone call) suggested I switch the direction of the herringbone so that the V shape would run lengthwise (i.e., parallel to the door). I ran with this suggestion and end up with this:
 Option 4: Herringbone V along the length
Much better. I did this quickly, so I didn’t actually verify that everything was lined up, but you can still get the idea of the shift of direction. I find this easy on the eye and flattering for the space.
A few people suggested inserting a border, so I tried that too.
 Option 5: Herringbone with simple border
I don’t actually think the space is large enough for a border (or carpet as I like to call it), but I can see how people like this option. It sort of finishes things off. It reminds me of colouring within the lines. All the fun happens inside the boxed border. For this foyer, I feel like the carpet style would just make the area feel smaller.
Shannon (8Foot6) suggested I try a basket weave, so I did. Here’s how it looks:
 Option 6: Basket weave
I thought I was going to hate it because the basket weave reminds me of outdoor patios, but I don’t mind it. It’s certainly tidy, and it would require very few cuts, but I’m not sure that I love it for this space.
What do you think? What’s your vote? I’d love to know!
What was that about it takes a village…
To everyone who follows me on Instagram and offered input – thank you!
Christmas and New Year’s seem like they were ages ago, don’t they? We’ve then had Valentine’s Day and St. Patrick’s Day is in just a few days. It seems as though as soon as one major holiday is over, another one is around the corner. Whether or not you celebrate all of these holidays, I don’t think that the celebrations should be on hold for special holiday days. Enjoying cocktails, dinner parties, or brunch with family and friends is an excellent way to reenergize and toast everyone’s successes! A beautiful table setting – for small and large gatherings – provides a warm welcome for your guests, and is a lovely preview for a delicious meal!

via Style Me Pretty


via Style Me Pretty
via Weddingomania

Following my end of January post called Things I Learned This Week, I thought it would be appropriate to end this week by sharing five things I learned this month.
1. February is a month that really just whizzes by in a flash. I never really paid too much attention to this before, but this month was really just a complete blur. I was sick for almost three weeks of it, but other than that, I have barely a recollection of what I did! I hate feeling like this.

via Me and My DIY
2. The Waterloo Public Library in uptown Waterloo is awesome. I love libraries and I think we should continue to show them our support. Right? Who’s with me?

3. I love doing the Saturday Toronto Star crossword when I’m at my parents’ house. I can actually do it (or most of it)! I don’t actually get the newspaper at my own home, but it’s one of the first pages I turn to when I see the Star sitting on my parents’ kitchen table. I liked this one especially since the clue for 67 down was “Ontario city”, and the answer was “Waterloo”. Do you see it in the photo?

4. Showering my cousin’s baby with well wishes on this sweet display made me happy.

5. I had a great time at The Home Depot spring preview event earlier this week. I can’t wait to BBQ and start planting in a few months. The HD has quite a few new BBQs in stock, so I encourage you to check them out if you’re in the market for one. Here I am pretending to water some herbs in a space designed by Tim:

While the month went by in a flash, and it was generally decent (from what I remember), I’m glad it’s coming to an end because I cannot wait to ditch my winter coat and enjoy a warm spring.
I haven’t posted any photos of my home for quite some time. Most of the major work is done (yay!), although I always have something on my to do list (e.g., my basement bathroom). I am so proud of all that I have accomplished in the 1.5 years since I moved into my home. The house looks nothing like it did when I moved in. I slathered gallons and gallons of paint on every single wall, changed a bunch of light fixtures, cleaned for hours on end, tore down a wall, and so much more.
I haven’t taken after photos of every room, so this past weekend, I devoted some time to doing just this. I am just about ready to share a house tour. I really should post the before photos, too, to make things extra dramatic (maybe I will one day)!
For now, here’s a look at what my powder room. This space was completely gutted, and nothing (besides some of the walls) was salvageable (you can see some before photos here and here). It was a disgusting space, really, and that just sums up the before.
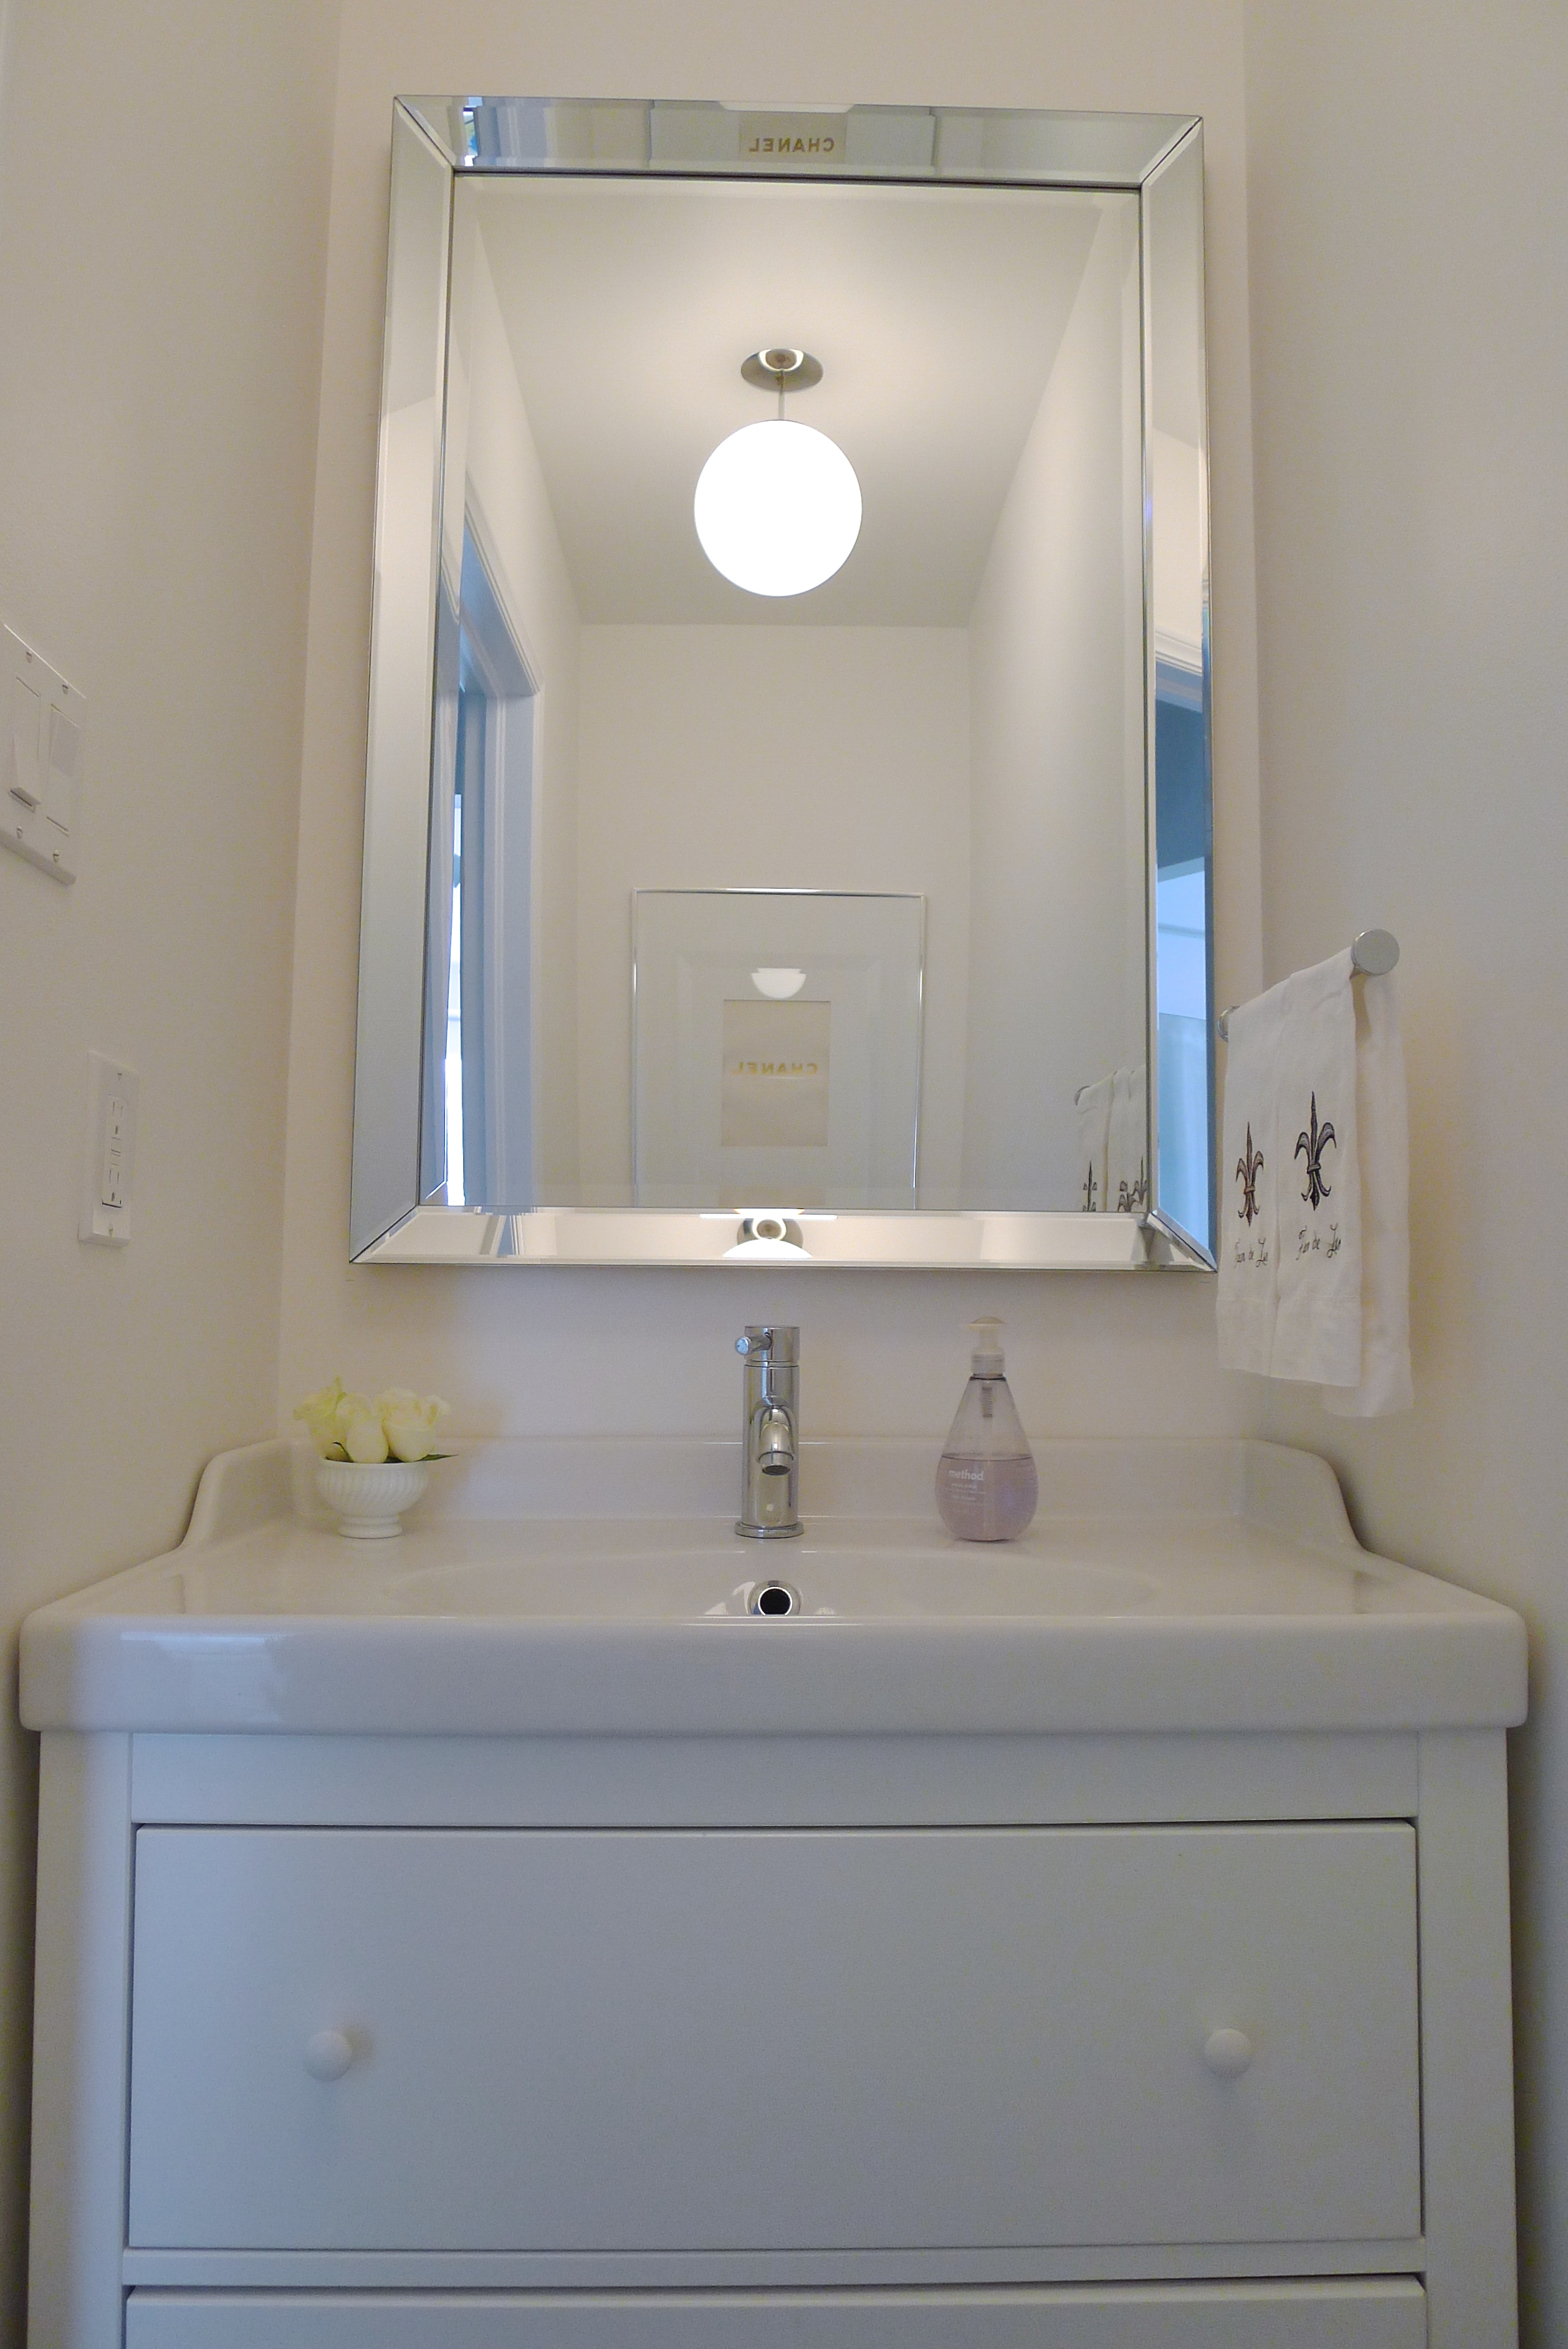
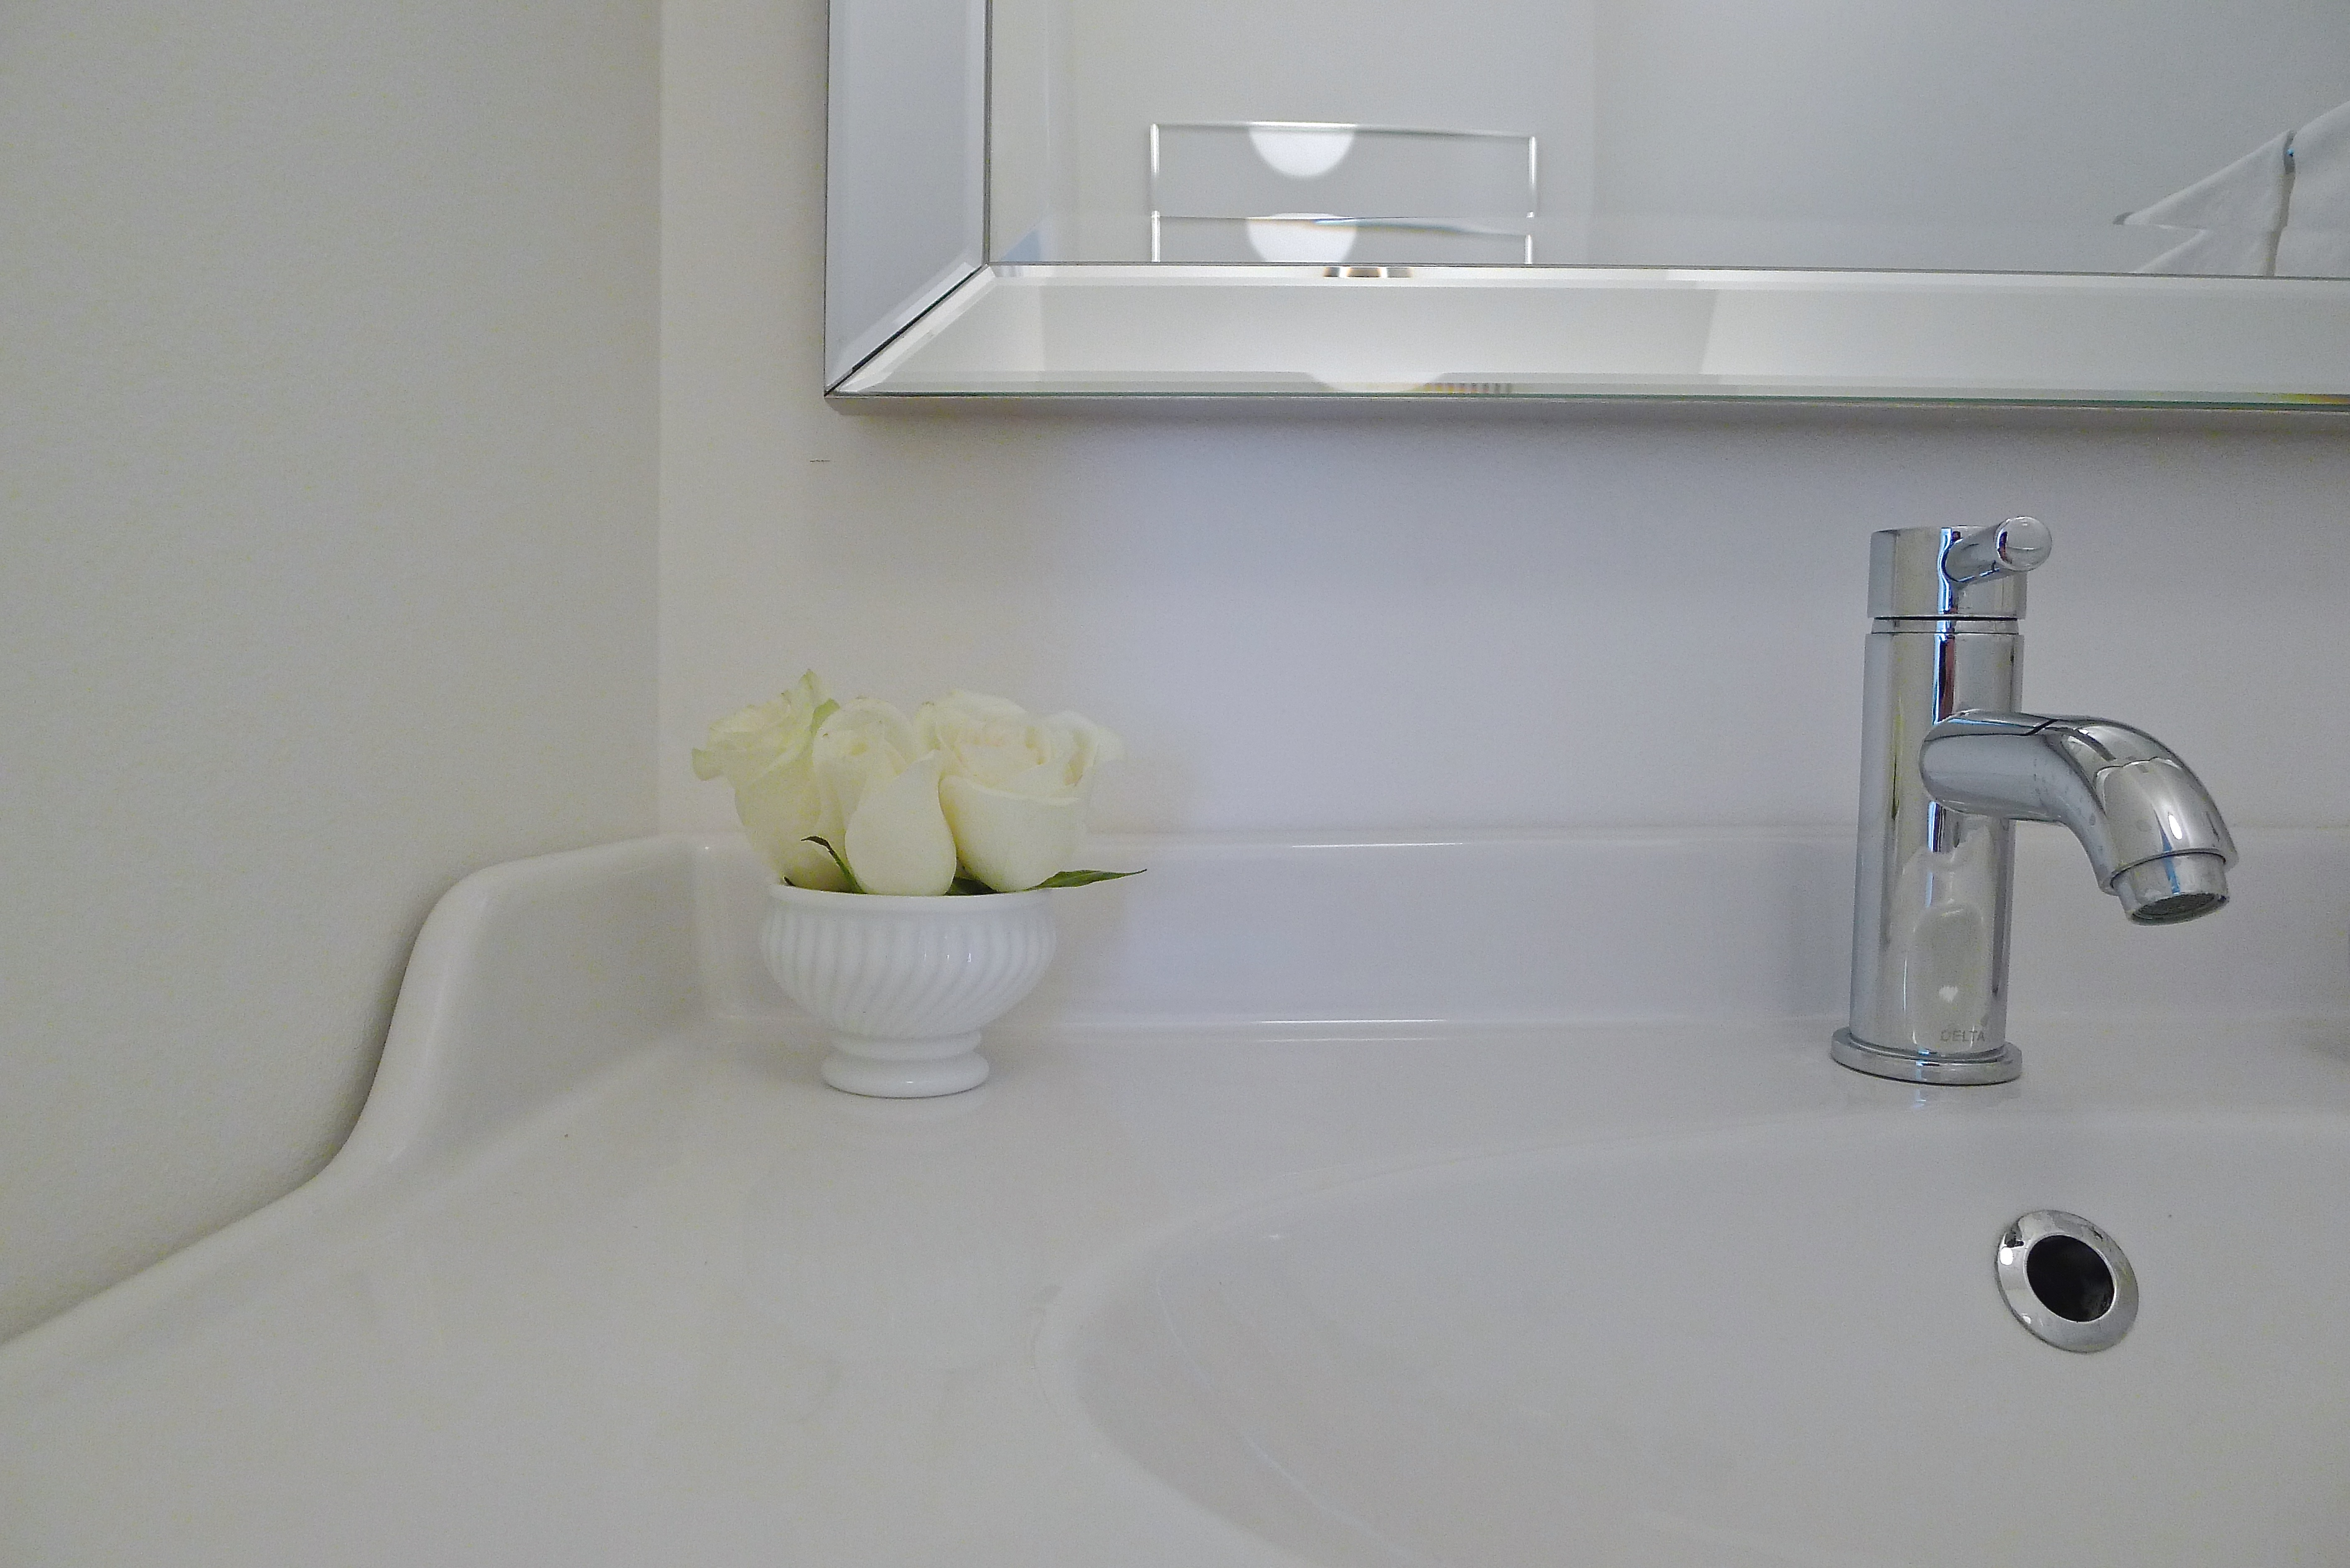
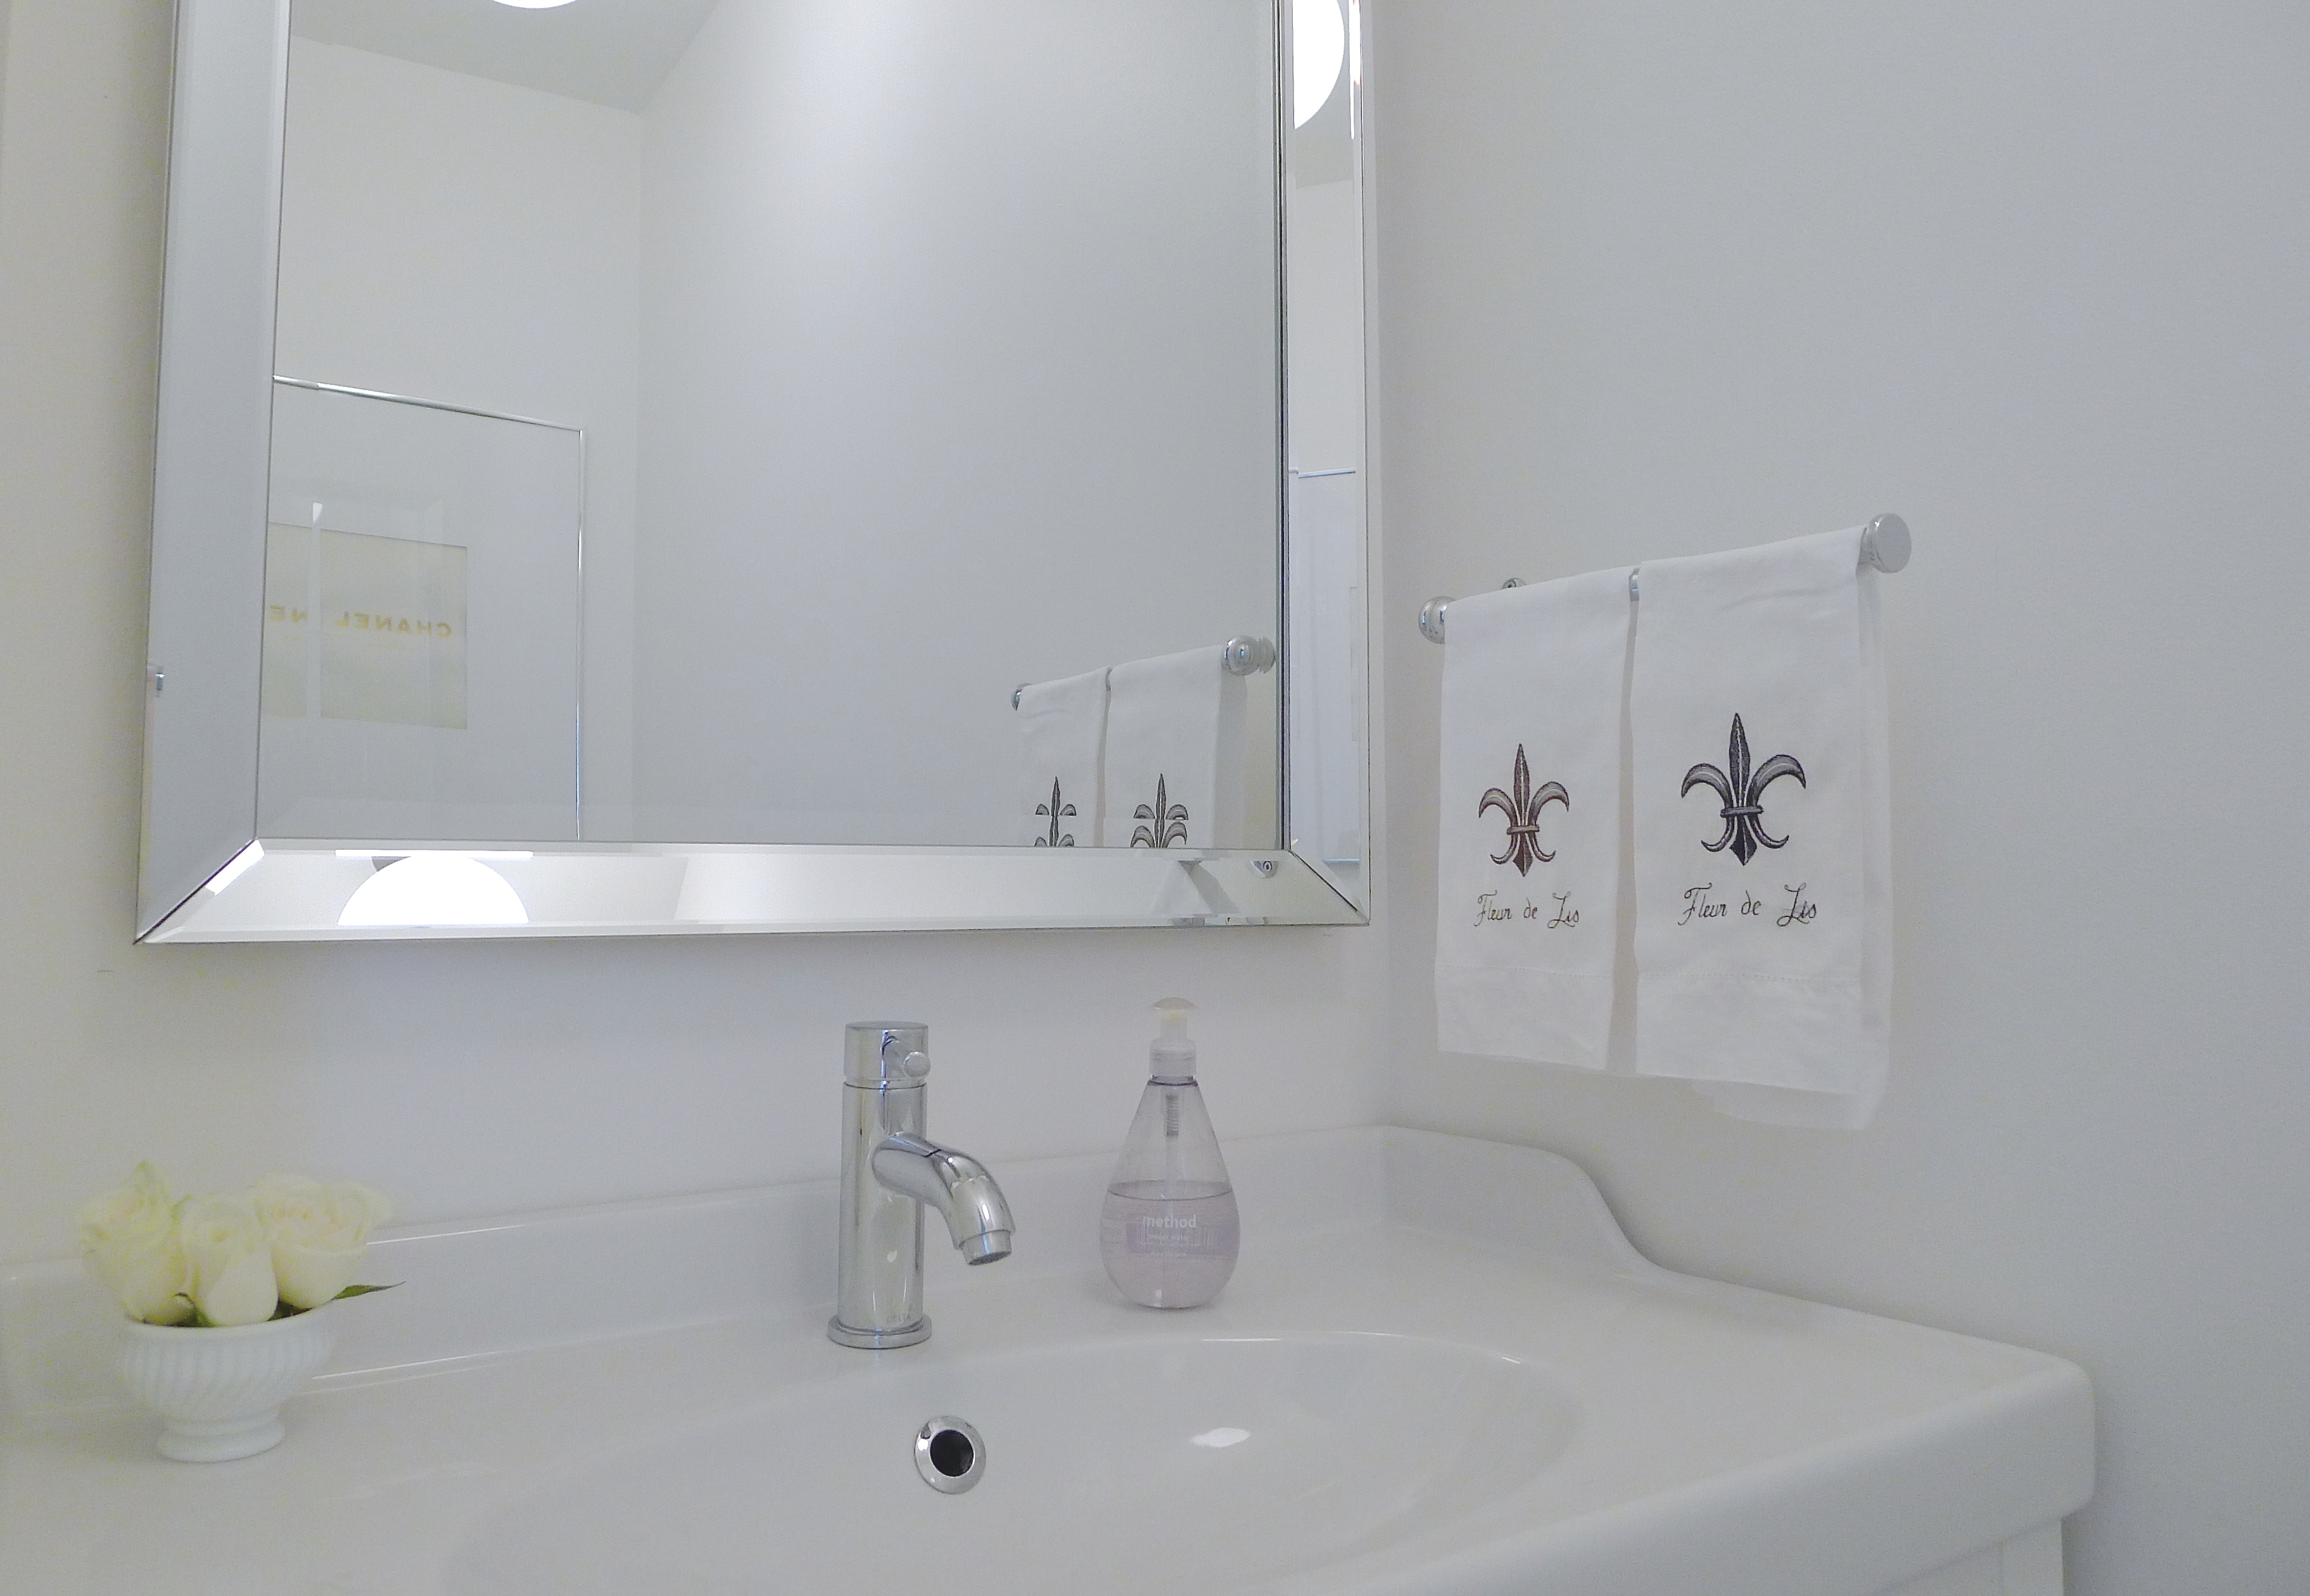
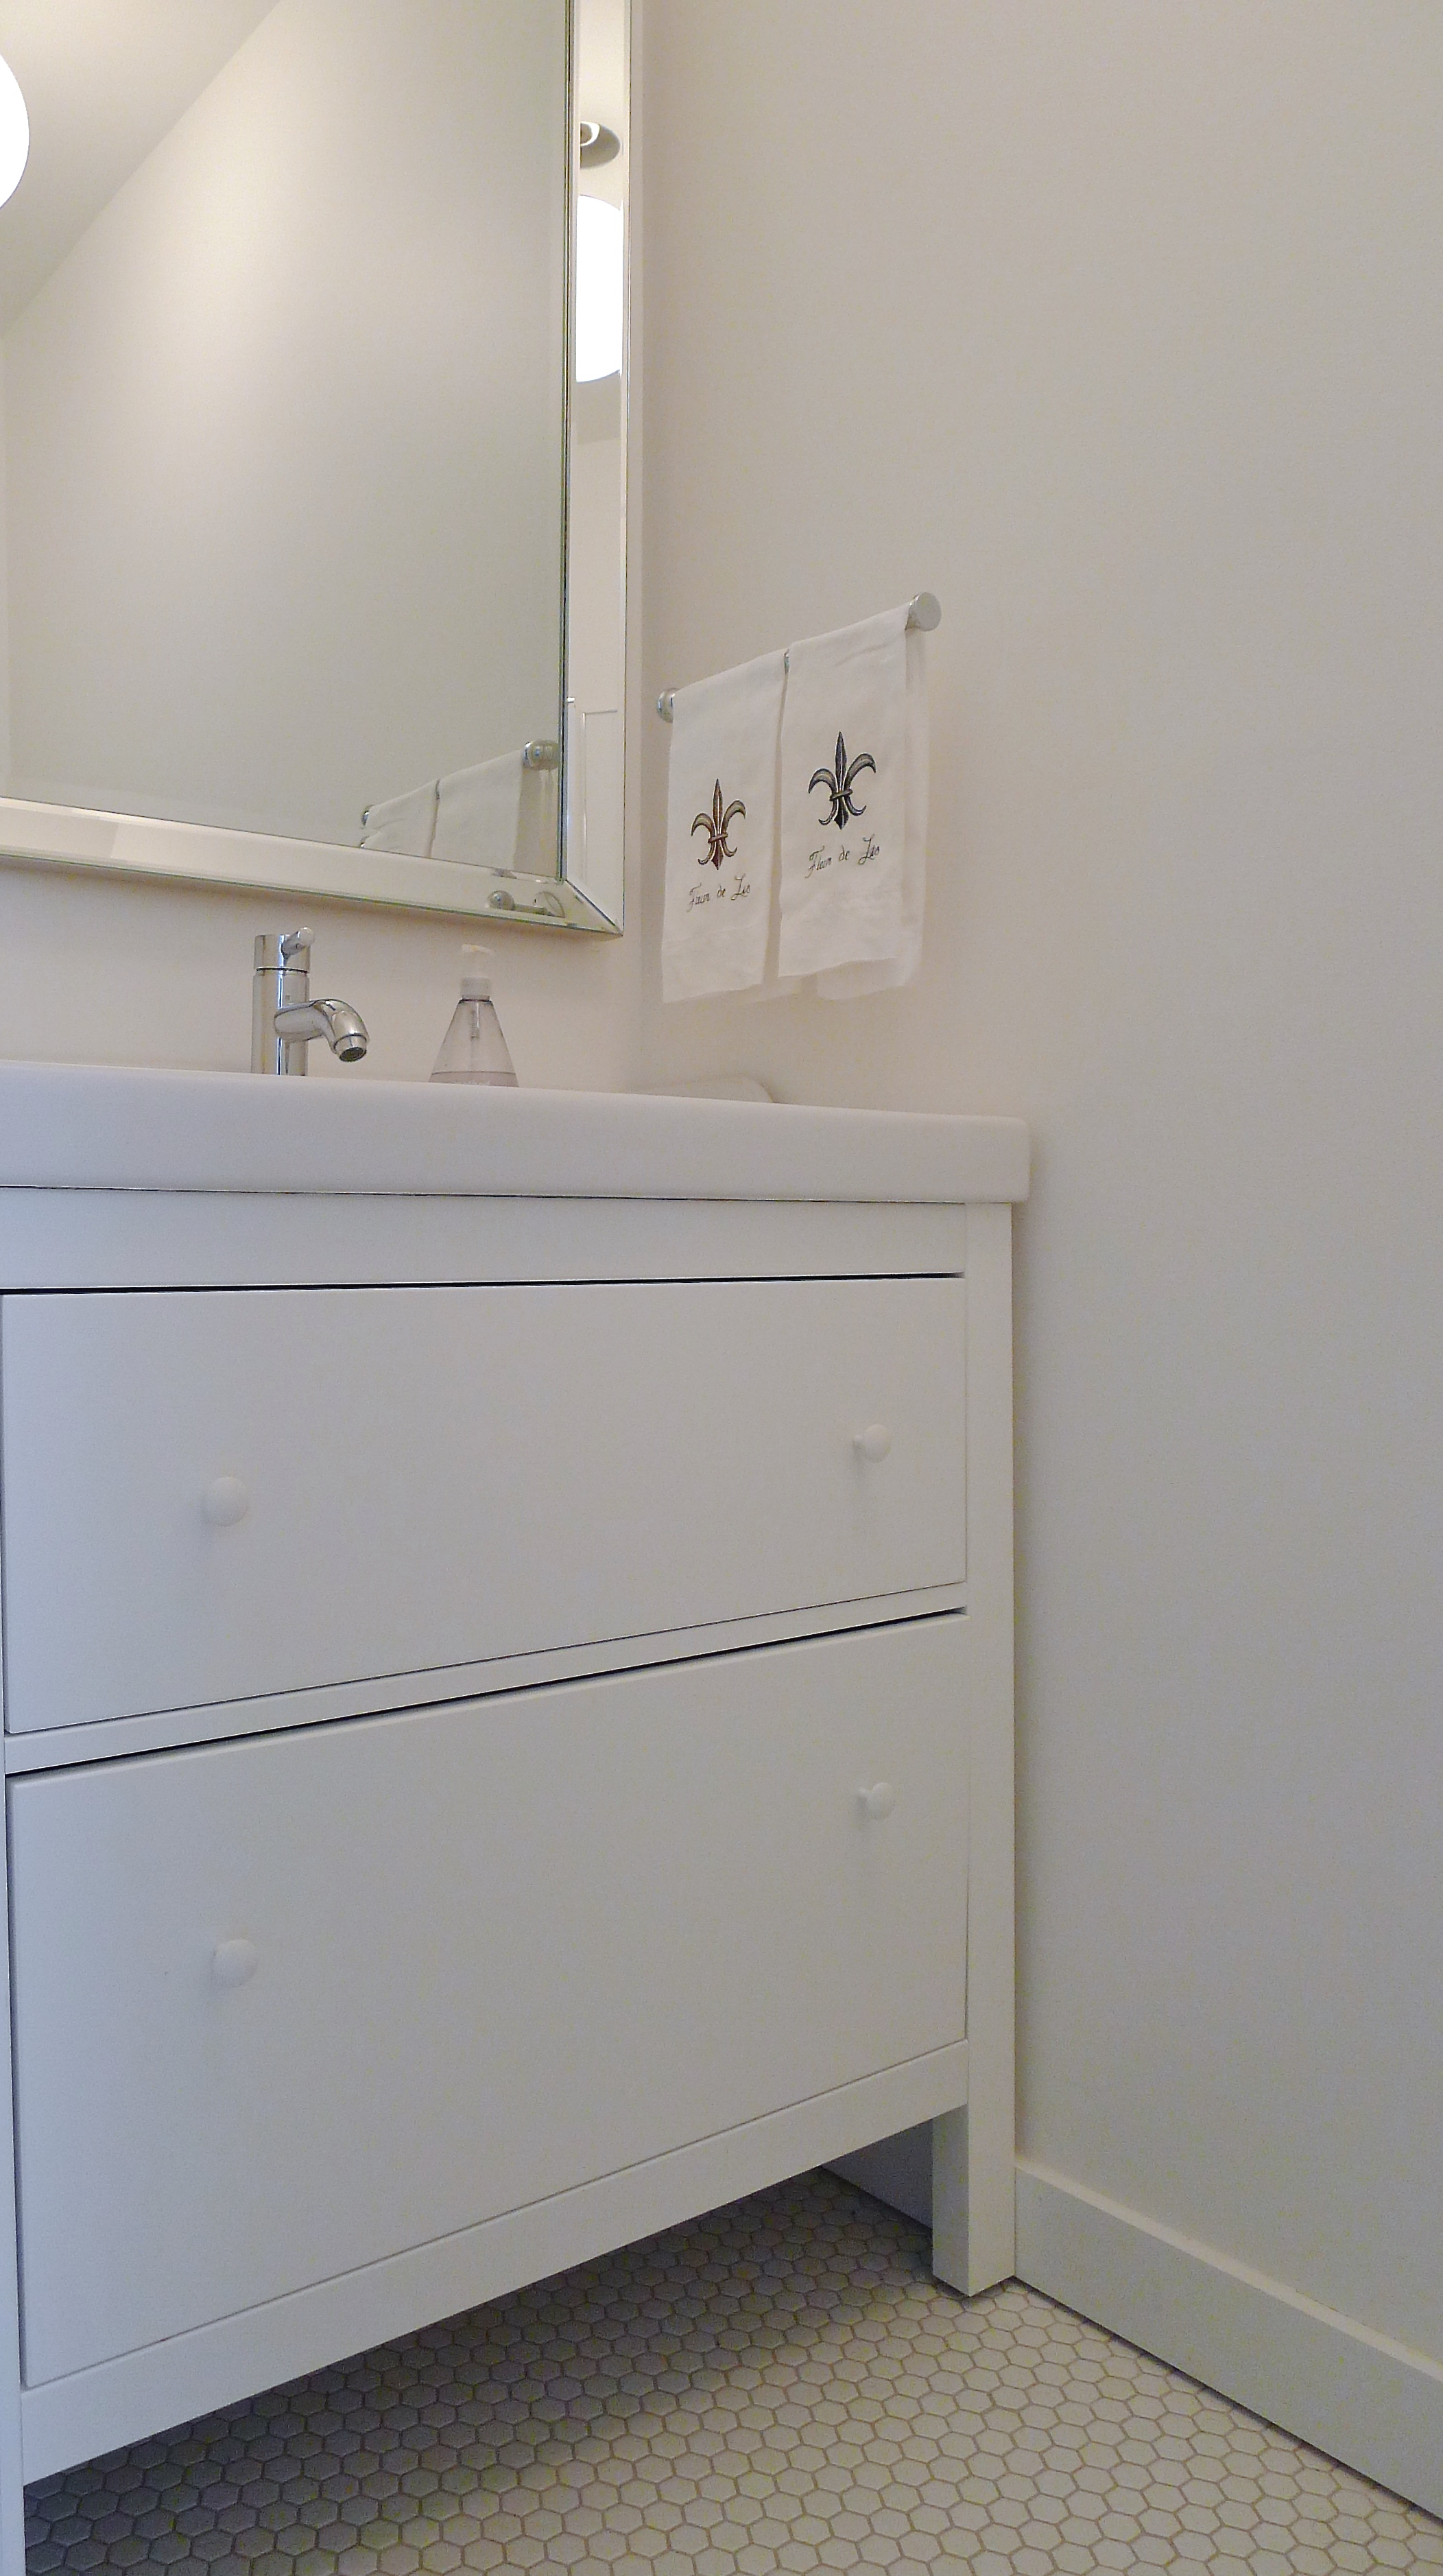
 I am so pleased with how this little room came together. Me and my family did the work ourselves, so the only cost was for supplies and fixtures. Little money, big impact. I especially love the floor in my powder room because I installed it myself. Who knew I would ever do such a thing!
Sources:
Tommy faucet – Delta c/o
cabinet & sink – IKEA
hex tiles – Twin City Tile
twin flush, energy efficient toilet – Costco
vintage Chanel poster – Les Puces flea market, Paris
mirror – HomeSense
towel bar – Umbra (it’s a paper towel holder)
linen towels – vintage
milk glass – vintage
light fixture – vintage
toilet roll holder – Bed Bath & Beyond
baseboards, light plates – Home Depot
Photos by me.
I know pink and red usually invade stores and homes at this time of year, but I really like the graphic black and white of this easy DIY.

via Oh Happy Day
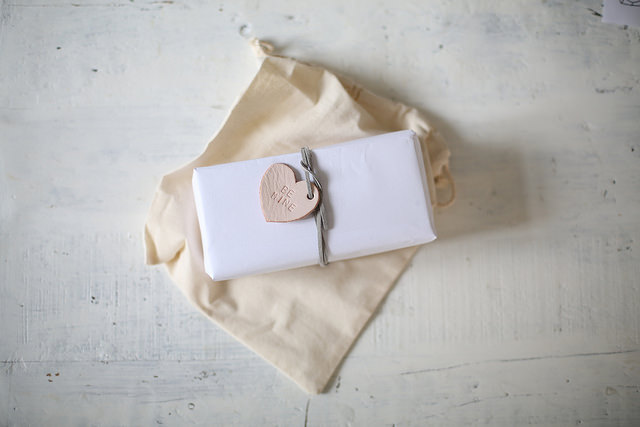
I love these sweet leather gift tags that Geneva (A Pair and A Spare) made:
Merry Christmas!
 DIY doily Christmas trees, Oui Oui Oui Studio
My life this fall has been slightly chaotic. Sometimes I do wonder why I decide to take on so much work and extracurricular and blogging activities. Why, oh why, do I do this to myself? Then I realize that I have so much fun doing what it is that I do that I have no reason to complain about my sometimes-overly-packed days. A couple of weeks ago, for example, I headed to Toronto to join the very colourful Tiffany Pratt and about 20 other bloggers and influencers to create a #HappiMess sponsored by Delta Faucet Canada. Here’s my recap in five points…
1. Delta Faucet Canada welcomed us into a very white event space at Andrew Richard Designs. The long white table was all set with artsy materials.

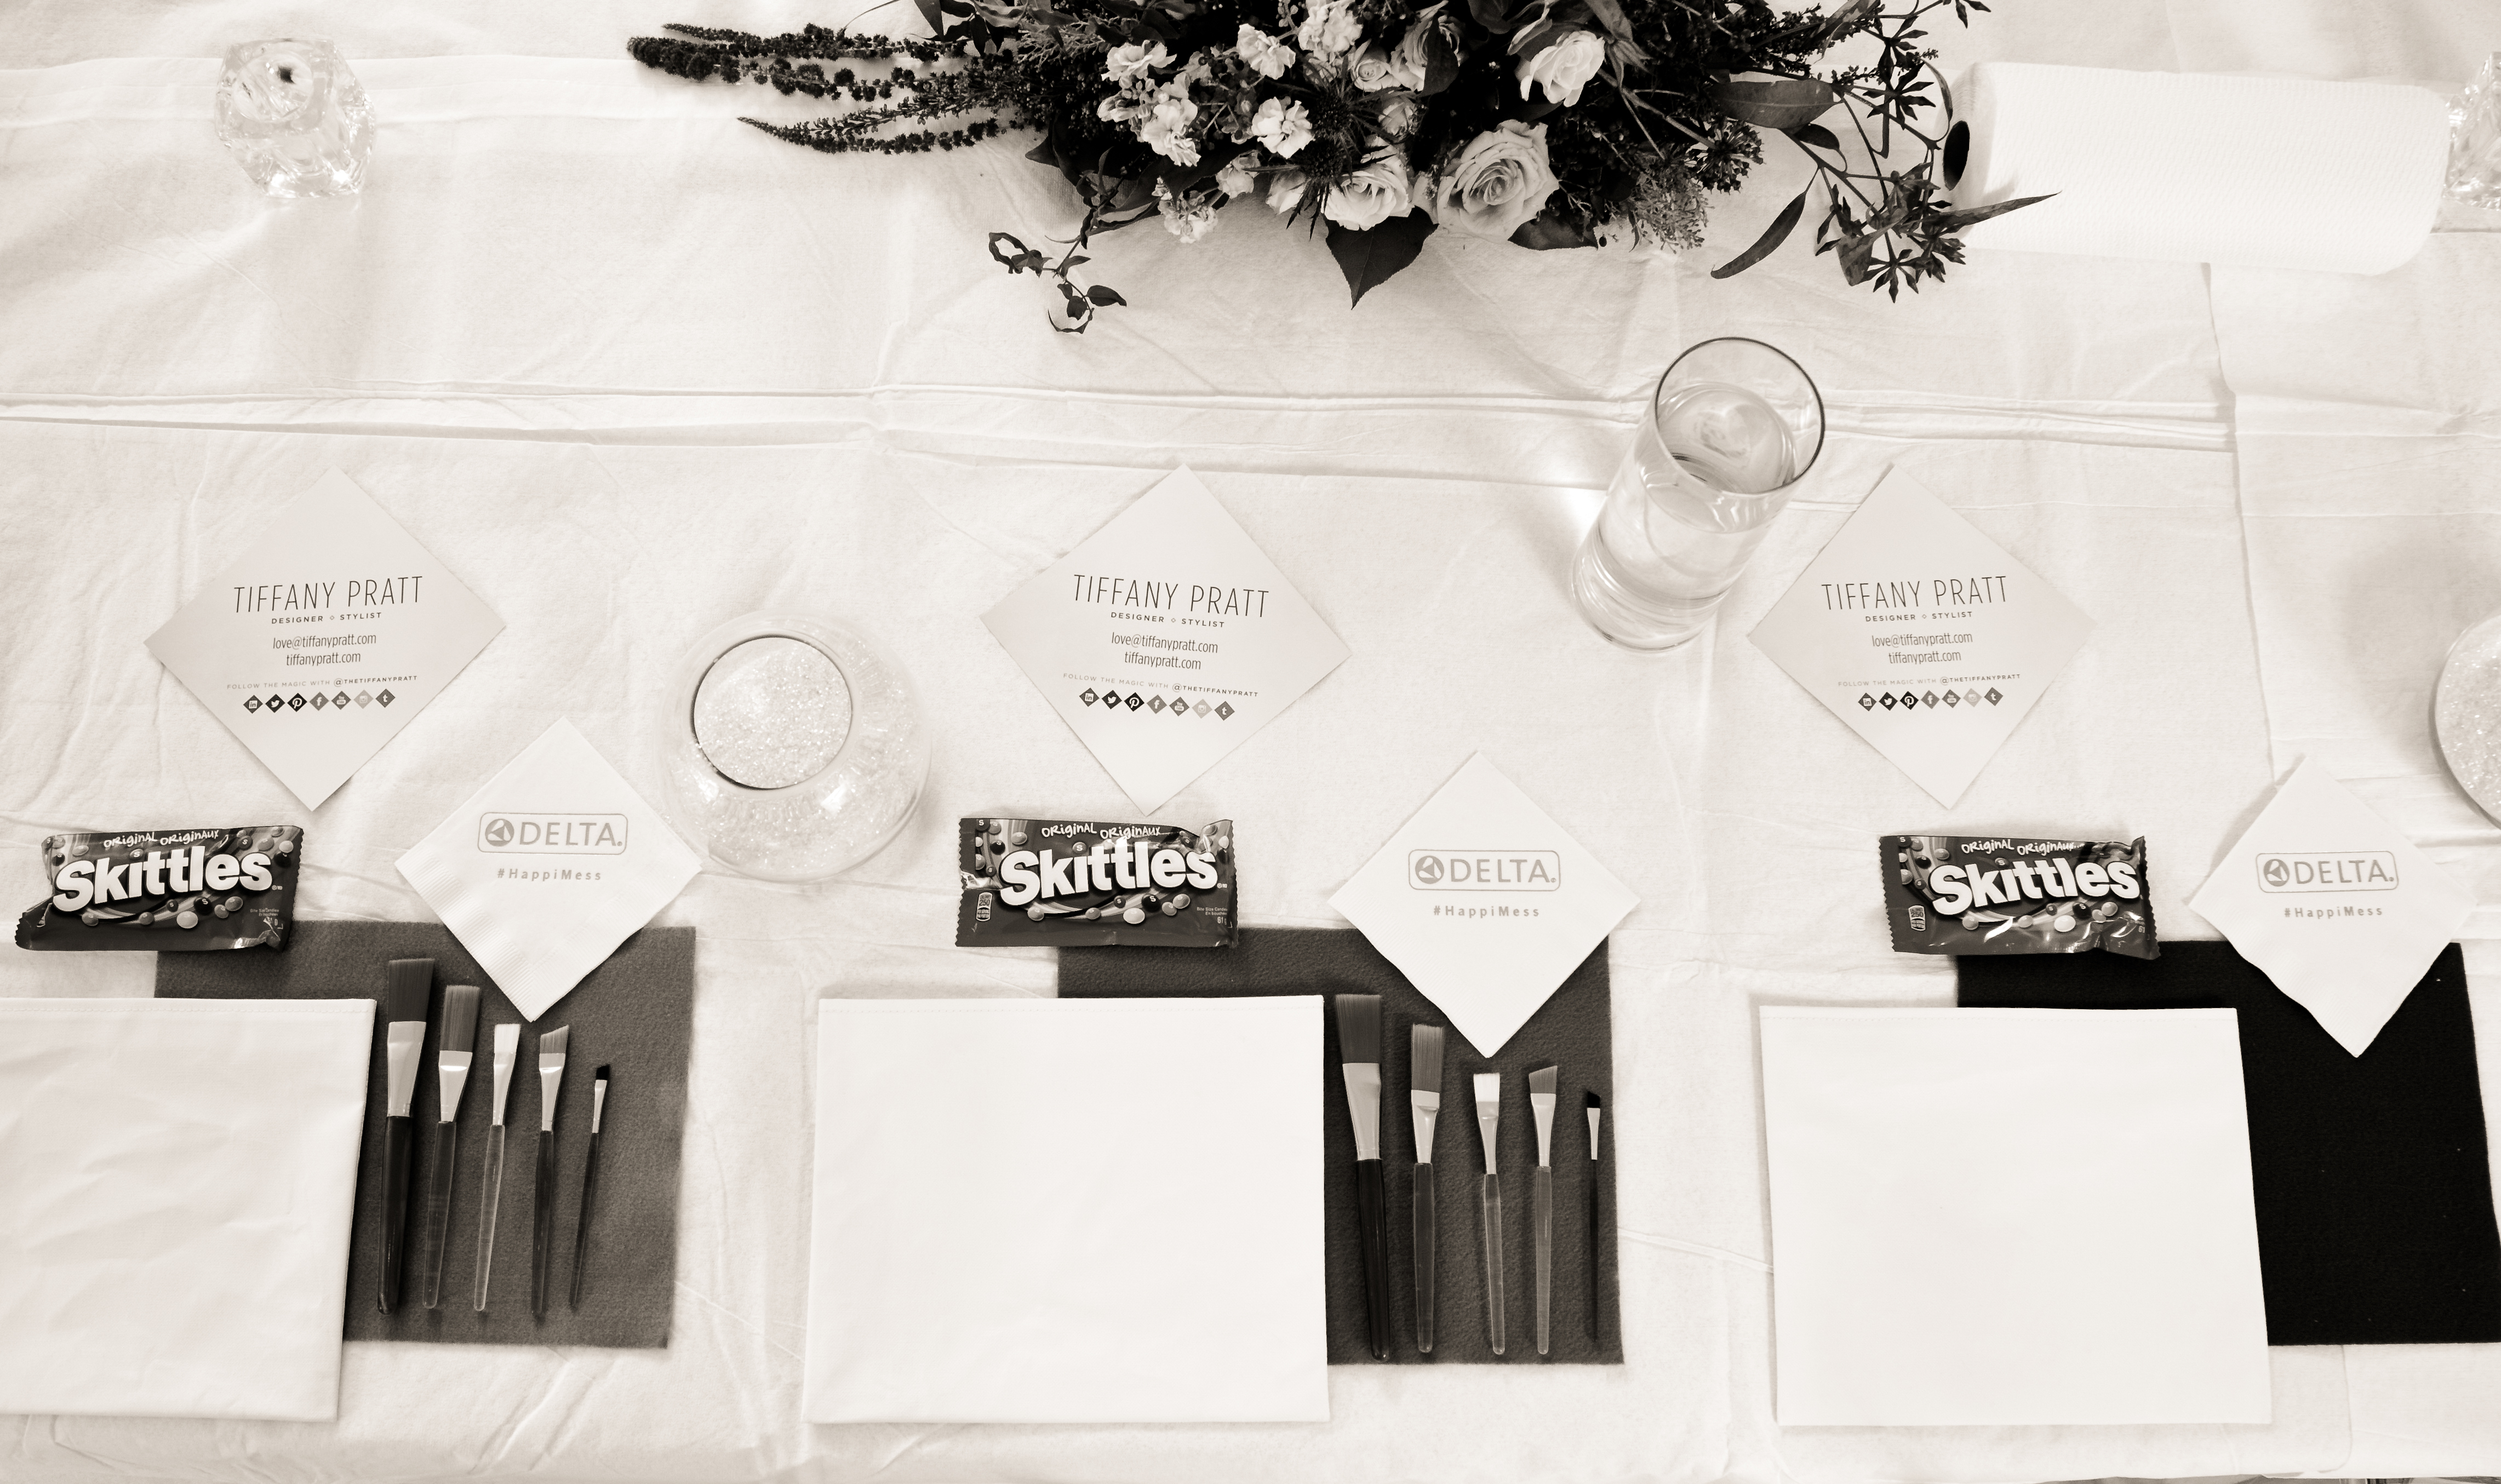
2. Tiffany encouraged us to create and paint and sparkle up a unique clutch. I was totally frozen when I saw the palette of colourful paints. Luckily, the Tiffany and the PR crew had a spare tube of black paint, and I put it to very good use. I definitely felt more at ease once the black paint made an appearance! (Thanks, team!)


That’s my clutch! (It sparkles more in real life!)
4. We mingled and laughed and played with paint. And then washed our hands…obviously. Here I am washing up (and pretending to be a hand model):
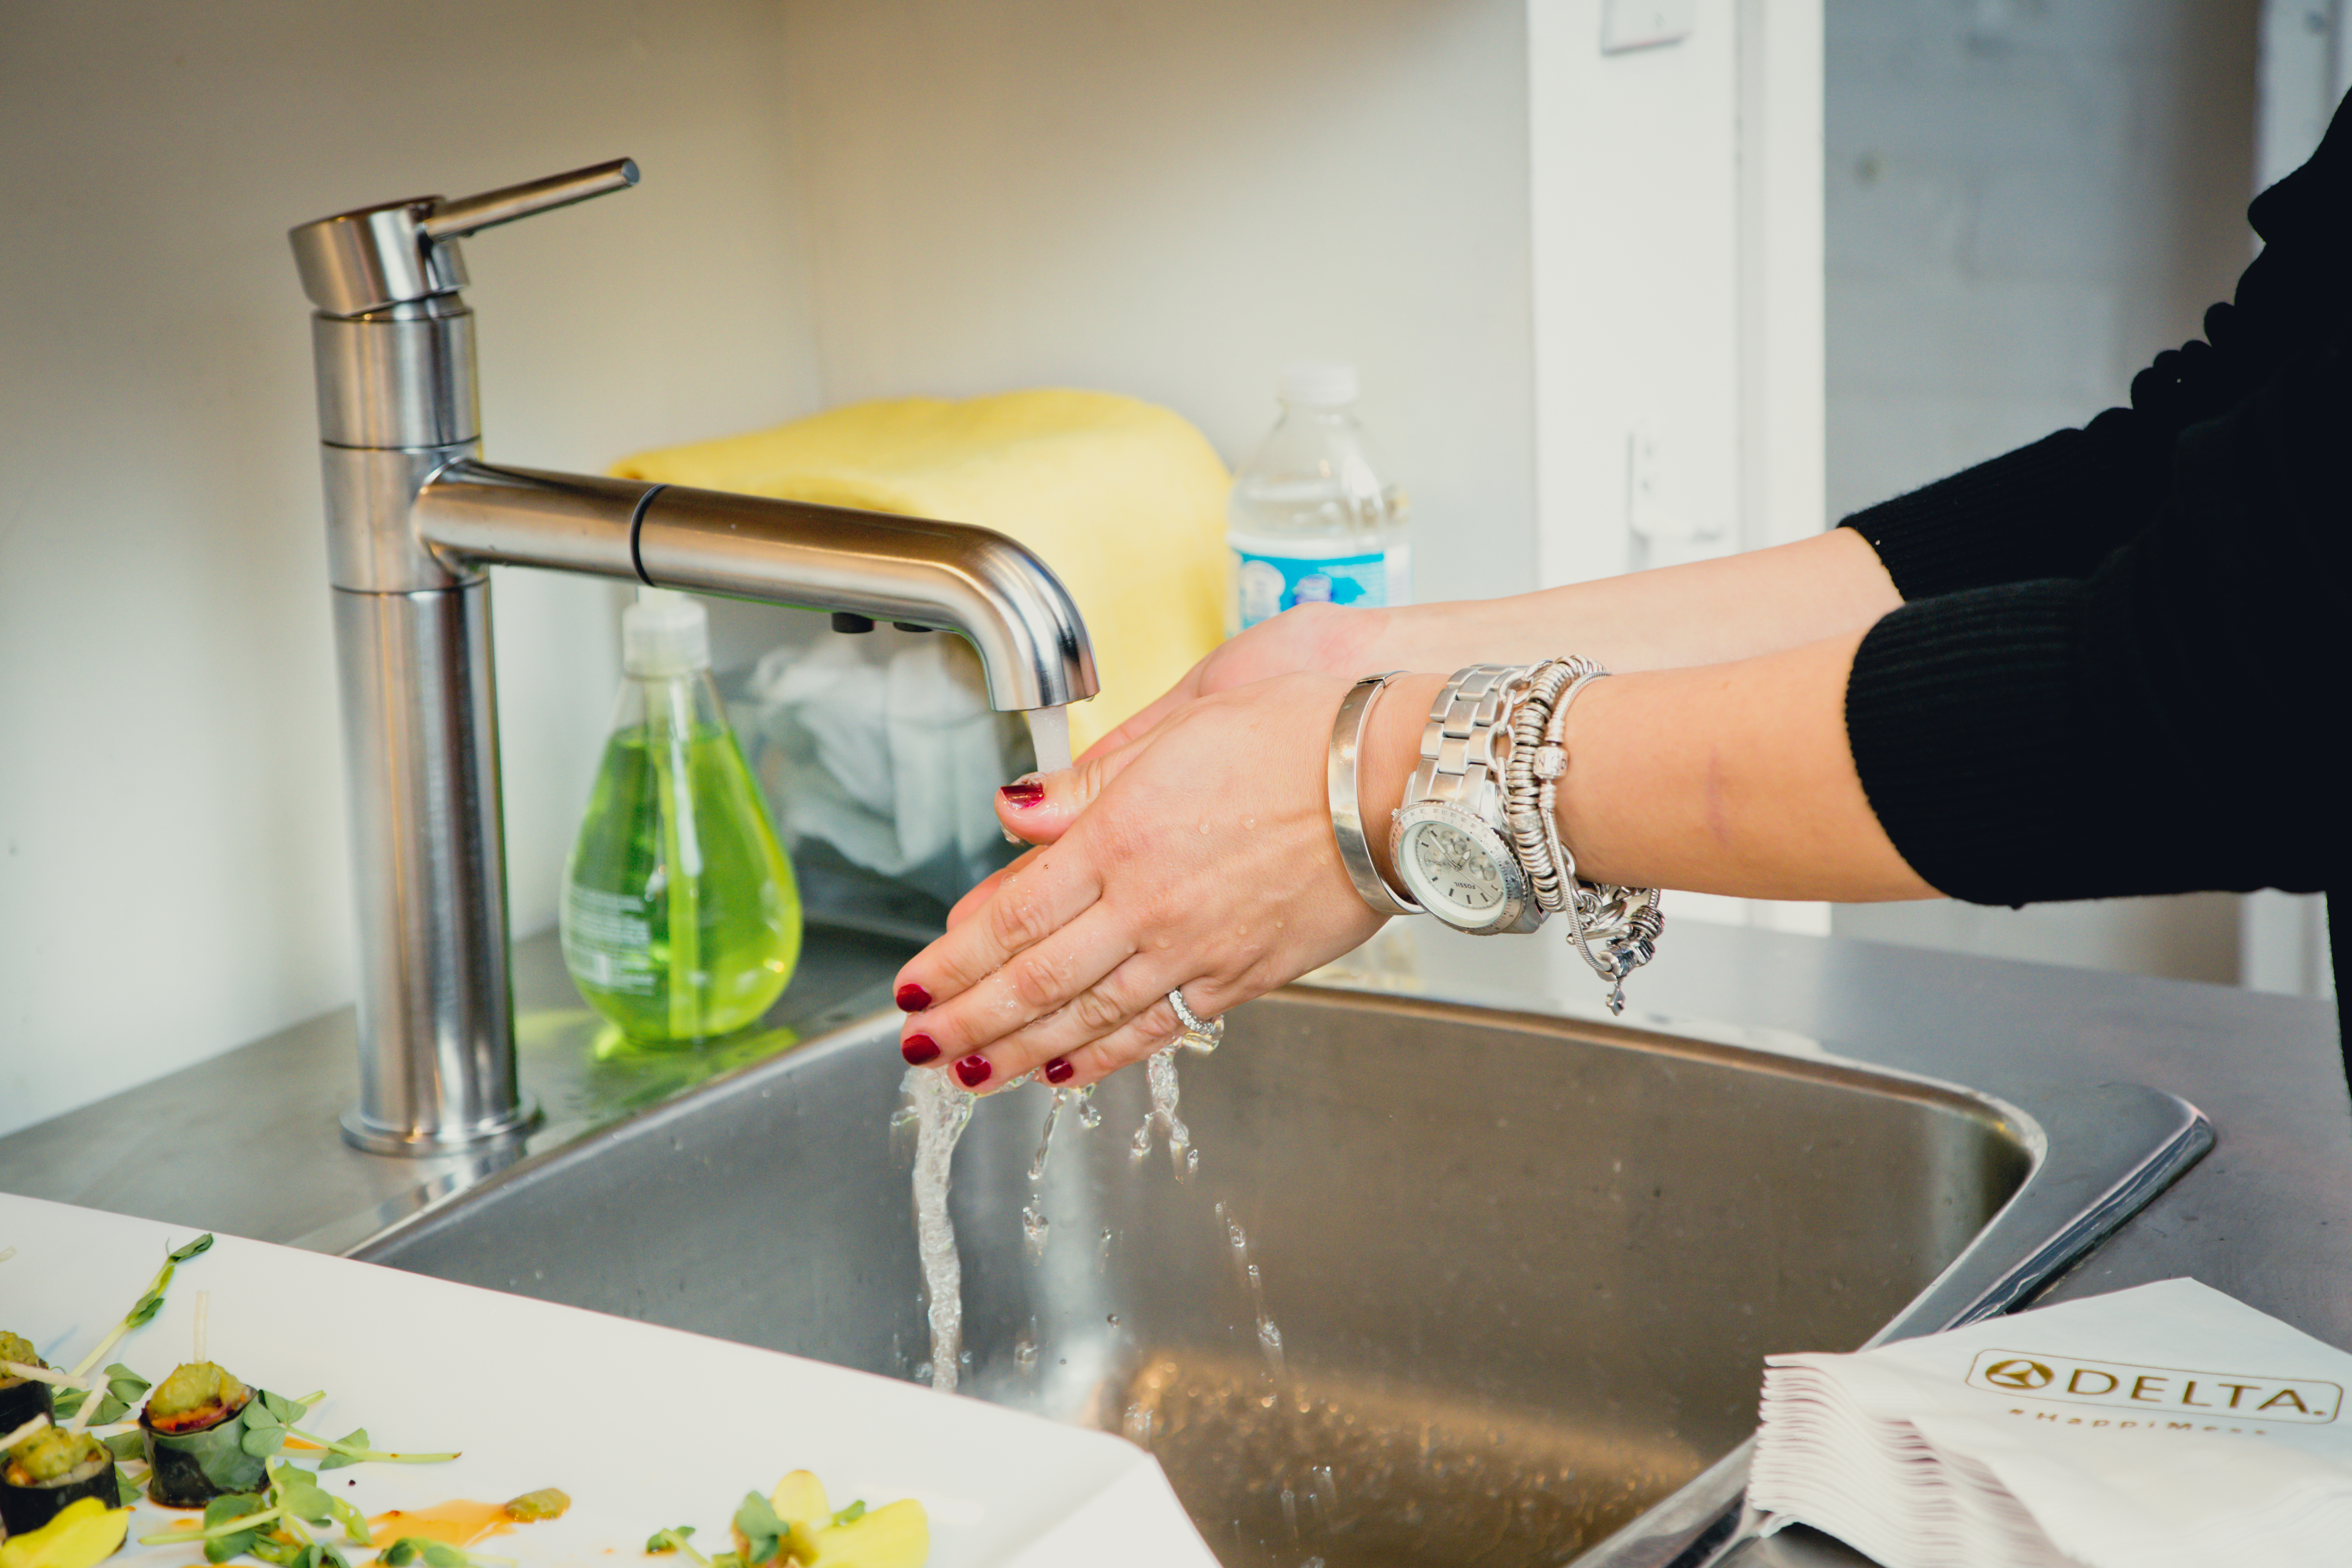

great faucet, right?
3. We nibbled on delicious eats by the Food Dudes and talked about Delta’s collection.
5. In addition to the painting, the clutches, the food, the drinks, and the Skittles, we filled our Instagram and Twitter feeds with photos of lovely flowers from Blush and Bloom.
It was a very fun evening, and completely different from my day-to-day university life. Kudos to Tiffany and Delta for bringing out our creative sides (and for showing us how magical sparkles can be!).
Have a wonderful weekend, everyone! Do let me know if you make a #HappiMess over the next couple of days!
Photo credit: Koko Photography
Seeing all the rust on my air conditioner unit, I really just wanted to bite the bullet and buy a shiny new one. But thinking about my bank account, I quickly realized that I didn’t want to spend a fortune on a new unit when mine, although rusty, worked perfectly fine. A couple of weeks ago, I bought a couple of cans of spray paint (I used Rustoleum), read this article sent to me by Hogg (thanks!), and got to work.

before: I muted the colours in this photo, and it’s still disgusting

before: the rust was horrible, the muted photo only provides a glimpse into the condition of the unit (this is perhaps the ugliest photo I’ve ever shared on my blog)
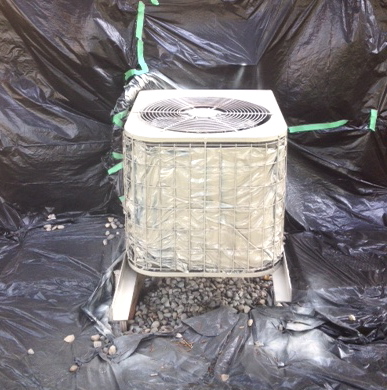
during: one coat of paint

after: rust has disappeared!

after: this looks like a brand new air conditioner
Here’s what I did:
1. I cleaned and scrubbed the unit with a CLR + water mixture. I then rinsed it off*.
2. While the unit was drying, I taped plastic bags on the wall surround and around all the pipes. I also unscrewed the top grate so I could cover the fans with plastic, and I weaved plastic in between the grate and the filter/fan/unit**.
3. When the unit was dry, I sprayed two coats of Rustoleum Tremclad rust paint*** (letting the paint dry in between coats) all over the unit and the rusty metal bars that hold it up.
4. When everything was dry, I removed all the plastic, and screwed the top grate back on. Done.
The project took about 3 hours from start to finish. I could have put on a 3rd coat of paint for fun, but I was too lazy (2 coats covered very well). I feel like I have a brand new unit, and the side of my house now looks so much more attractive!
* I would recommend scrubbing with a wire brush. I didn’t have one, so it took me a bit longer to scrub and chip the old rusty bits off the unit.
** I covered the fan and the filter parts with plastic, but I’m not entirely certain this was necessary.
*** I didn’t paint the unit white (big shock, right?). Instead, I chose a colour that matched the grout in between the bricks.
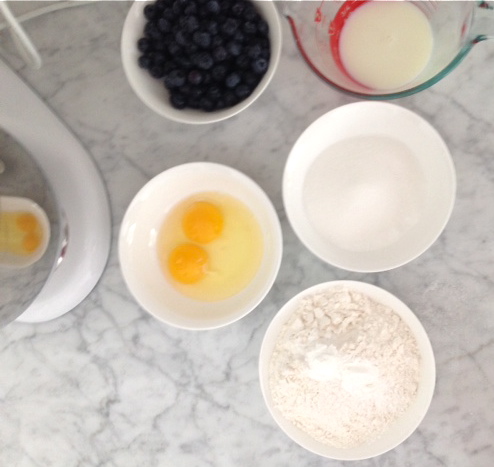
One of the first recipes I tried after my friend Johanne gave me Gwyneth Paltrow’s My Father’s Daughter a few years ago was Blythe’s blueberry muffins. I have been making them ever since because they’re so darn good and easy!
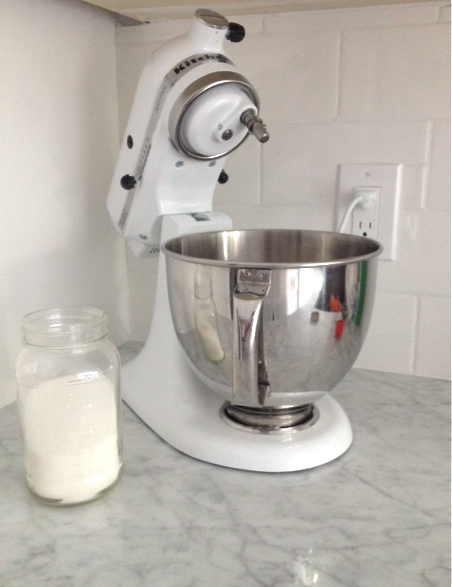
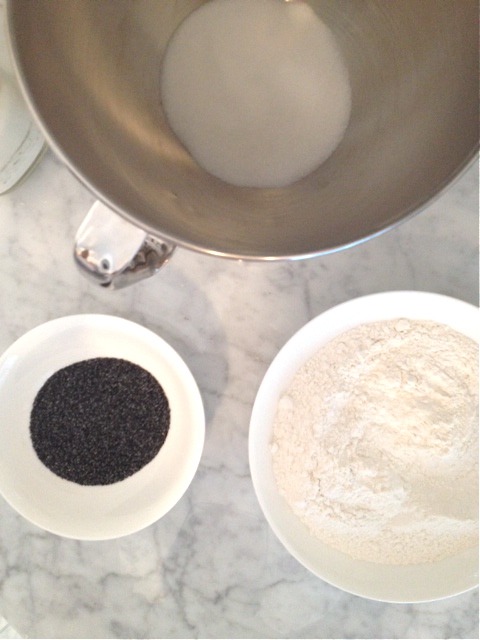
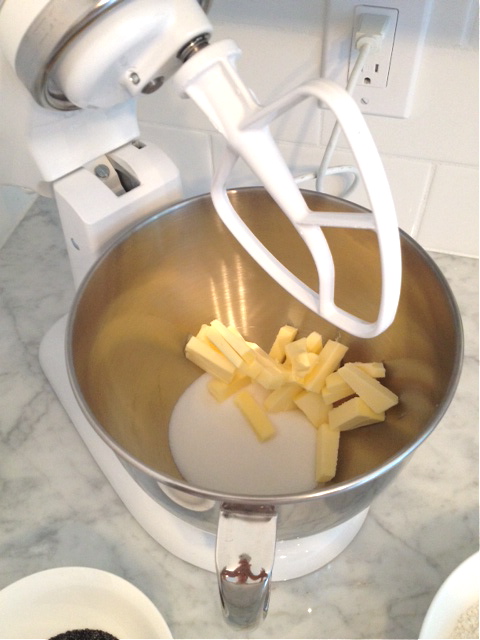
I recently gave them a try using my KitchenAid stand mixer. I didn’t really need to use the mixer, but I wanted to because I love it. Here’s how things turned out.
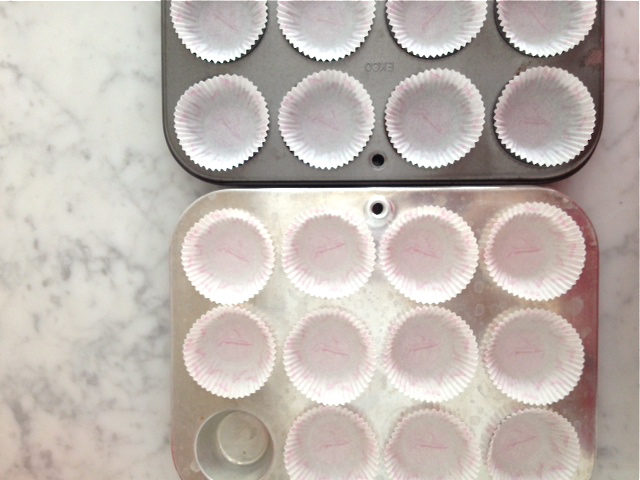
prepping the mini muffin tins

prepping the KA mixer
prepping the ingredients
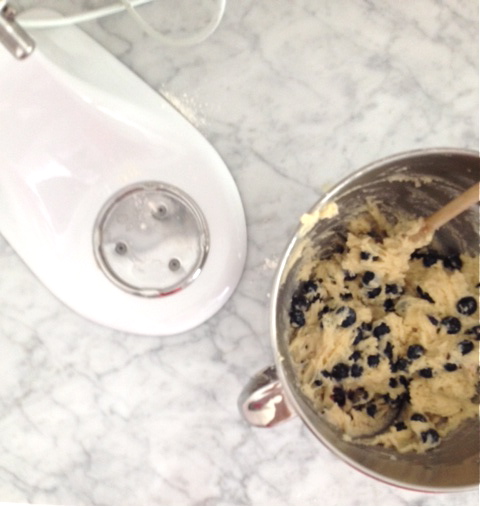
mixing everything together

fresh blueberry mini muffins – just in time for breakfast!
Here’s the recipe taken from Gwyneth Paltrow’s My Father’s Daughter:
Ingredients
1/2 cup unsalted butter, melted and cooled slightly
2 eggs (preferably organic)*
1/2 cup whole milk*
2 cups unbleached all-purpose flour
3/4 cup plus 1 tsp sugar, divided**
2 tsp baking powder
1/2 tsp salt
2 1/2 cups fresh blueberries
*I use whatever milk and eggs I have in my fridge.
**I always forget about the extra sugar, and I tend to under measure the sugar, especially in muffin recipes.
Directions
Heat oven to 375°. Line a 12-cup muffin tin with paper liners*. Whisk butter, eggs, and milk in a bowl. Combine flour, 3/4 cup sugar, baking powder, and salt in another bowl. Stir wet ingredients into dry ingredients***; fold in blueberries. Divide batter evenly among muffin cups; spring with remaining 1 tsp sugar. Bake until muffins are golden brown and a knife comes out clean, 25 to 30 minutes. Serve warm.
*I often use mini muffin tins, and I think I can usually get 24 mini muffins and 8 regular sized muffins with one batch of the recipe.
**I threw everything in the mixer at almost the same time, and the muffins still baked perfectly.
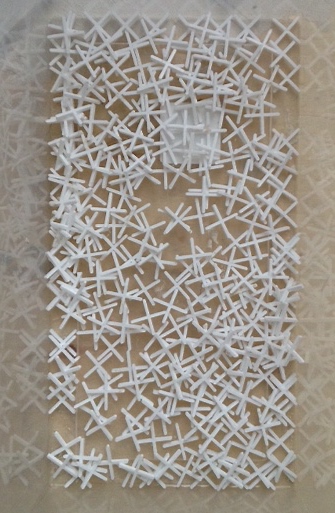
My big bathroom was a disaster when I moved in to my house last year, but I knew I couldn’t spend a whole lot of money on a full bathroom reno. Instead, I opted to make minor, but high-impact changes, to the space. I ripped off the silvery wallpaper (ugh!), painted out the wood trim on the 80s vanity, installed a new countertop and over-mount sink, and replaced the faucet, mirror, and lighting. I also cleaned the heck out of everything. The renos definitely improved the space, but the grey/cream linoleum flooring and the grey tub and tile surround were distracting. Rather than trying to change these things, I decided to create a high-impact gallery wall to divert people’s (and my) attention. I think it’s working, too!
I’ve been slowly filling in my Rorschach-inspired gallery wall as I come across frames of different sizes in thrift stores, yard sales, and stores. When I’m out and about, I try to find frames that might fit an empty space on the wall. When I have a few frames, I start painting the inkblots. And then I hang them where I feel they might look best (I only created one extra mistake hole so far…yay). I can be quite impatient so I didn’t wait until I had all the frames/art to start hanging them up. I constantly add to the wall. Here’s what it looks like now:
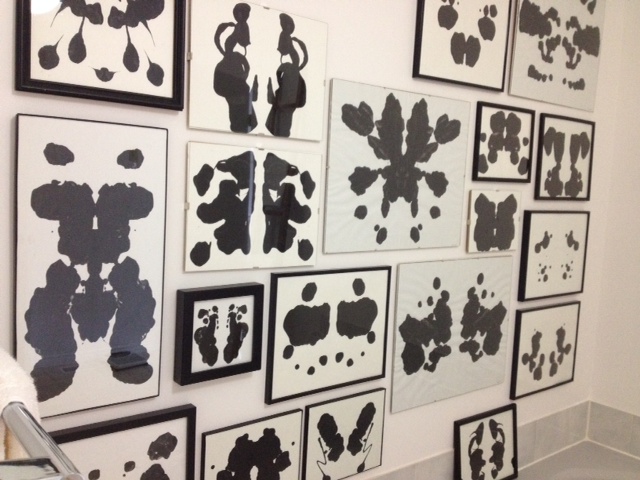
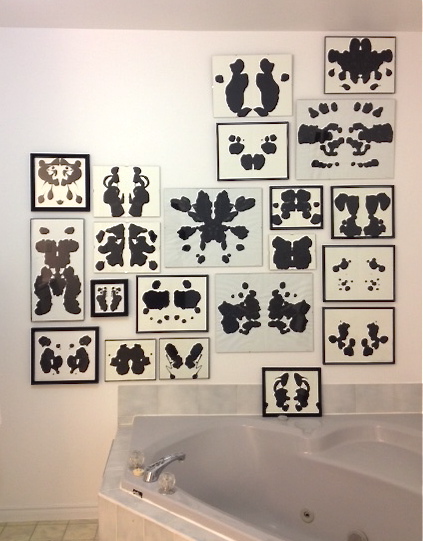
The upper left corner still needs to be filled in. Other than that, the wall is just about done.
Making inkblot art is super easy. Here’s my step-by-step process:
1. Find a frame (I only use black frames or borderless frame).
2. Cut a piece of white paper to fit inside of the frame. (I tend to use bristol board because it’s strong and thick and the paint won’t seep through.)
3. Fold paper in half.
4. Plop/drip/spread gobs of black paint on one half of the paper (I use artist’s acrylic paint, but craft paint from a dollar store also works fine).
5. Refold the paper in half.
6. Rub your hand over the folded paper. Smoosh the paint around through the paper.
7. Unfold the paper. (I love this step!)
8. Surprise! What do you see? (This is the best part!)
9. Let the paint dry.
10. Frame your art.
What do you think? Do your eyes – or your brain – hurt from staring at the wall too long? What do you see in the inkblots on my wall?
I’m sensing that we’ll be seeing a lot more hair pin legs in homes, magazines, and blogs over the next few months. The tables are light, sturdy, and can work in almost any space.
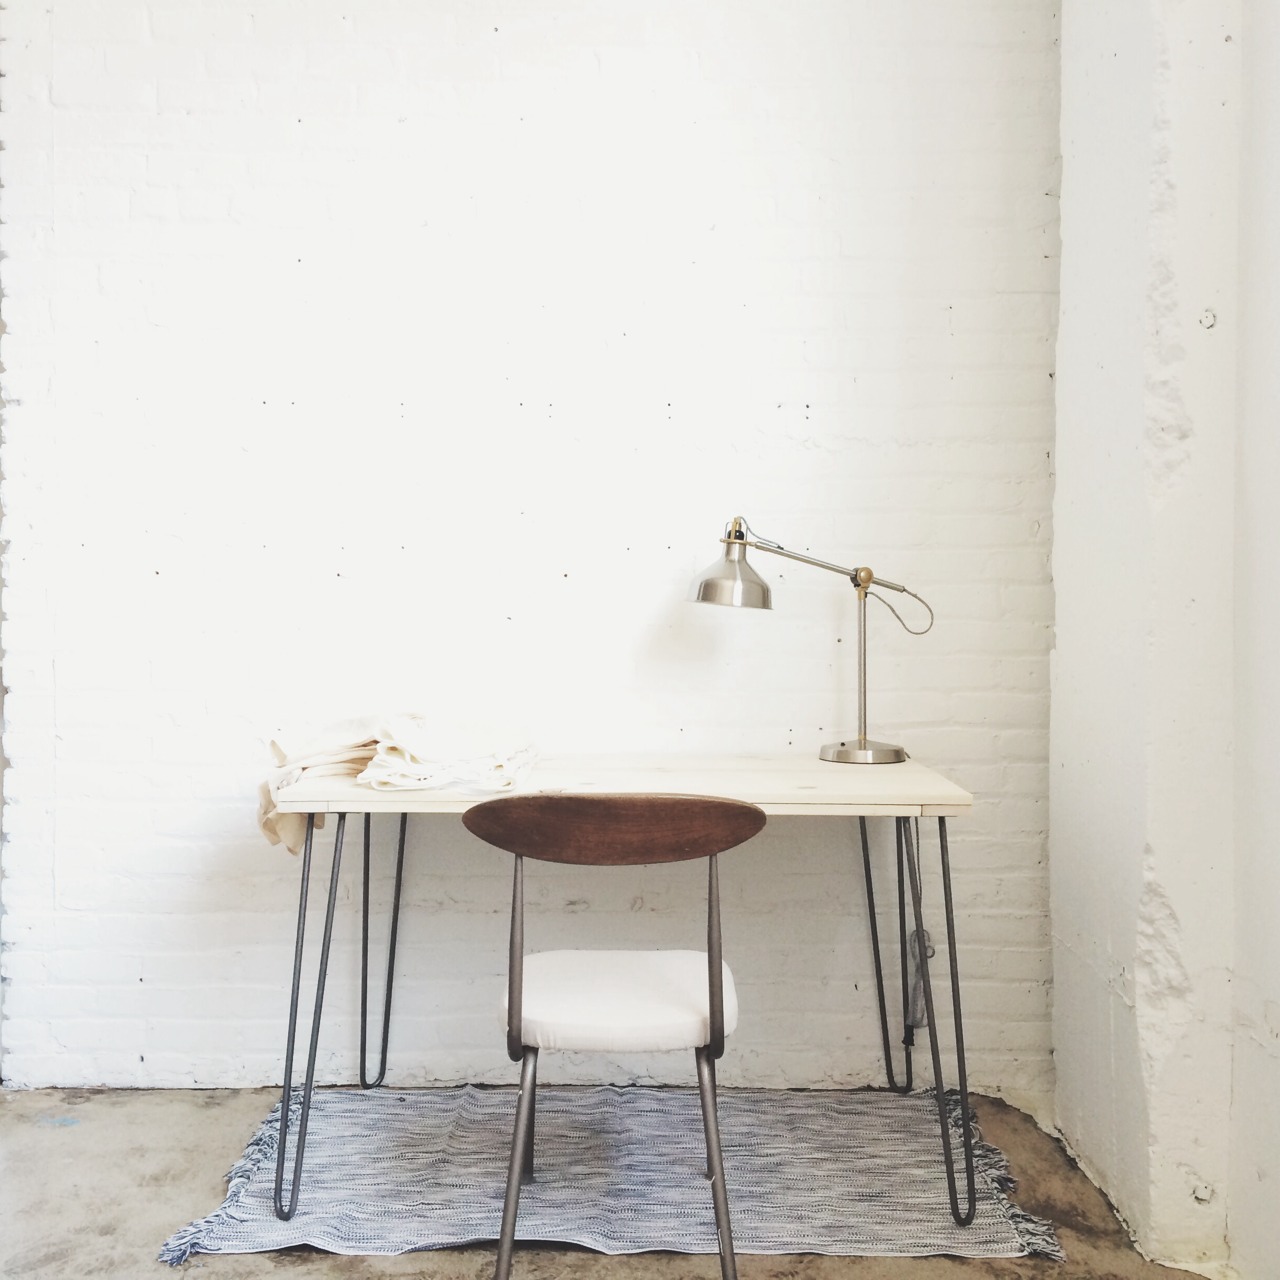 via Hackwith Happenings
 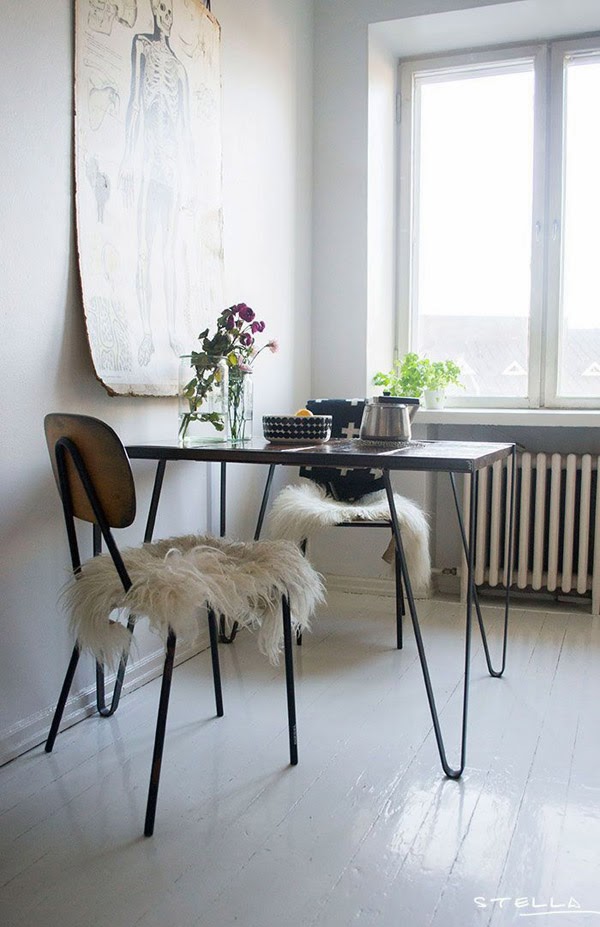 via Stella
 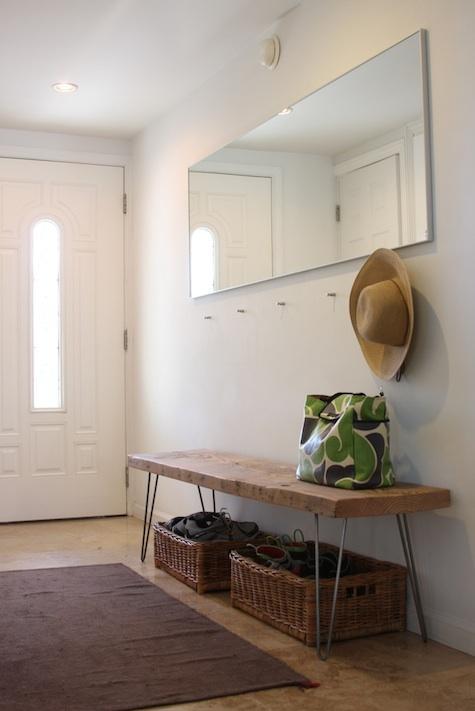 via kriselkeeper
  via West Elm
  via 1stDibs
 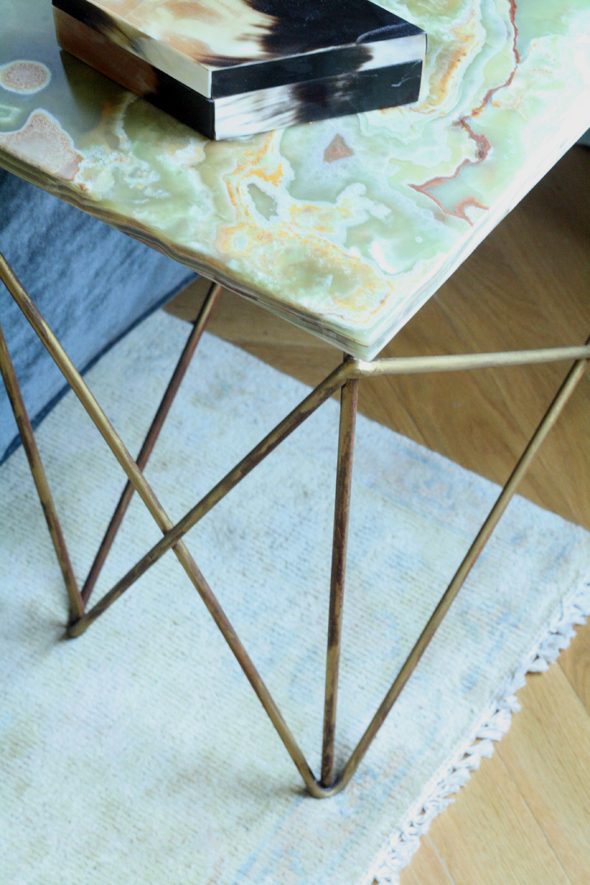 DIY version via Little Green Notebook
  via ABC Carpet & Home
  via 1stDibs
  via Candelabra
Remember when I first attempted making fresh pasta with my KitchenAid stand mixer and pasta attachments? I started with the recipe that was in the KitchenAid recipe book. I failed. It was horrible. I then tried out my mom’s very vague recipe and it worked perfectly. Well, some of my family members thought I shouldn’t have been so harsh on the KitchenAid recipe and that, surely, it was my fault and I did something wrong. (I followed the recipe exactly, but noone seemed to want to take my side.) Anyway, when my parents were over last weekend, I tried the KA recipe again (under my mom’s supervision). The recipe calls for: 4 large eggs, 3.5 cups all-purpose flour, and 1 tbsp water. My mom suggested that I reduce the amount of flour by 1/2 a cup. So I did. I followed the exact recipe but I only used 3 cups of flour. I let the stand mixer do its job, and me and my mom watched over the bowl. I could tell something wasn’t right. After a bit of mixing, I dumped the dough out onto the counter and I knew it wasn’t right. It didn’t feel like it was supposed to feel. My mom was pretty surprised (“but you followed the recipe, you reduced the flour”, she said). At this point, I added a bit more water, then a lot more water, then more flour. It wasn’t coming together the way it should have. I gave up. I left my mom to knead the dough for maybe another 5-10 minutes. There was a lot of kneading involved. In the meantime, I started a new batch with her trusted (and very vague) recipe. It worked out perfectly. She was still kneading the original batch of dough, while I was done with my new batch. 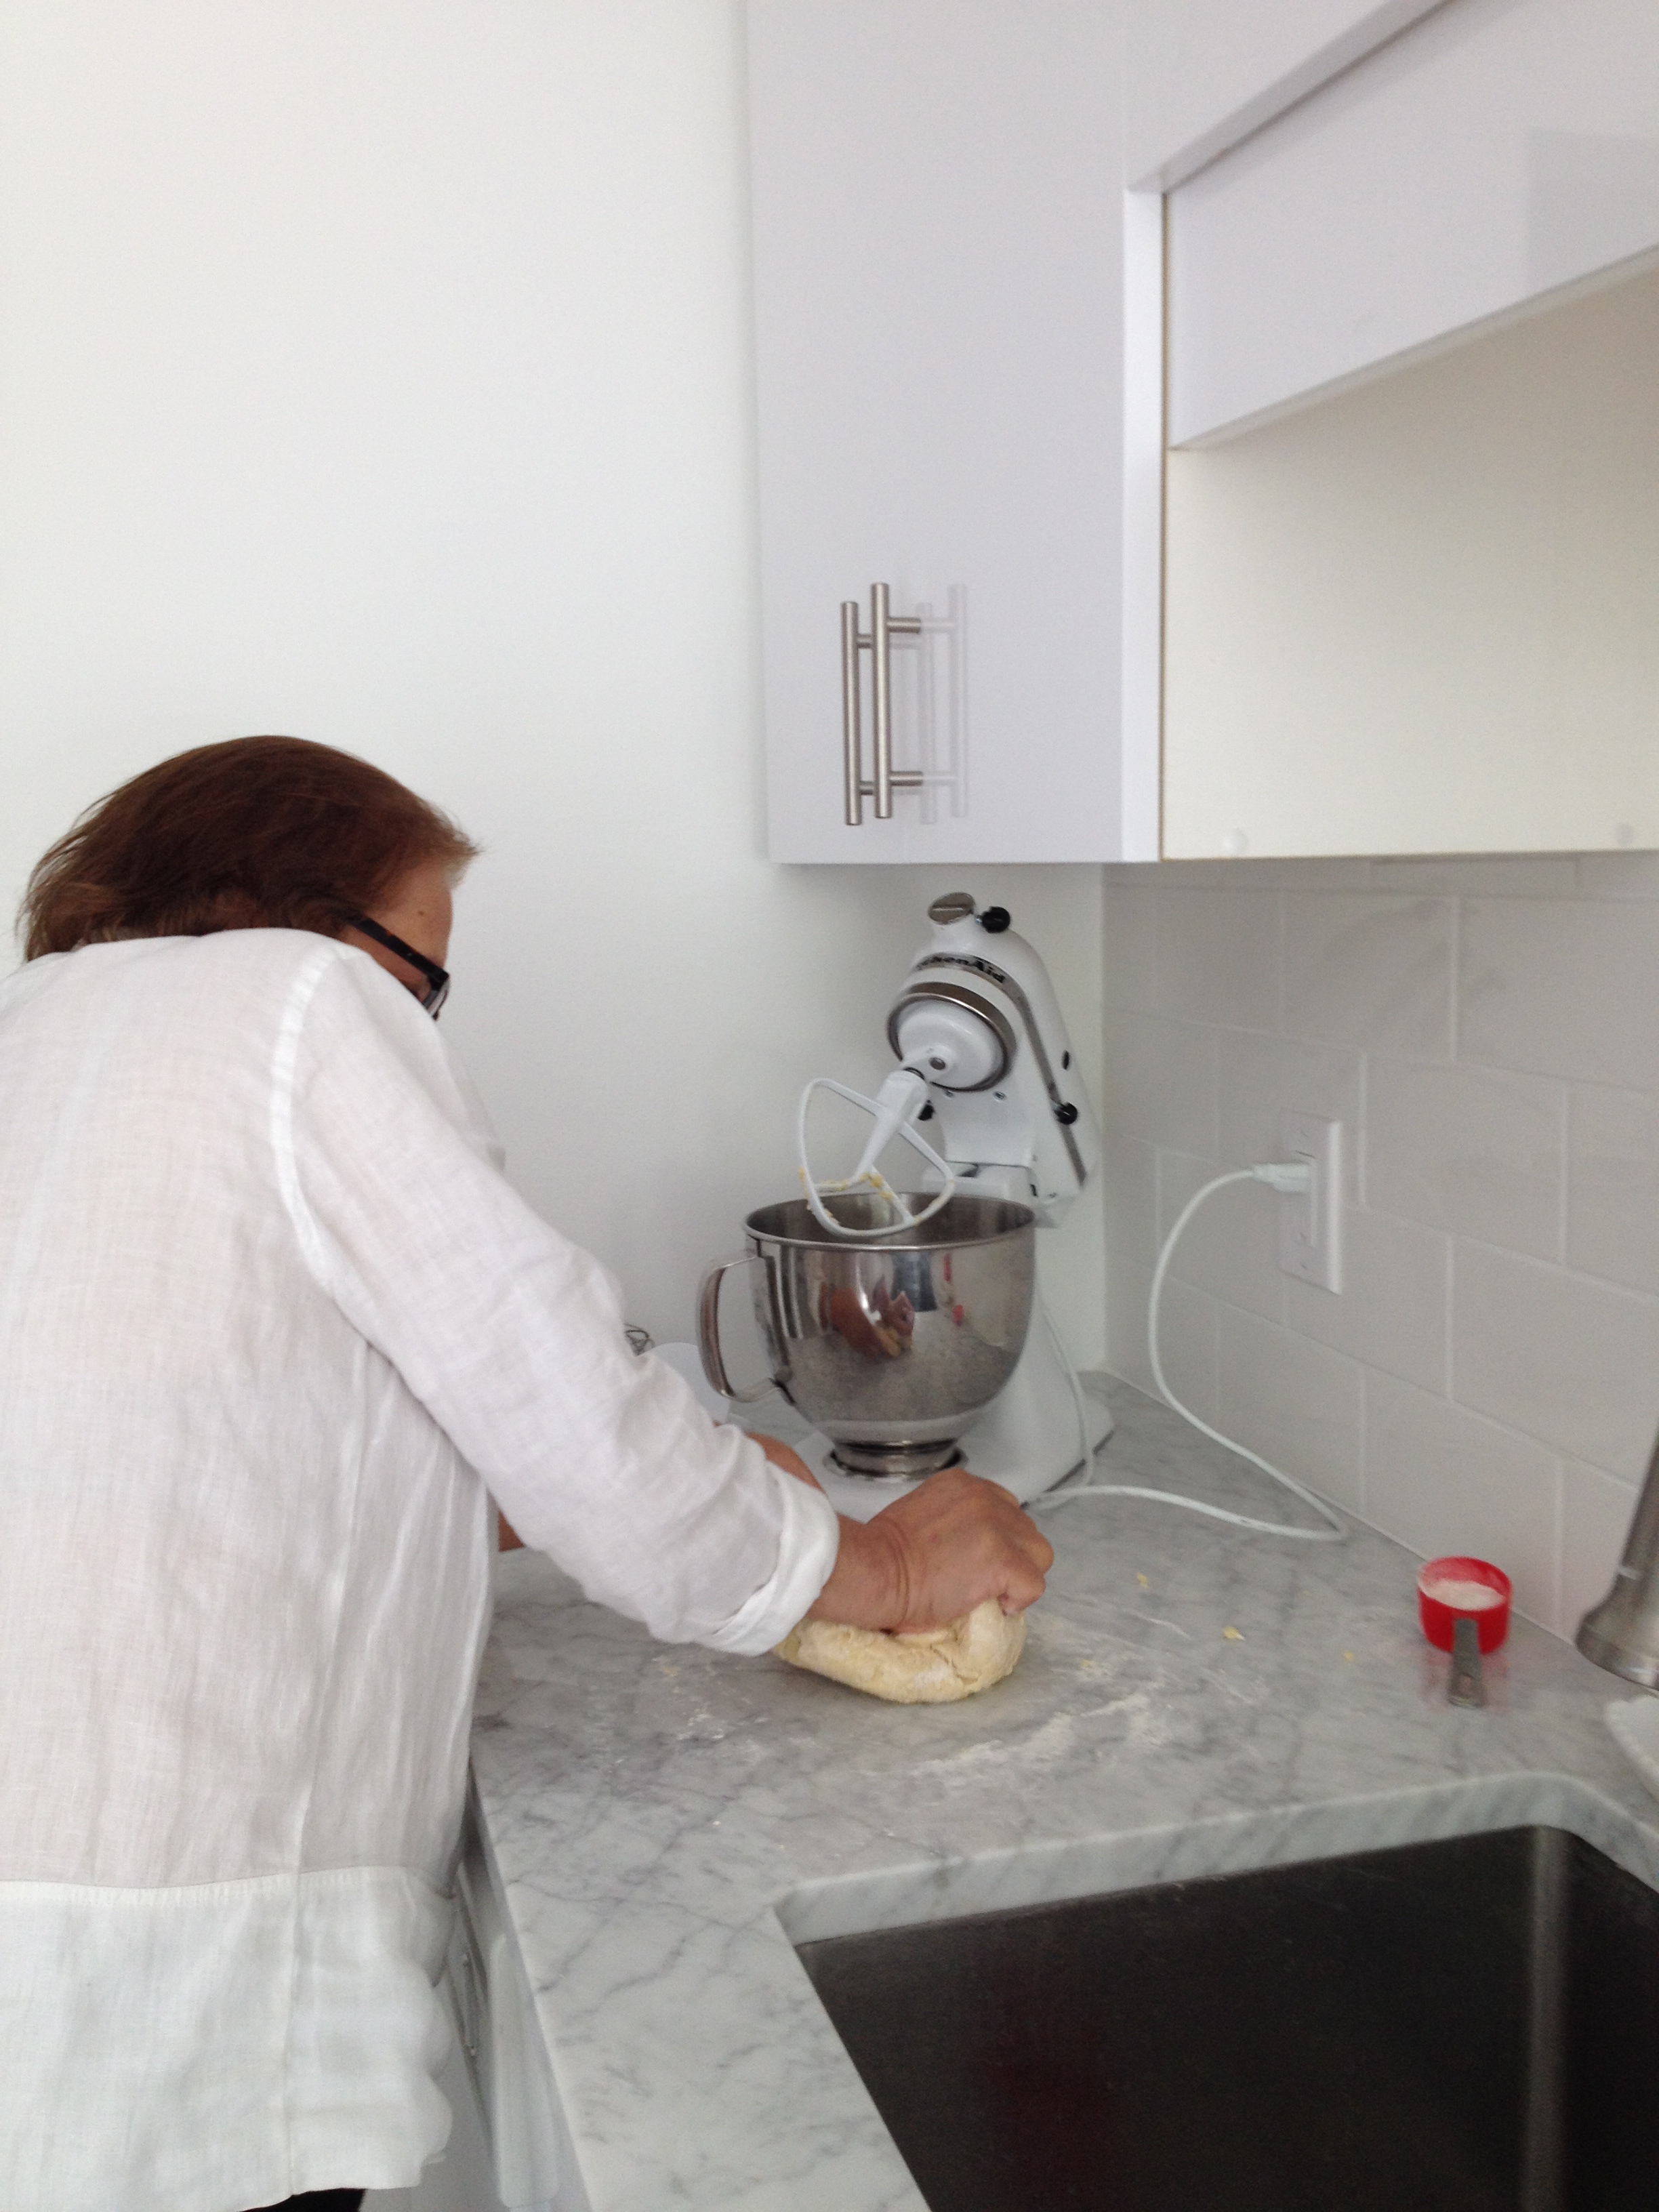
here’s mom hard at work 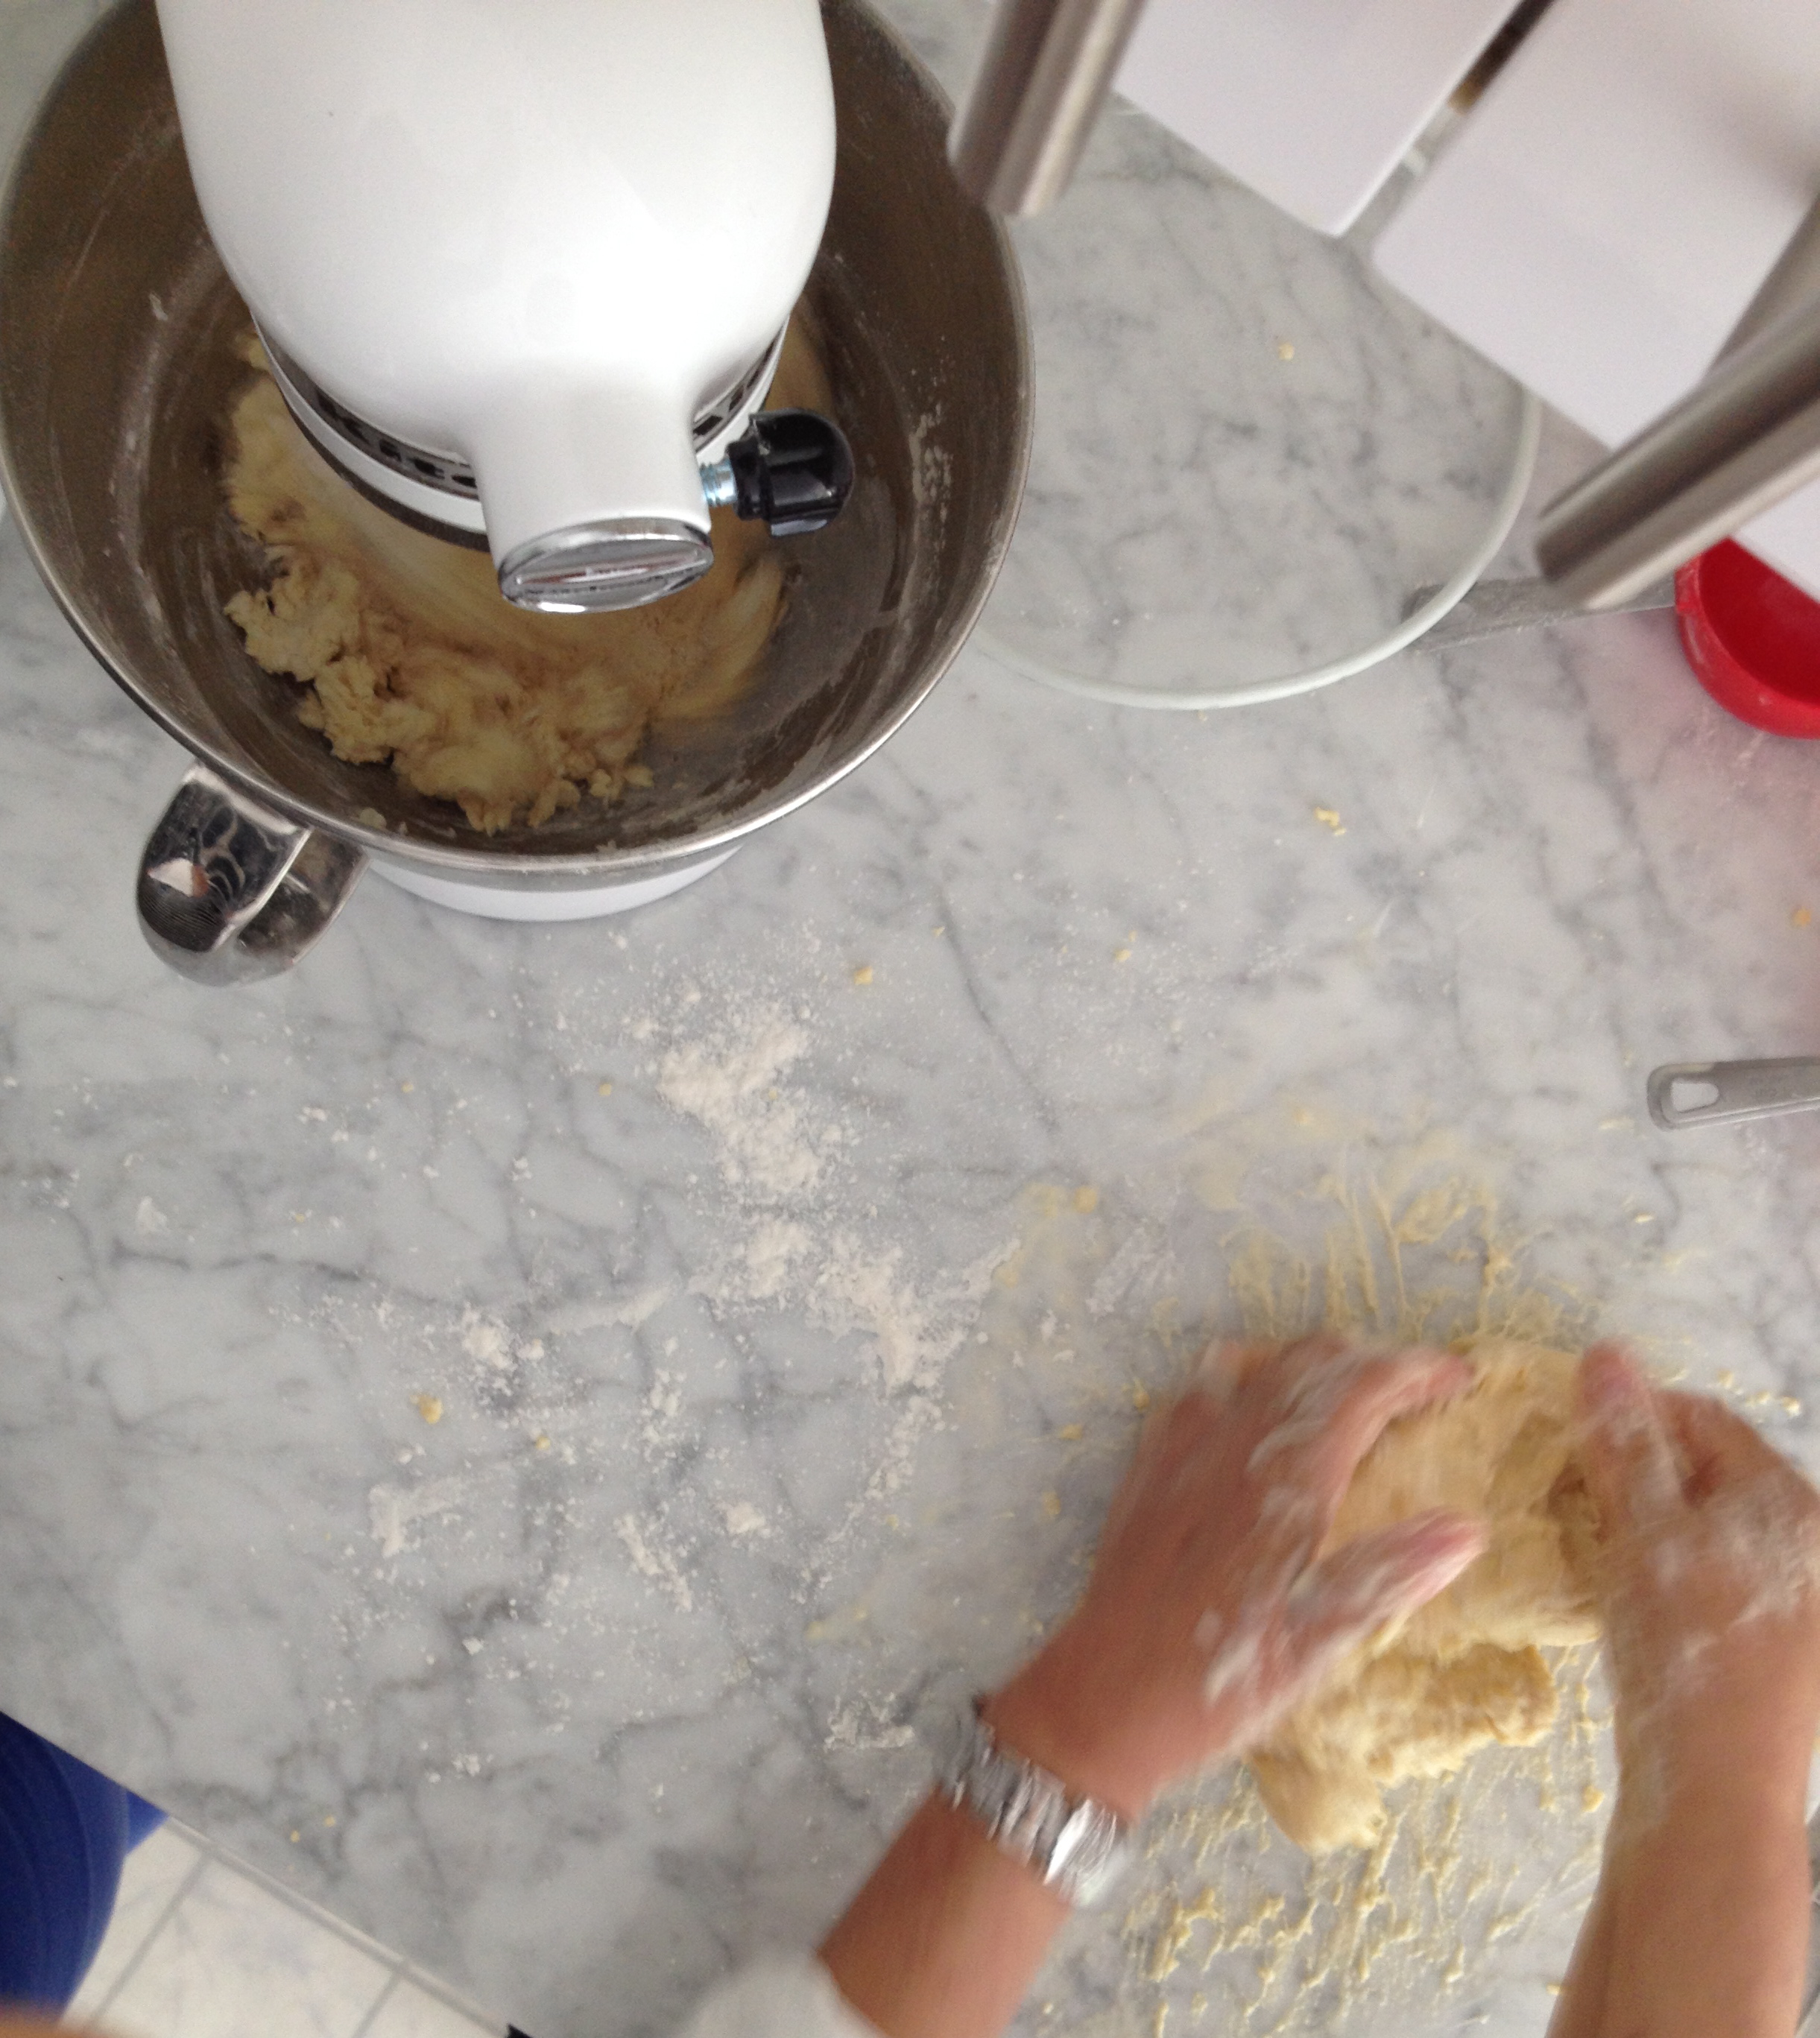
here’s mom still trying to fix the broken dough, my new version is in the mixer

dough 2.0 is done and mom is still kneading dough 1.0
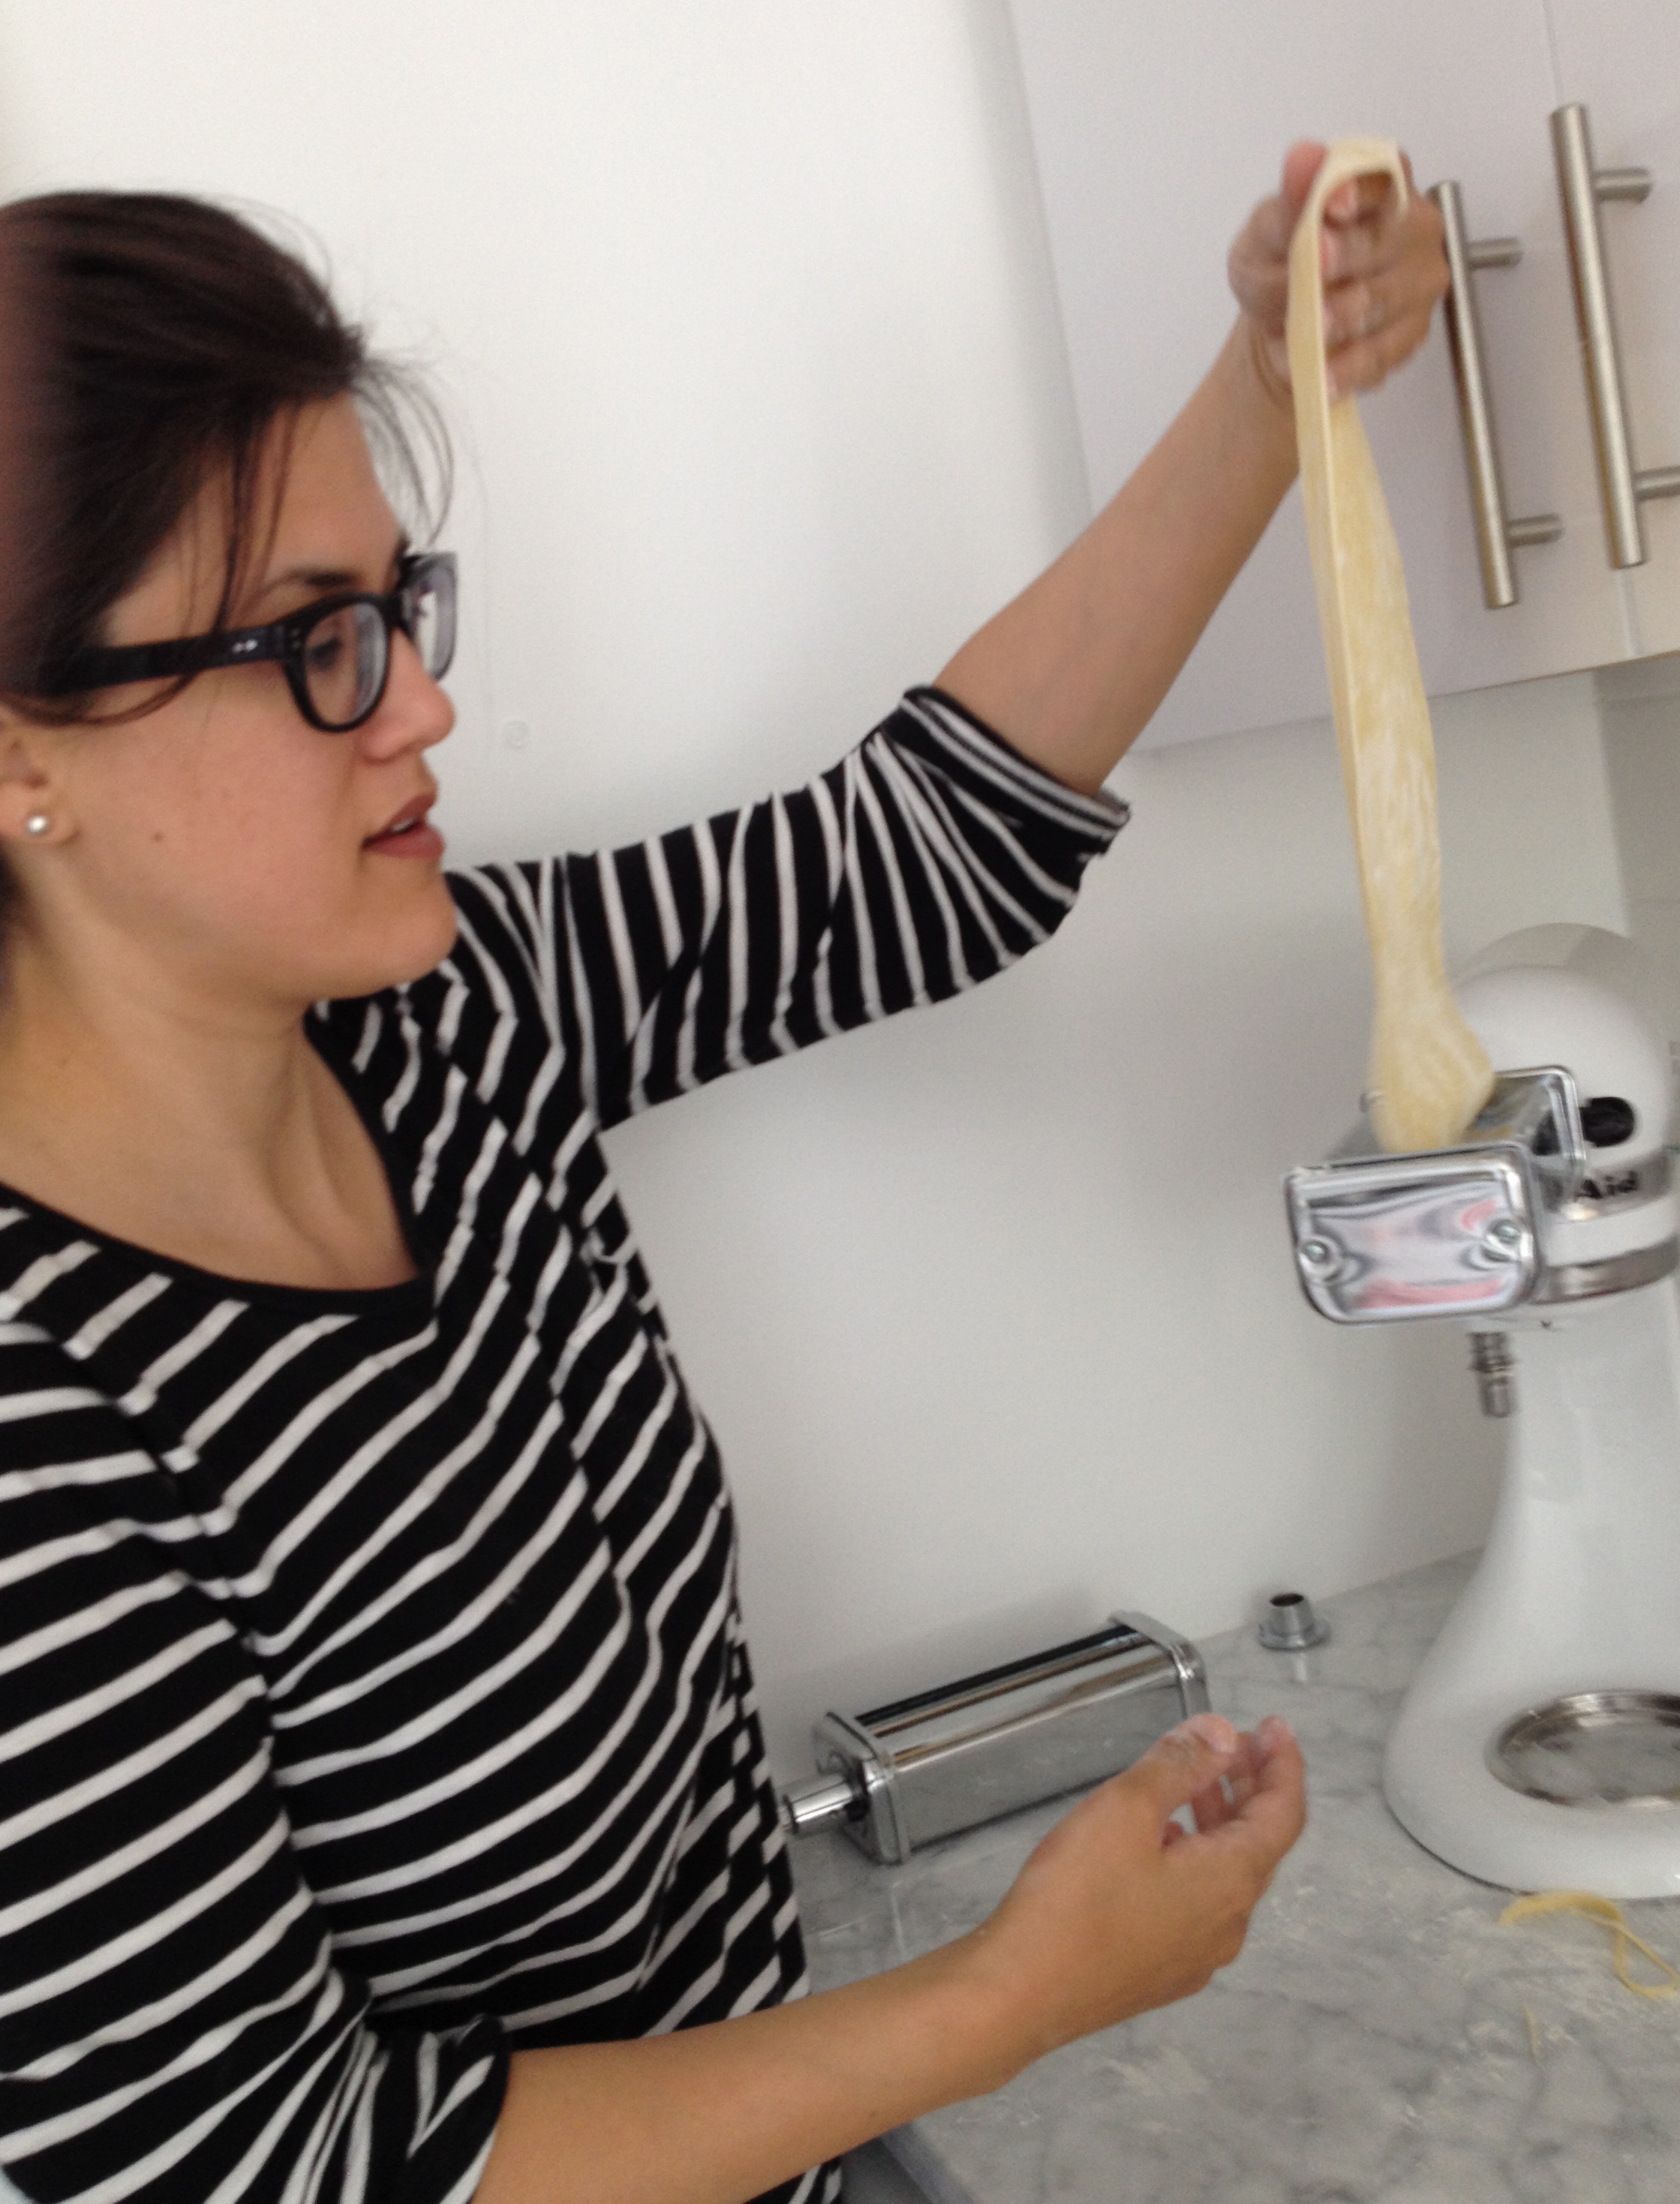
I tried to measure her recipe this time and it’s something like this: – 1 egg per person – 3/4 cup of flour per egg – a bit of water (I think I may have used about 1 tbsp) – a bit of salt (I might have used 1 tsp) Dump all the ingredients into the bowl with the paddle attachment. Mix for 2 minutes. Dump the dough out onto the counter and knead for 1 minute. After Mom finally got the first version of dough to the right texture, I got to work with the pasta attachments. First, I used the flat one to stretch out long flat pieces of pasta. I set the knob on the cutter to position 1 and then worked my way to number 5. I set the mixer speed to 3 or 4 and the whole process was quick and easy. 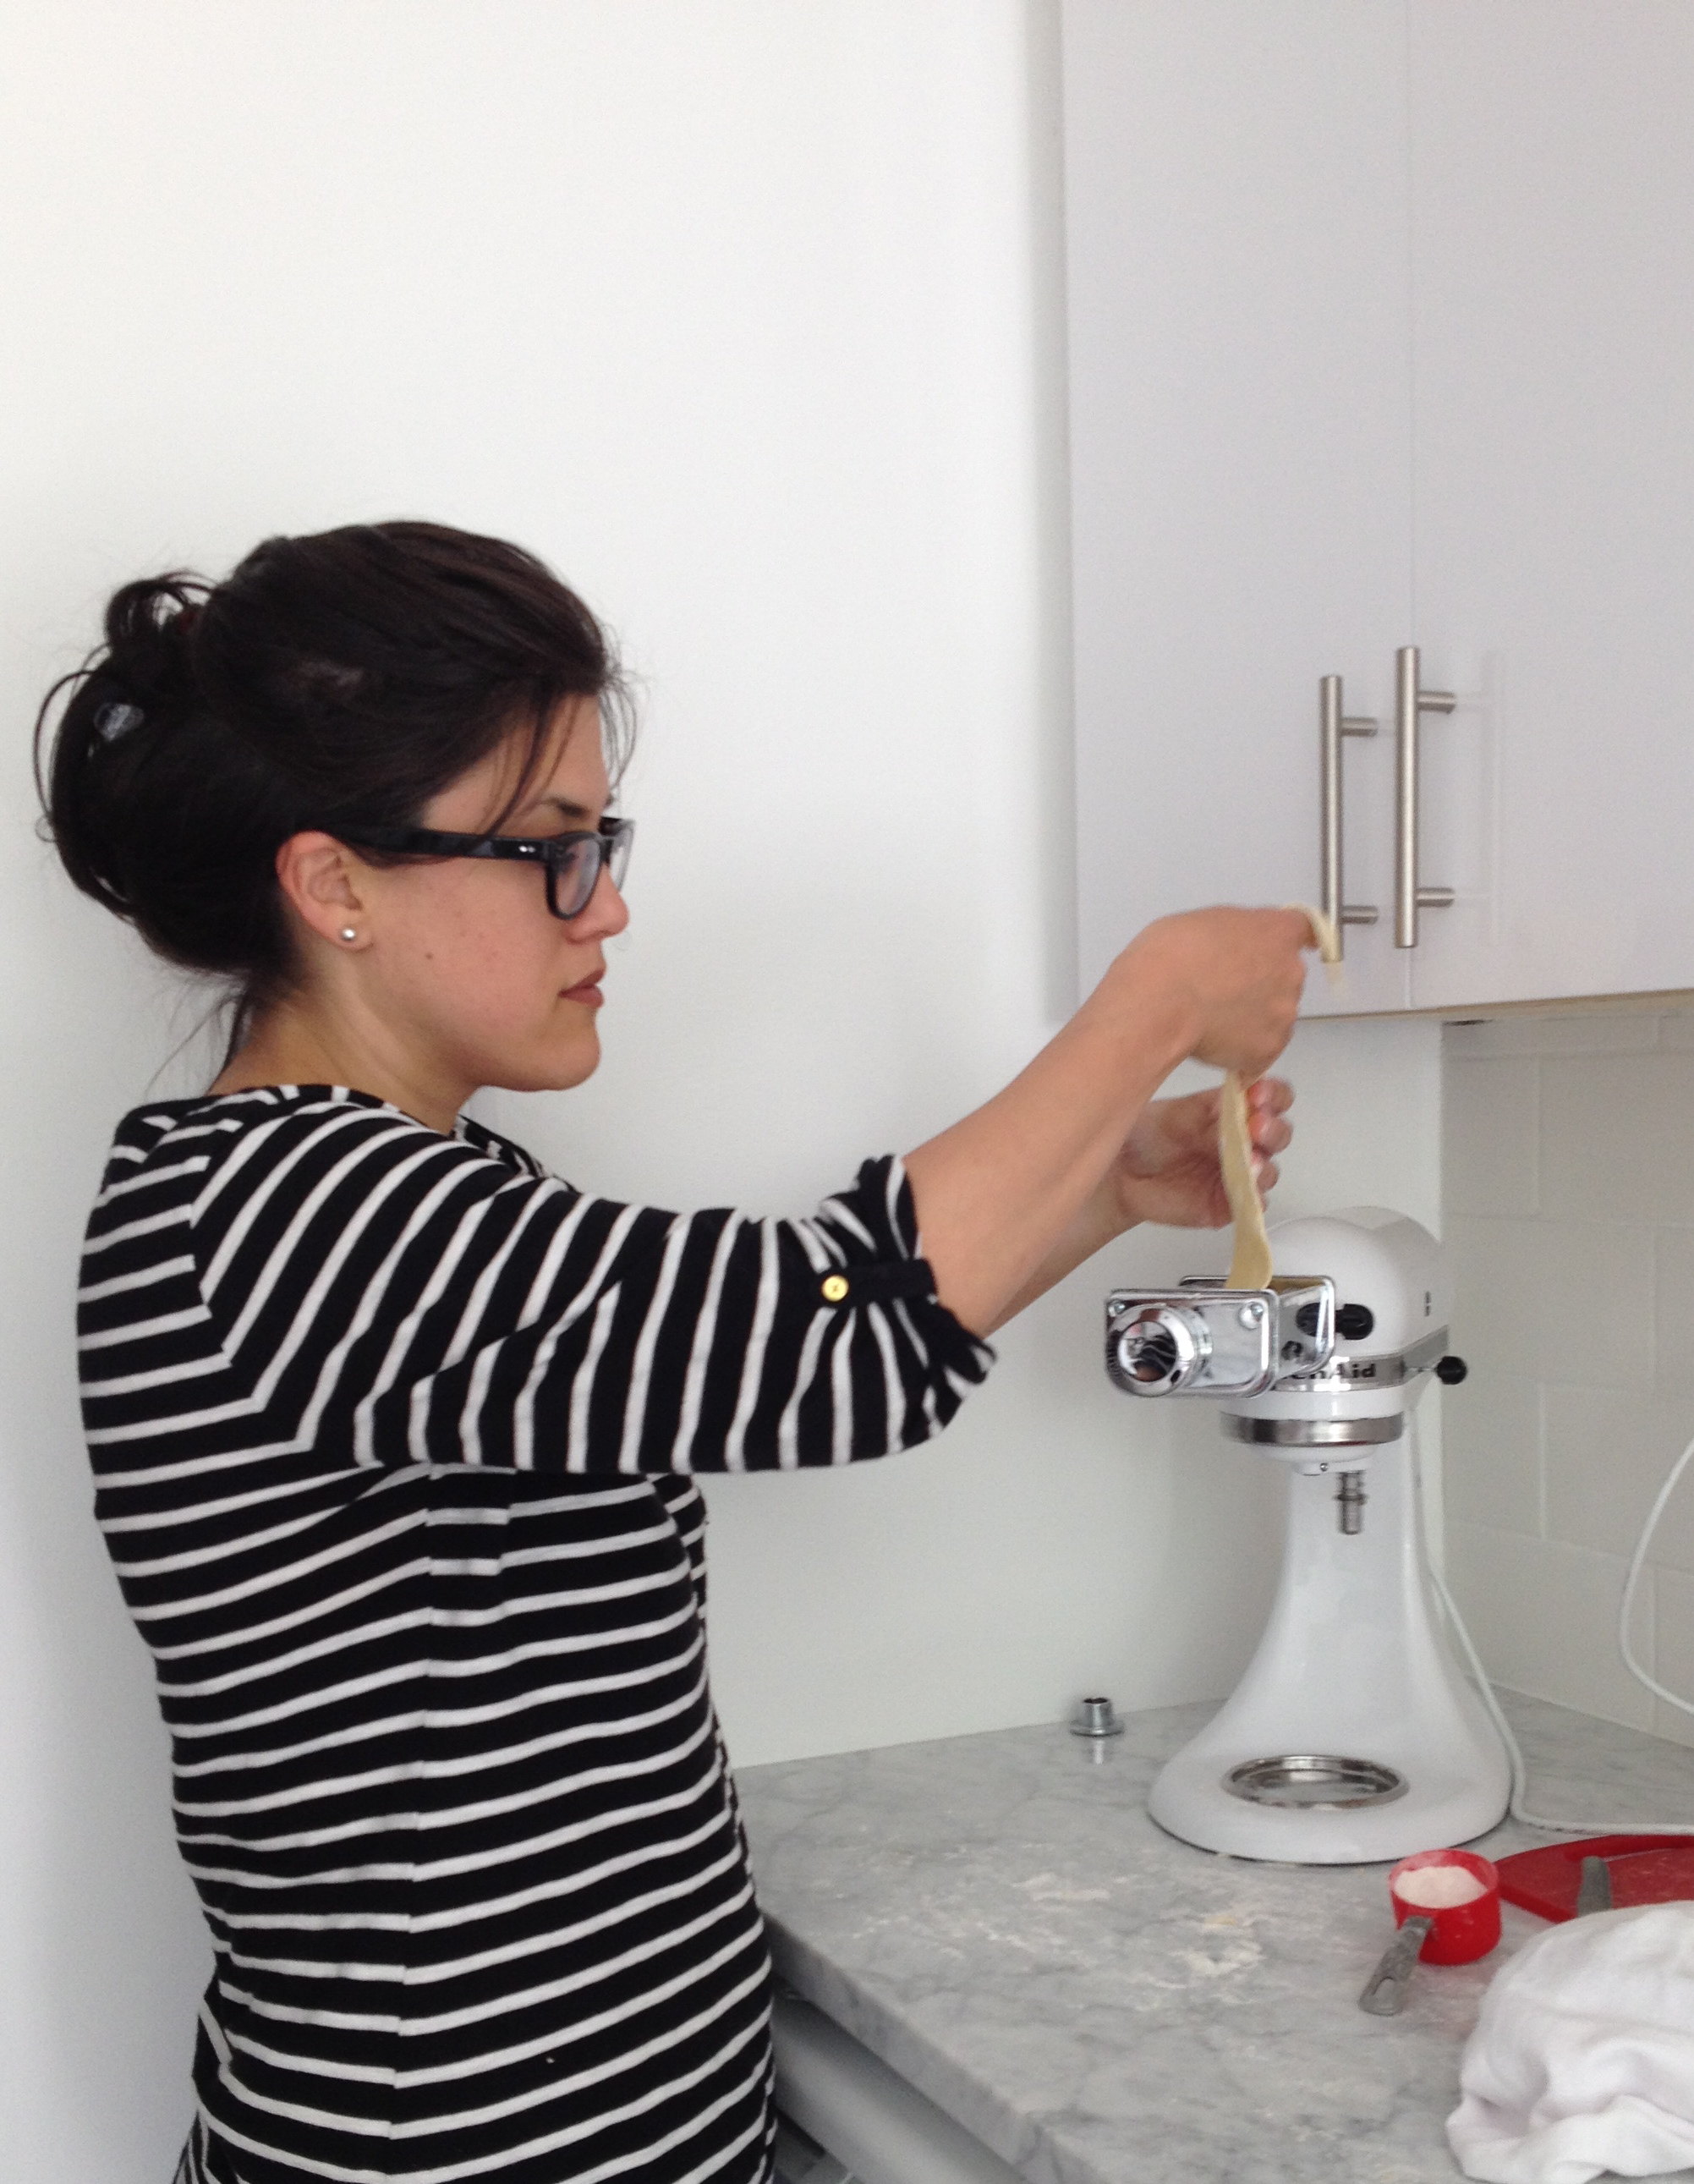
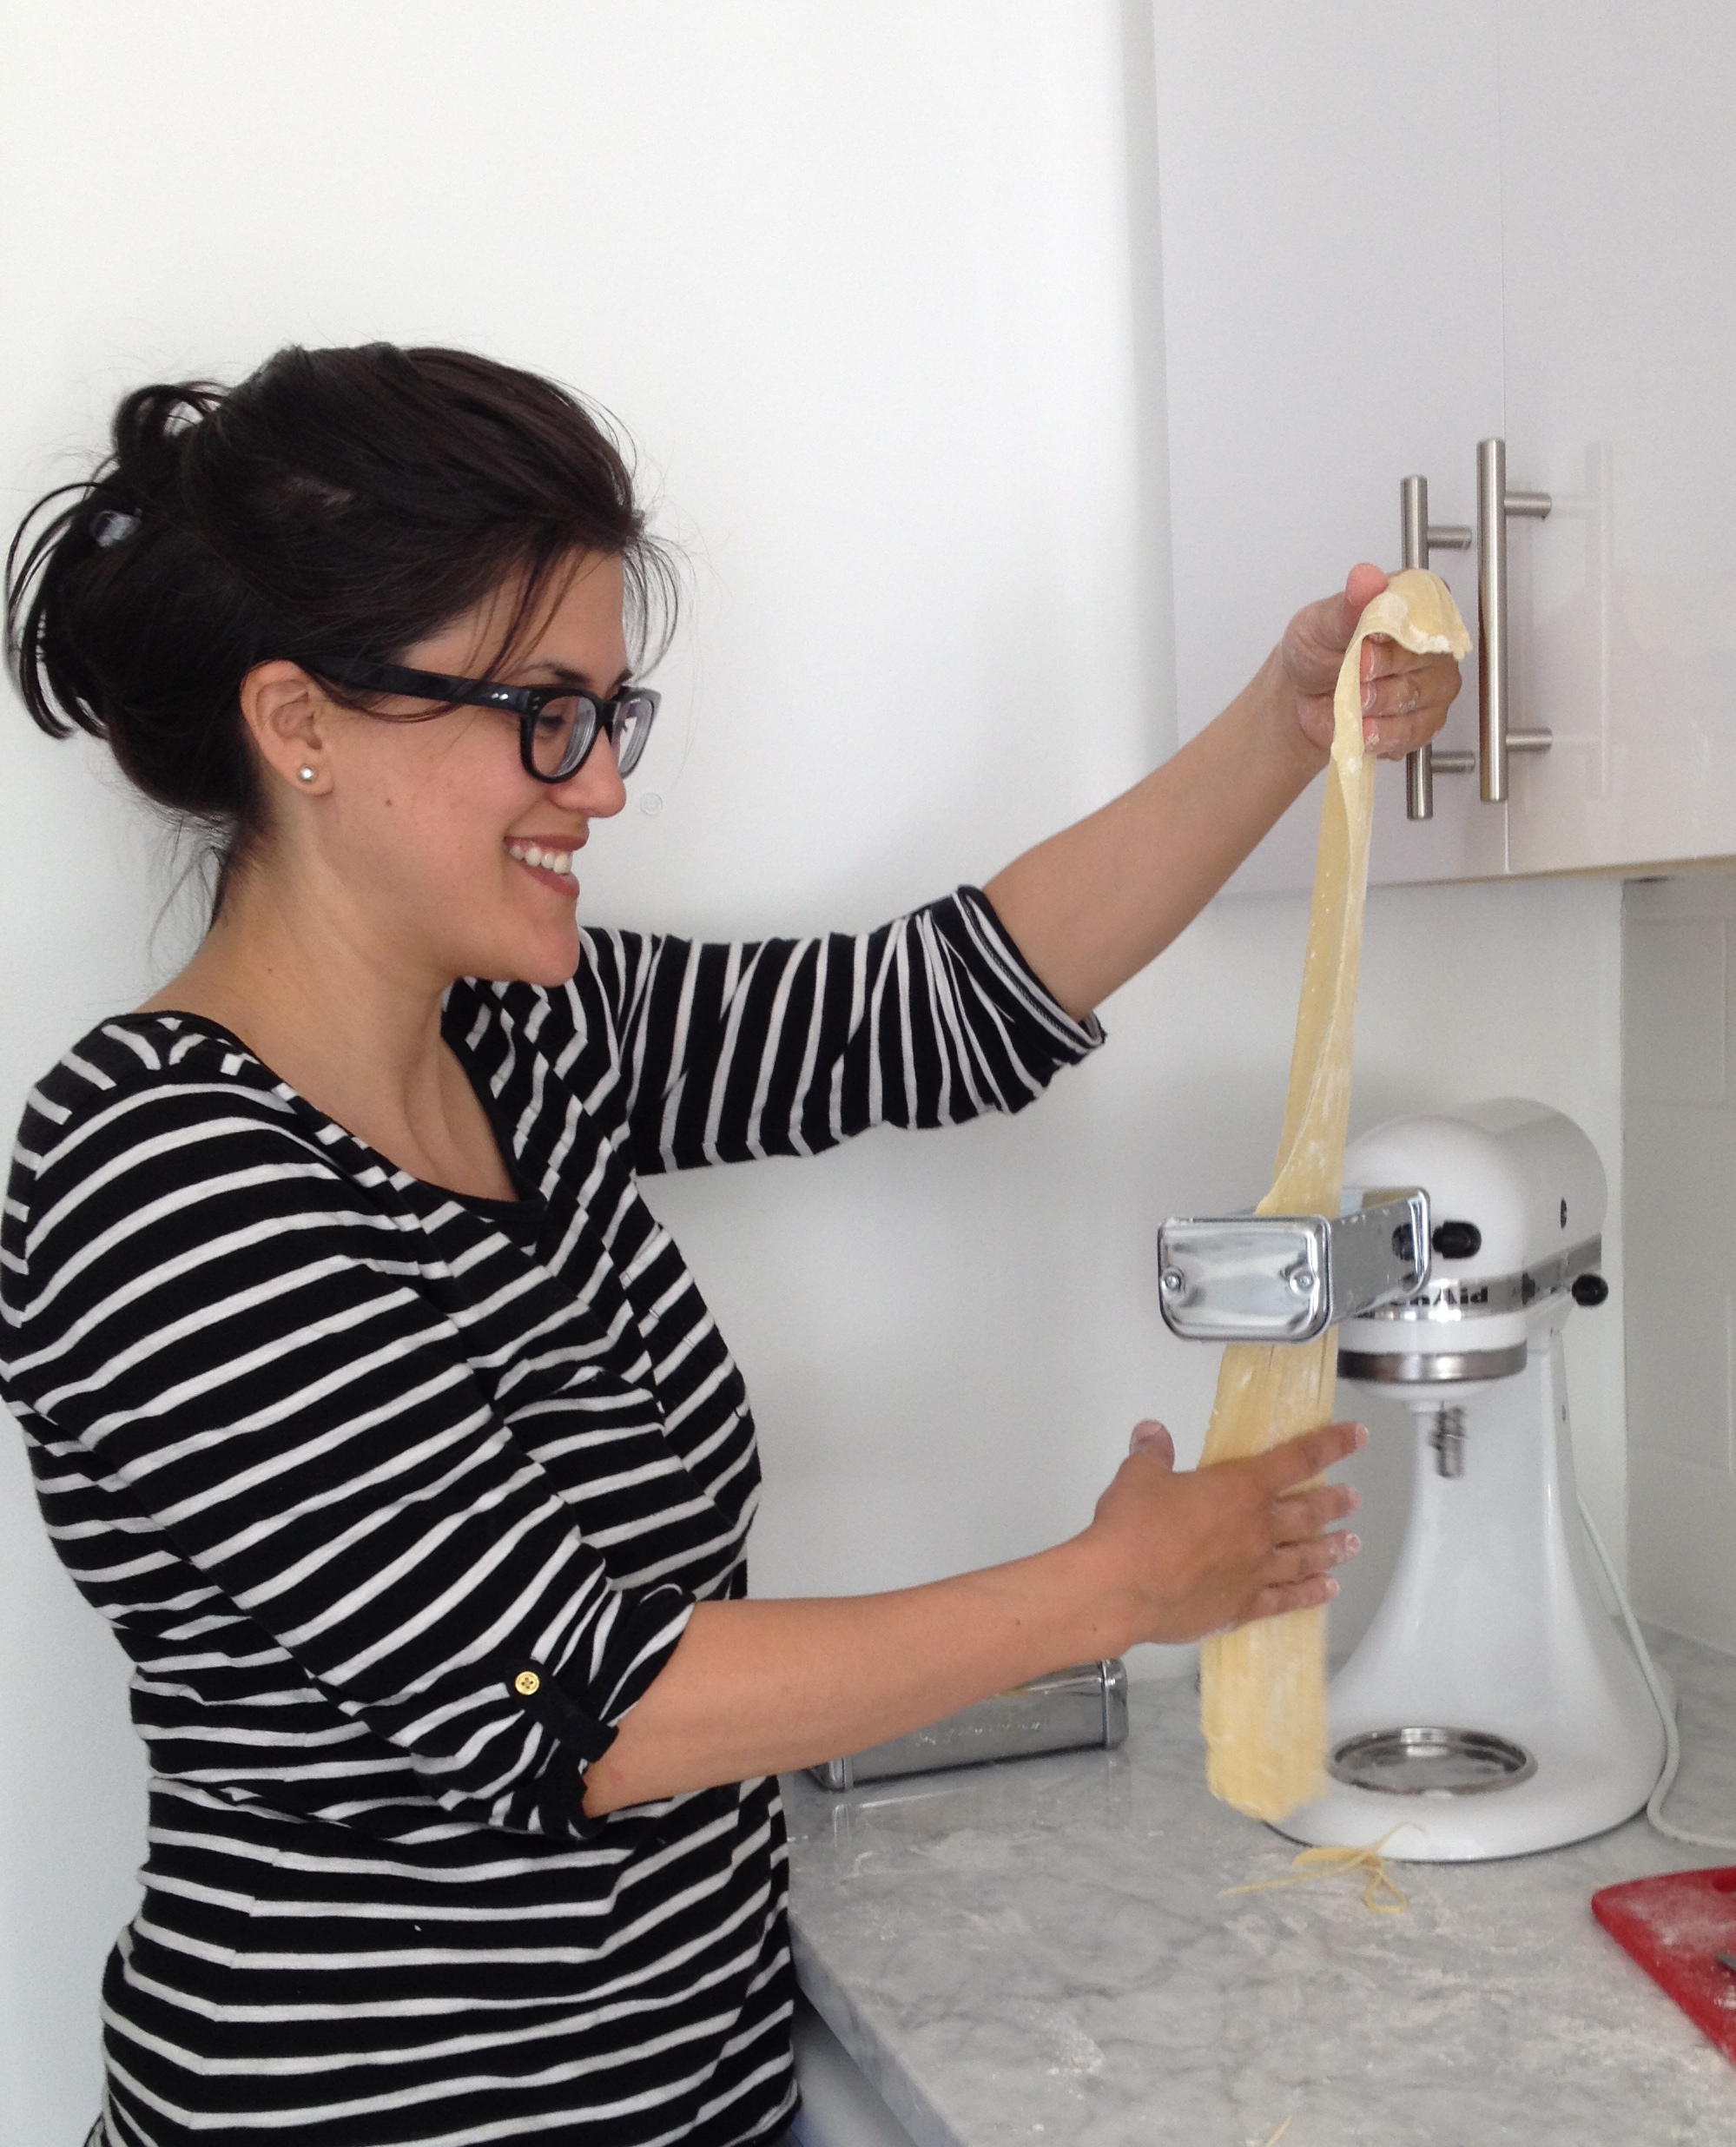
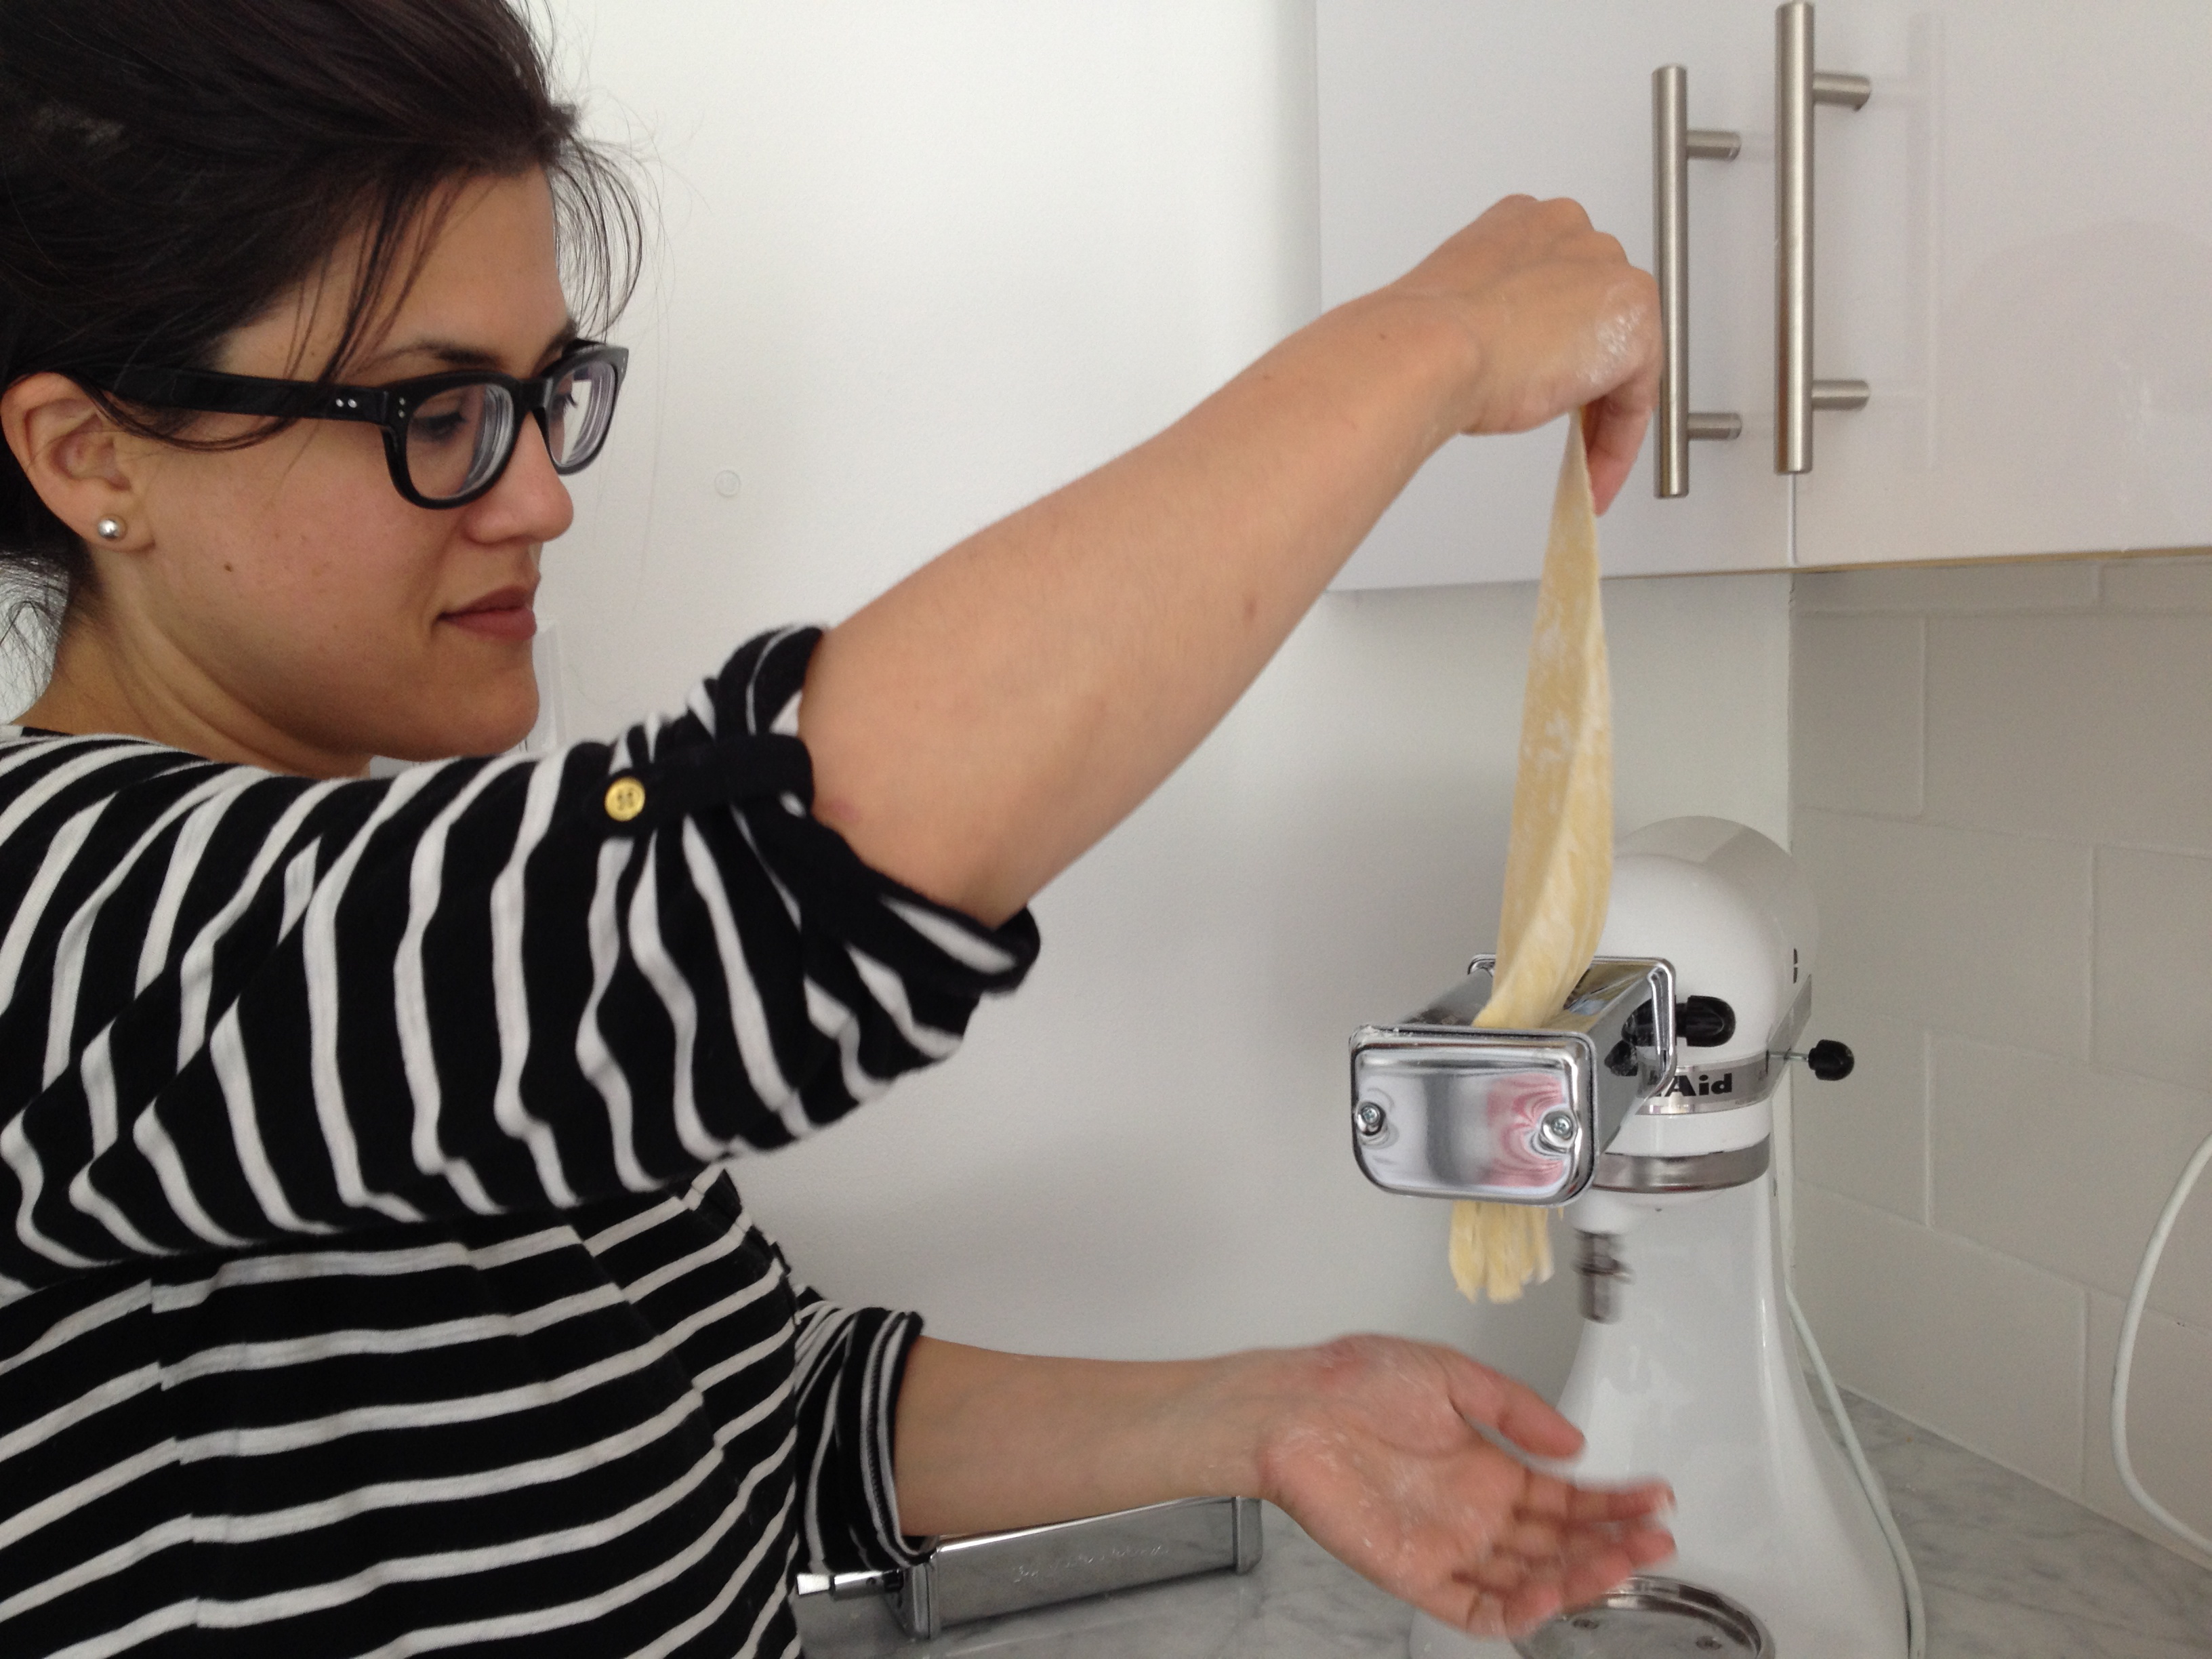
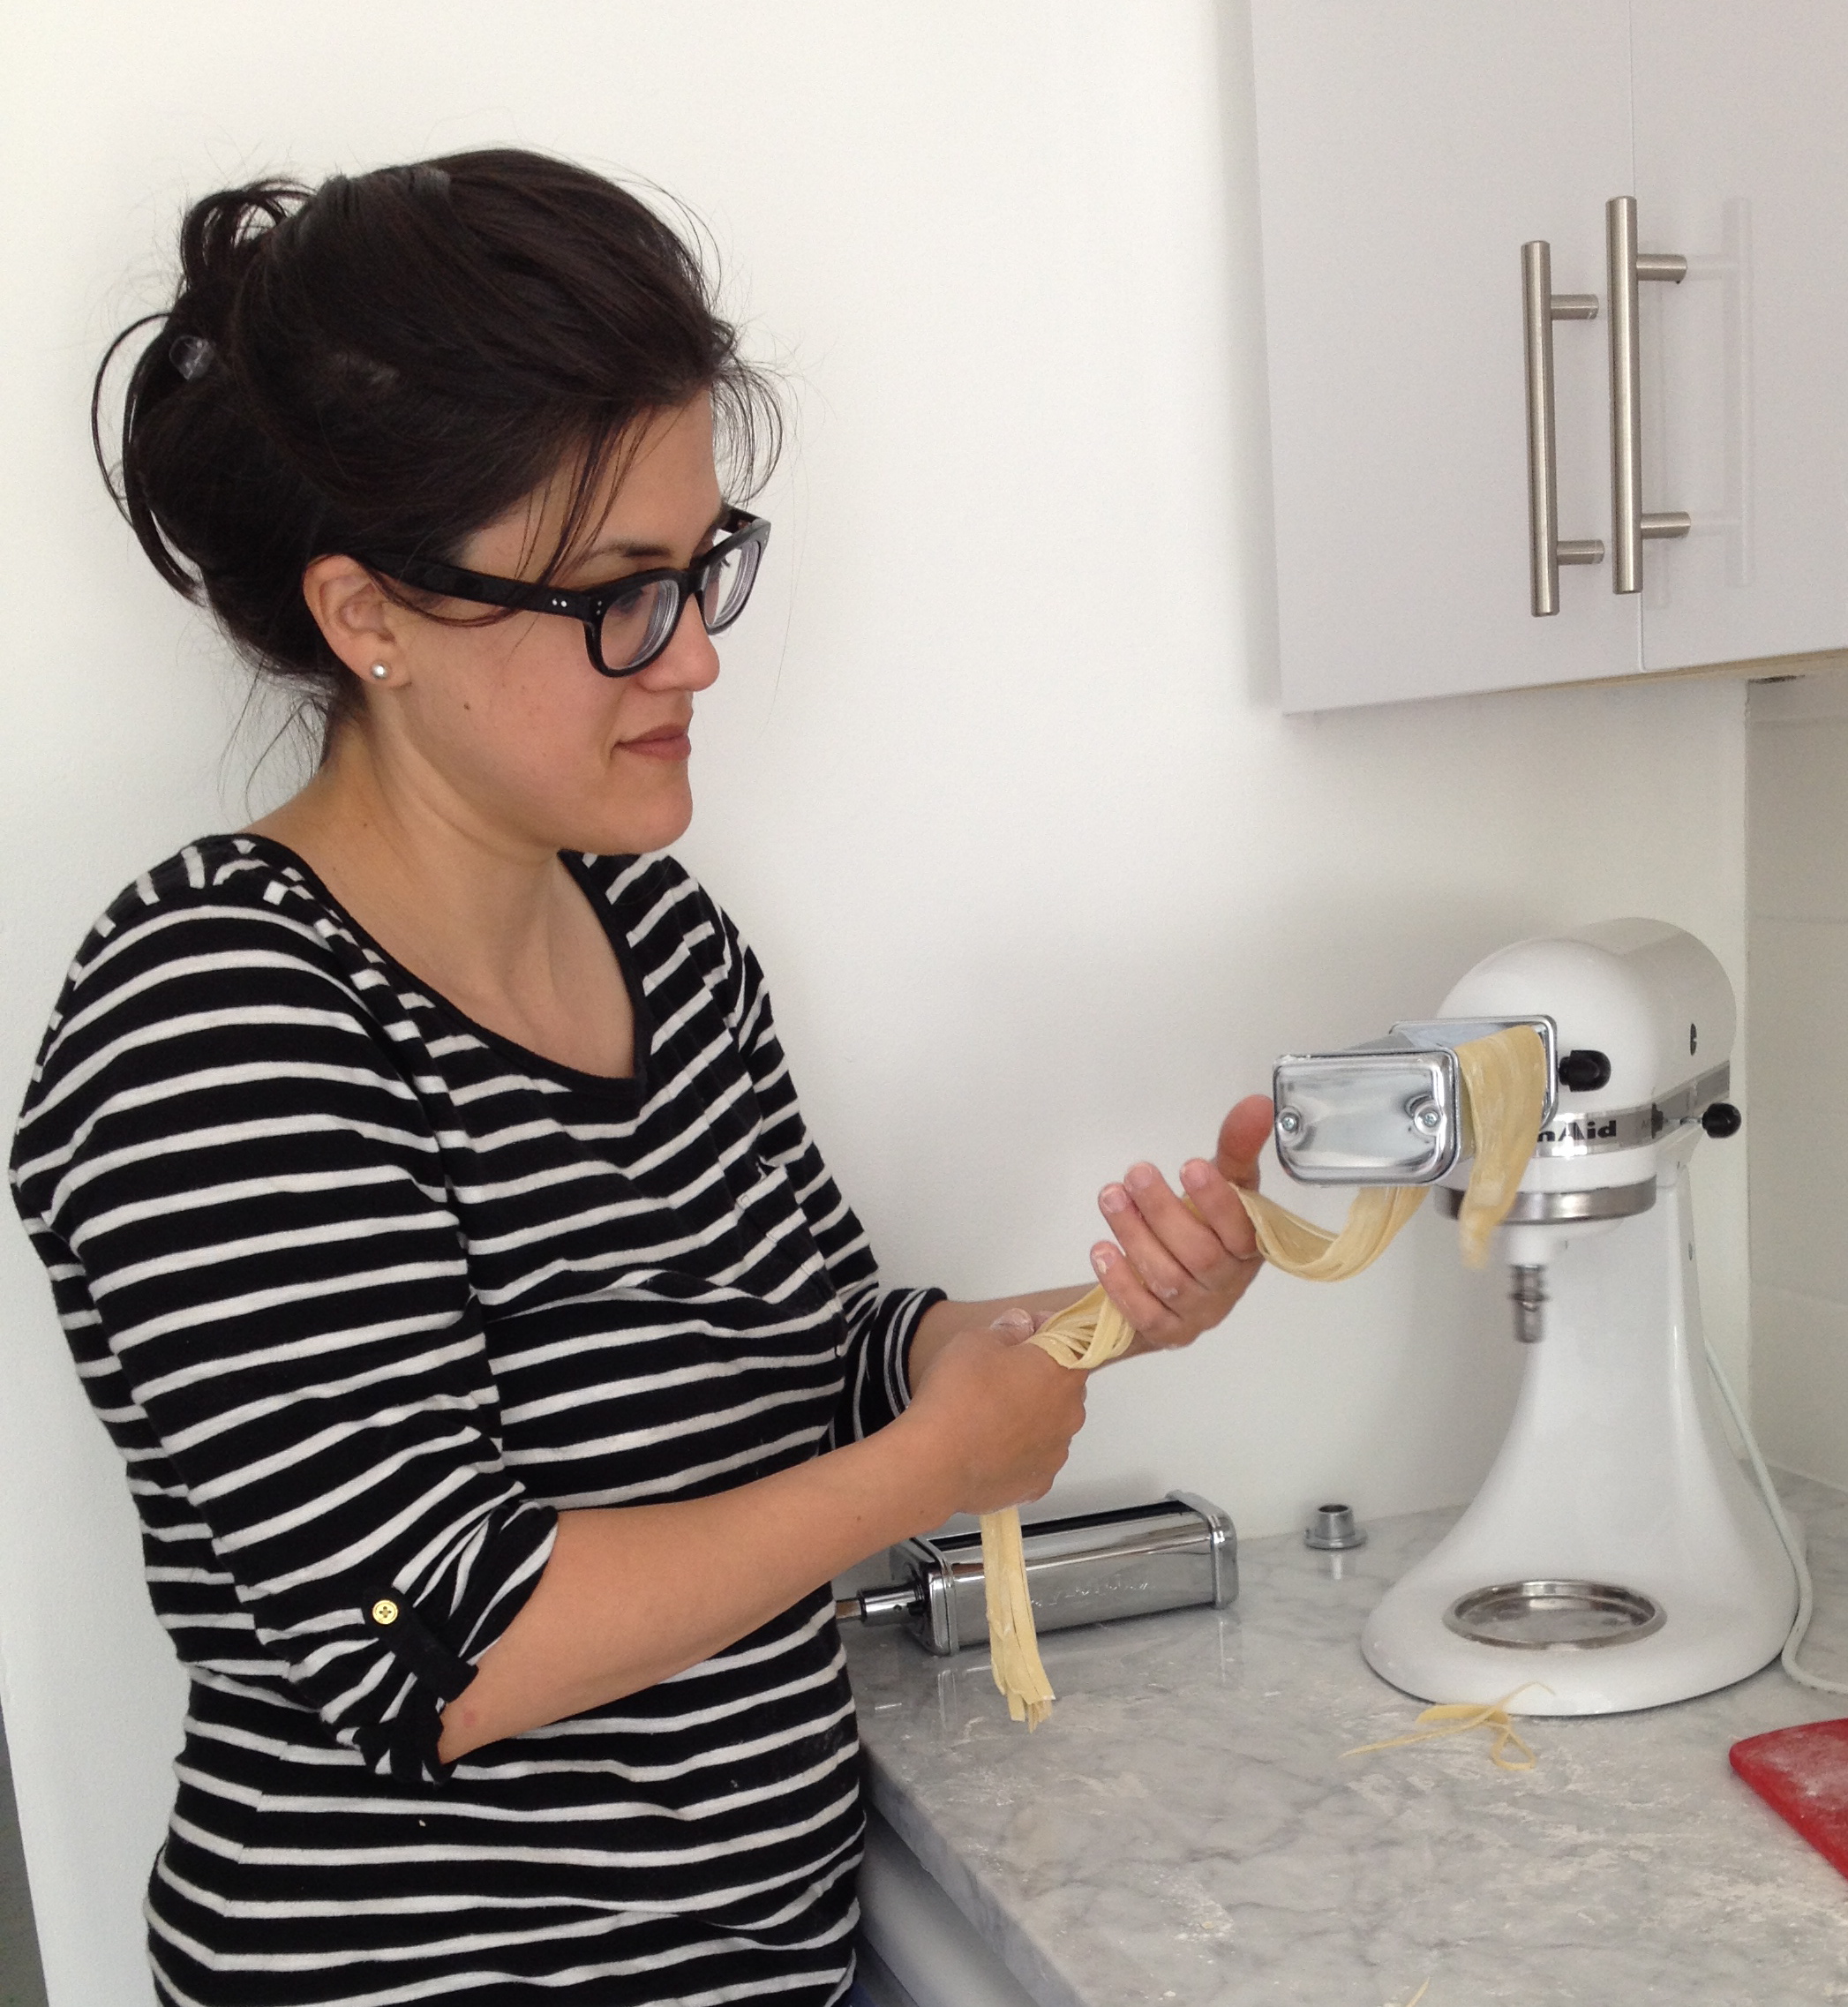
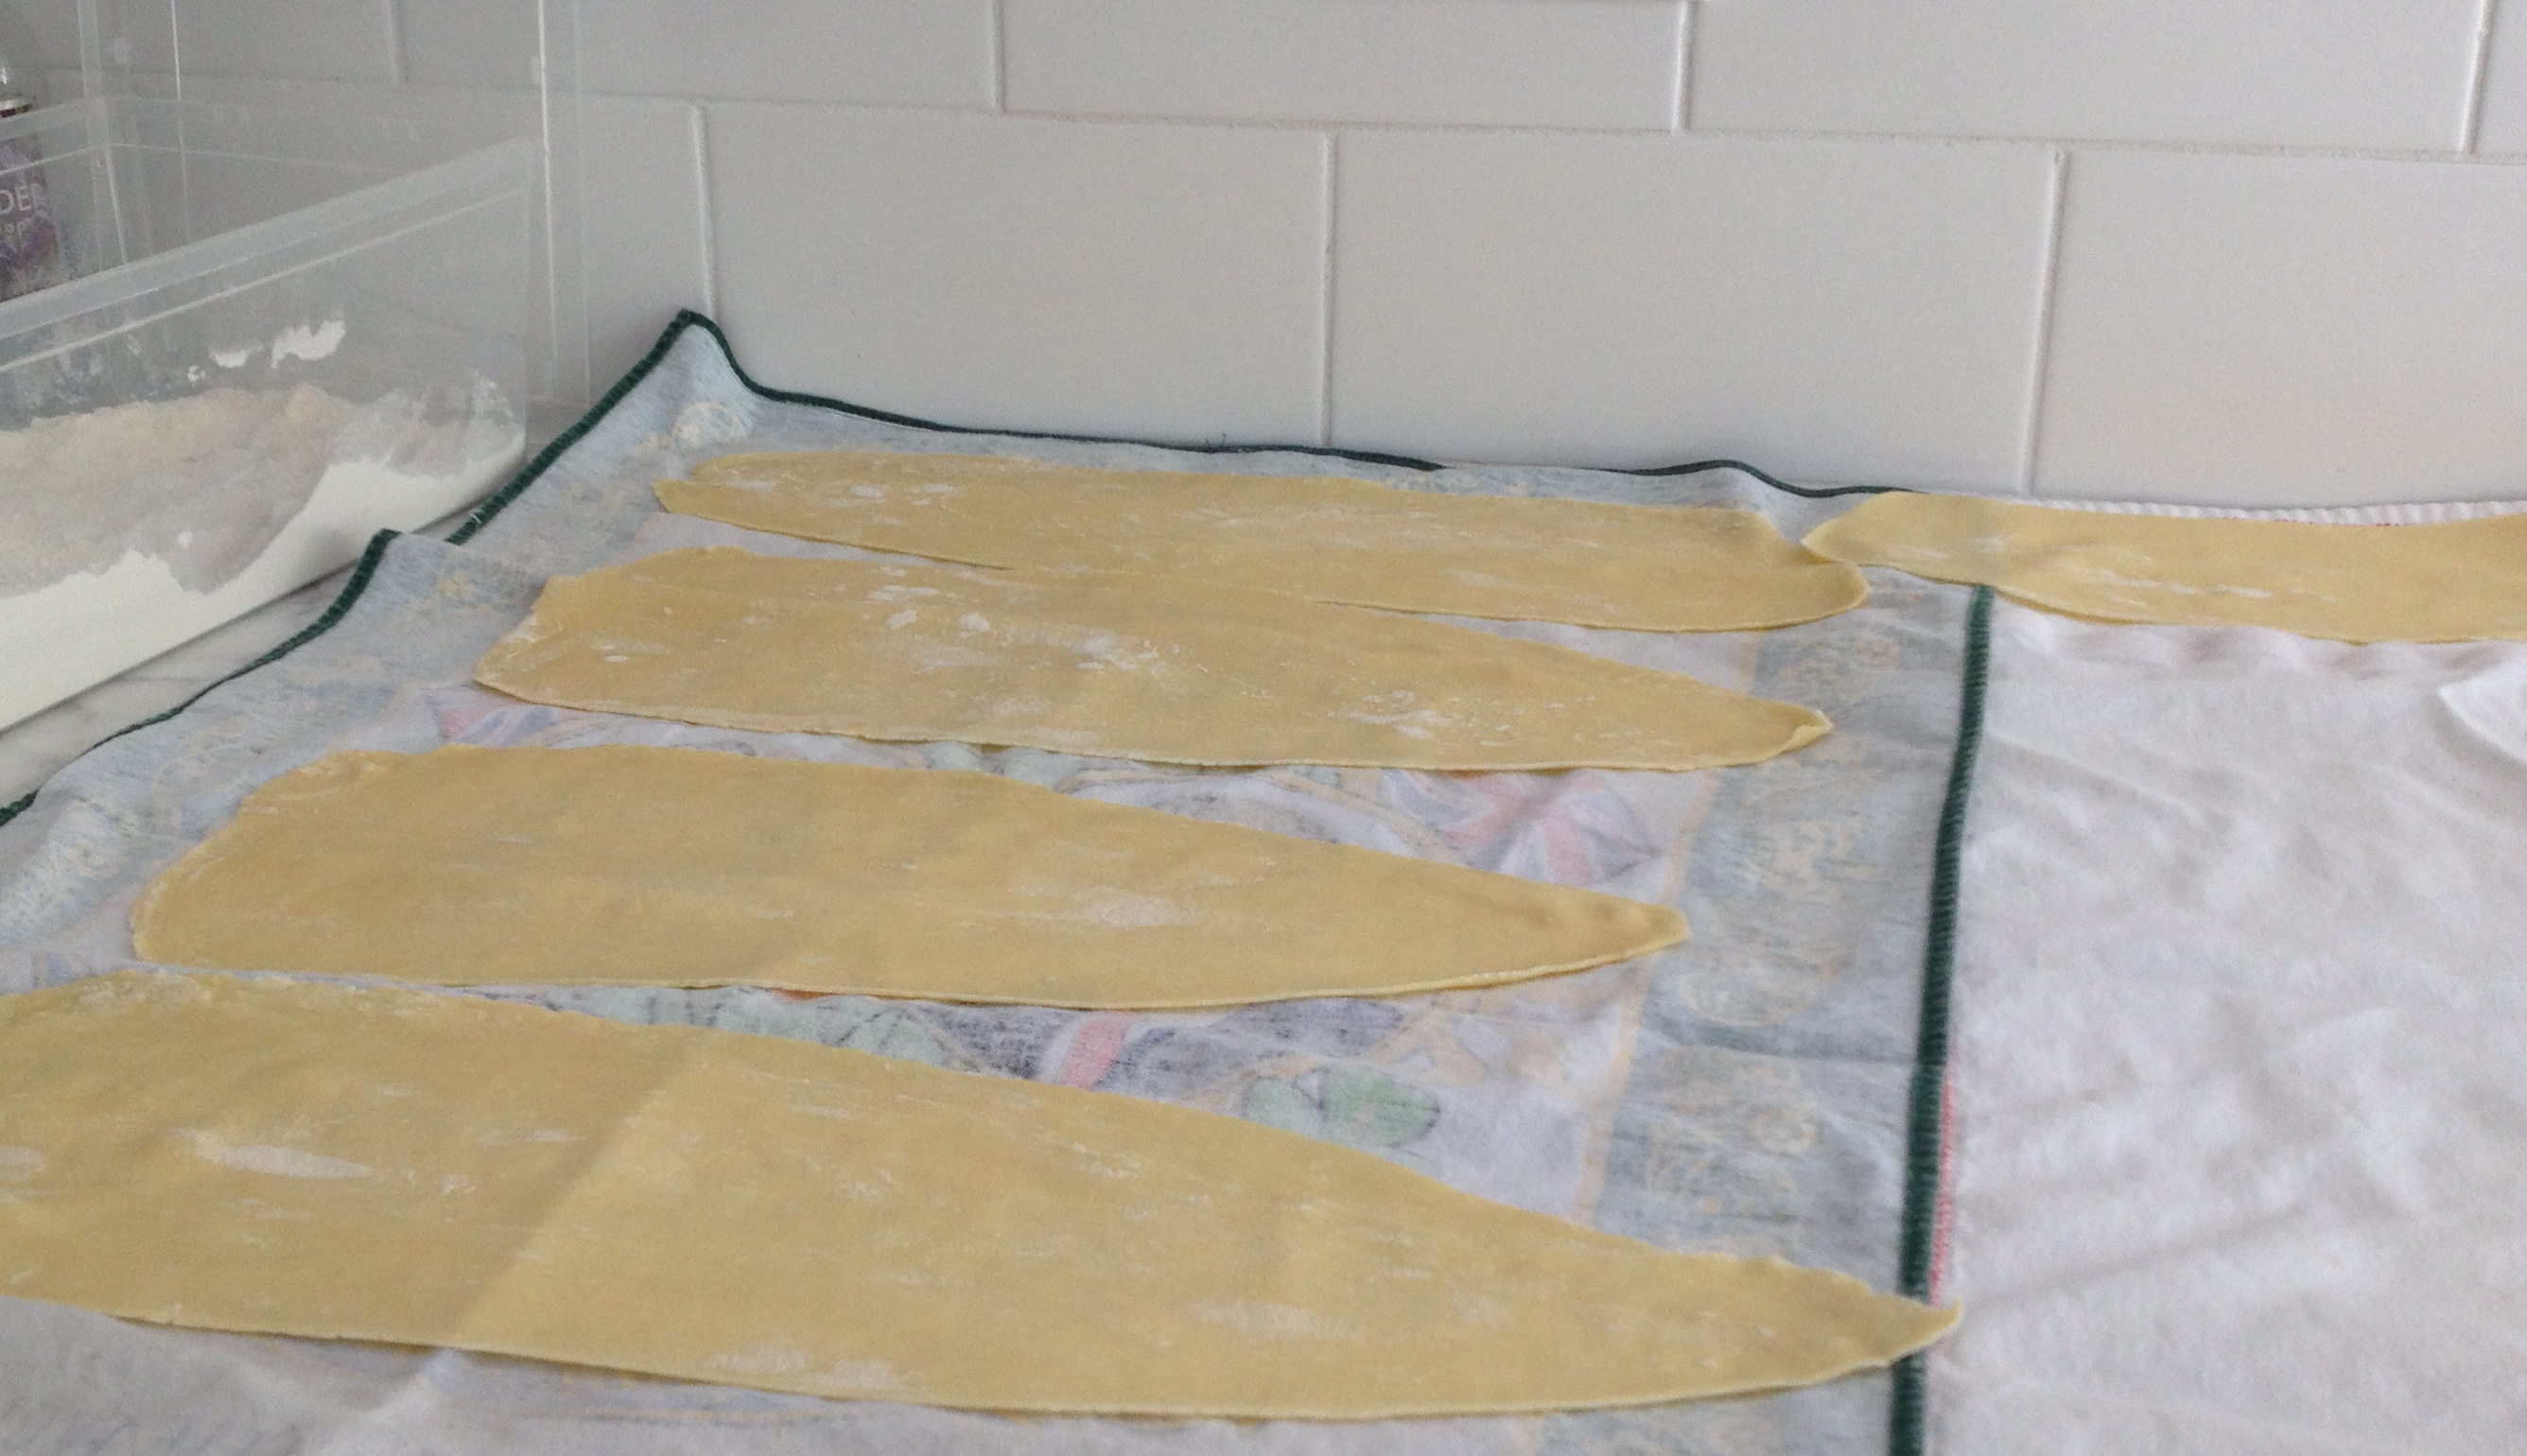 When all the dough had been passed through the smooth stretcher attachment, I attached the fettucini (and then the spaghetti) cutter to the mixer (quick and easy) so that I could pass the long sheets of pasta through to make the noodles. I floured the pasta sheets before passing them through the cutter.
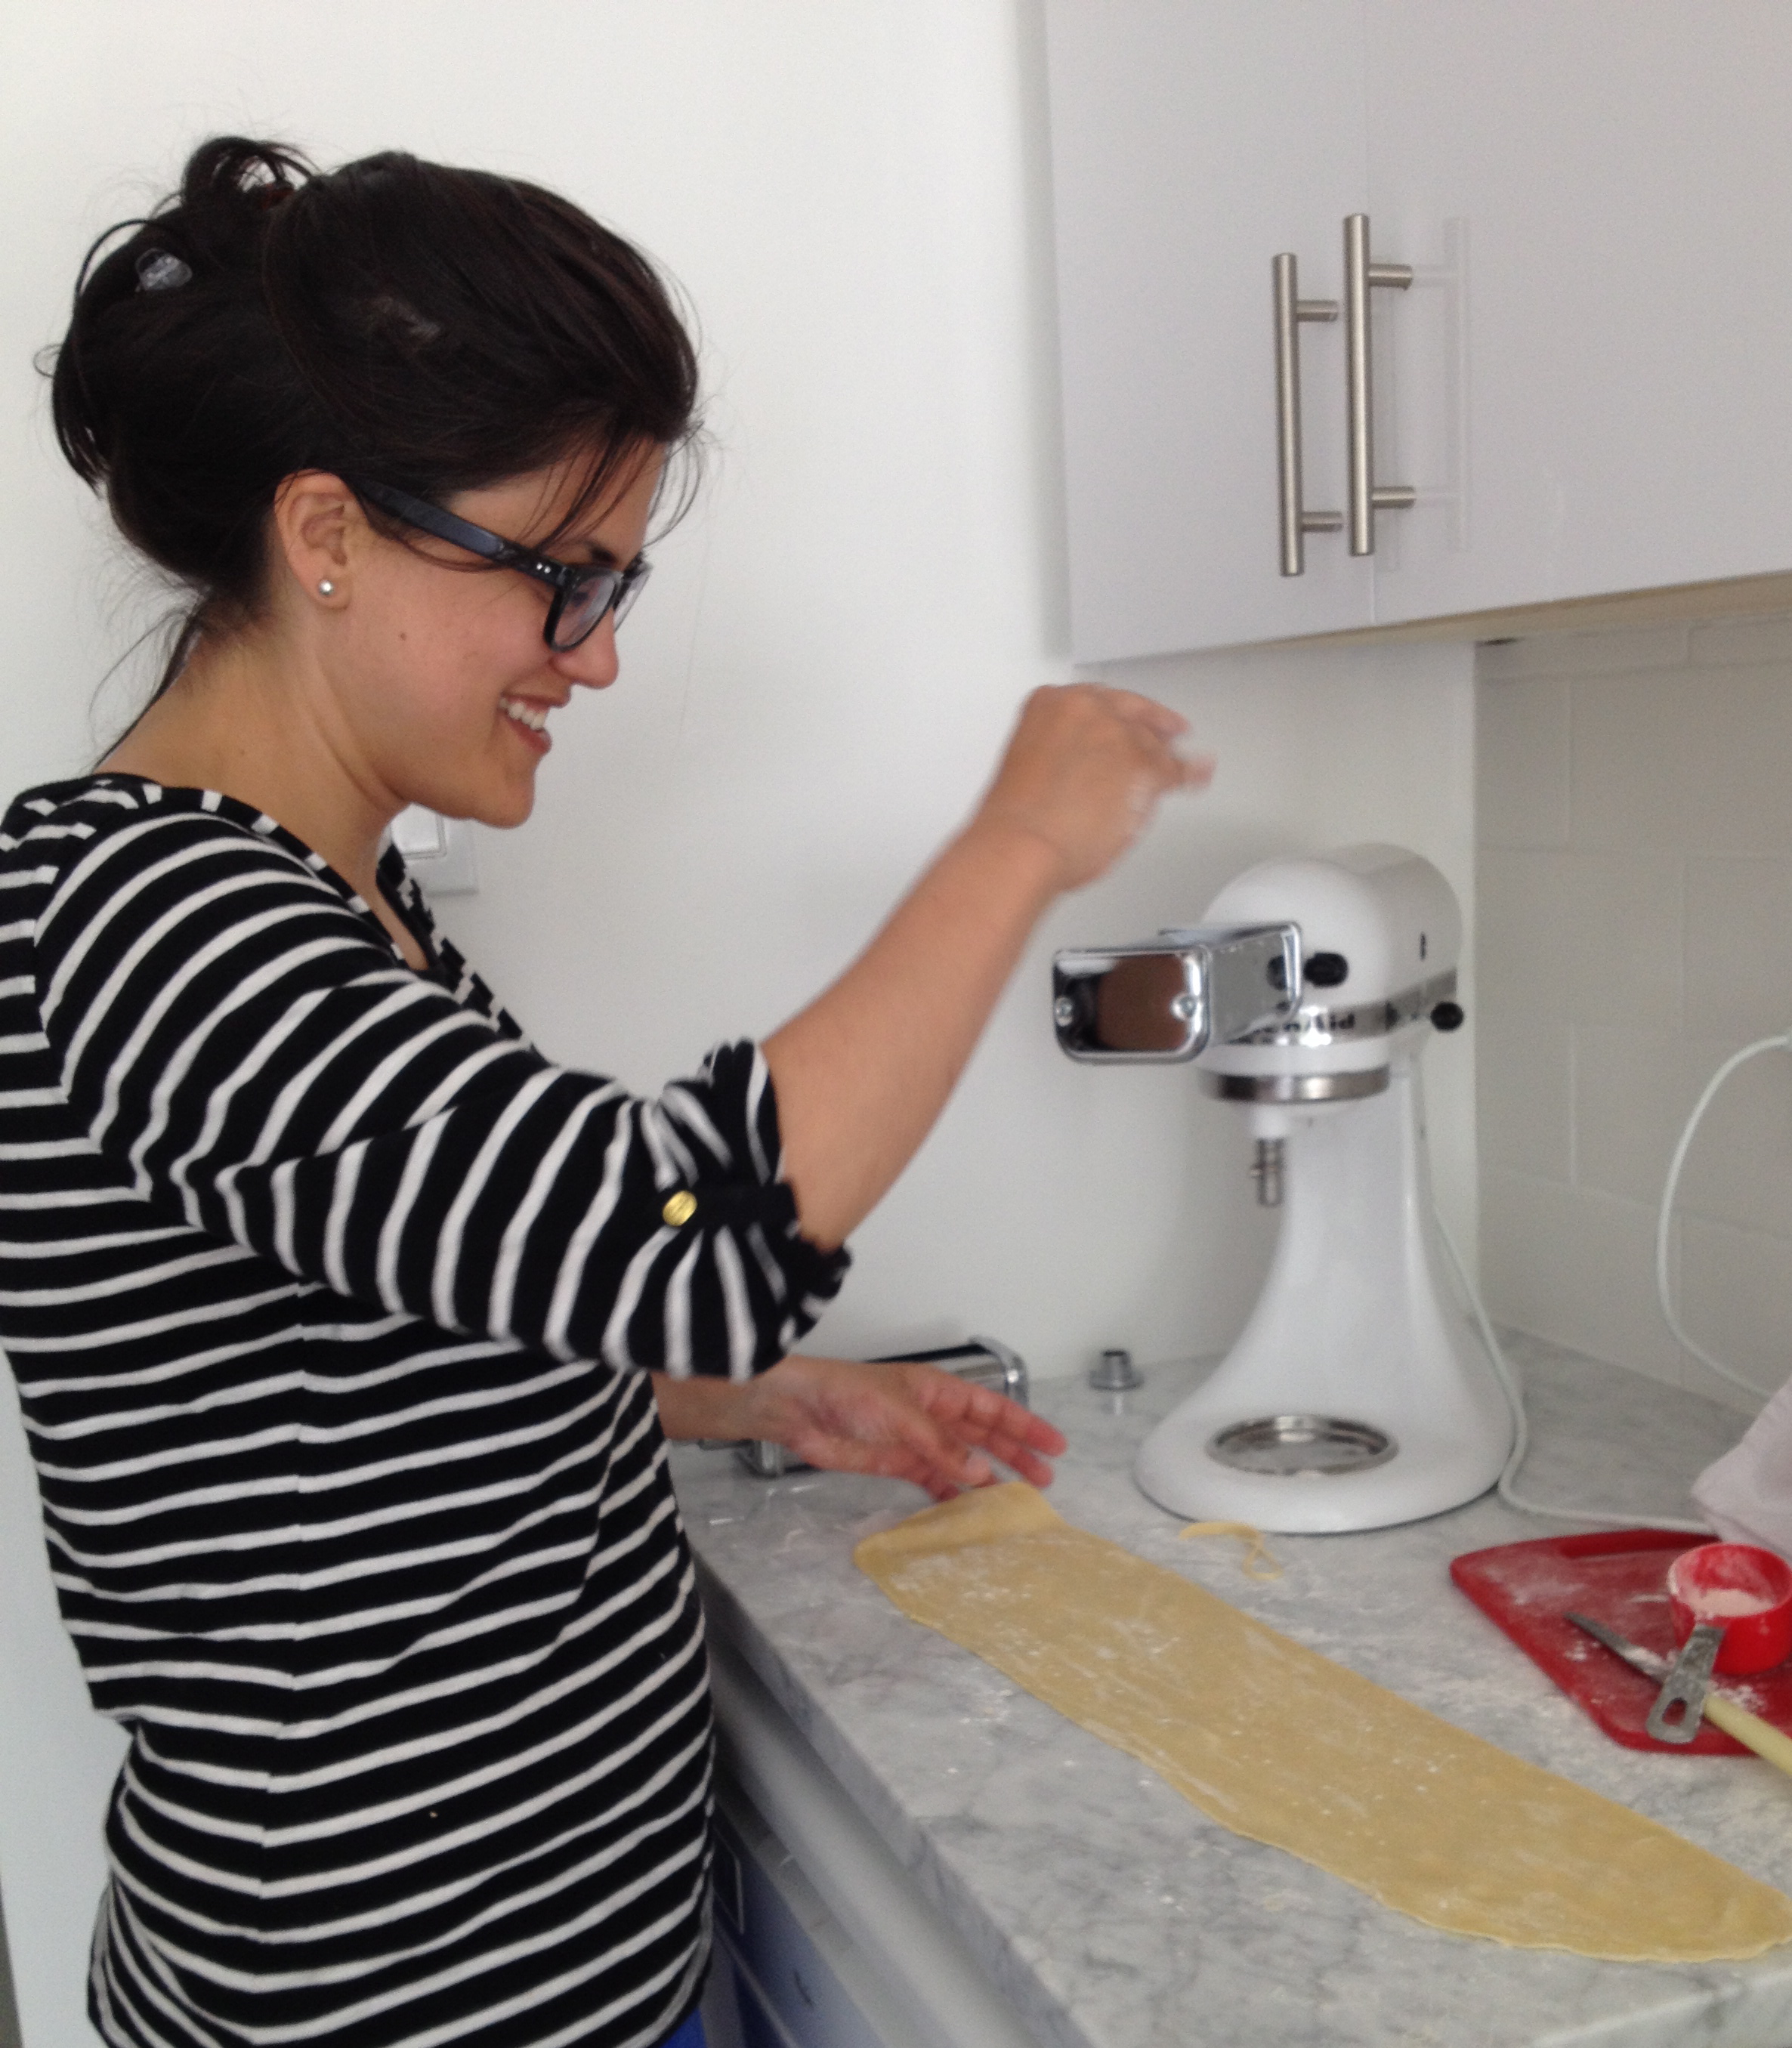
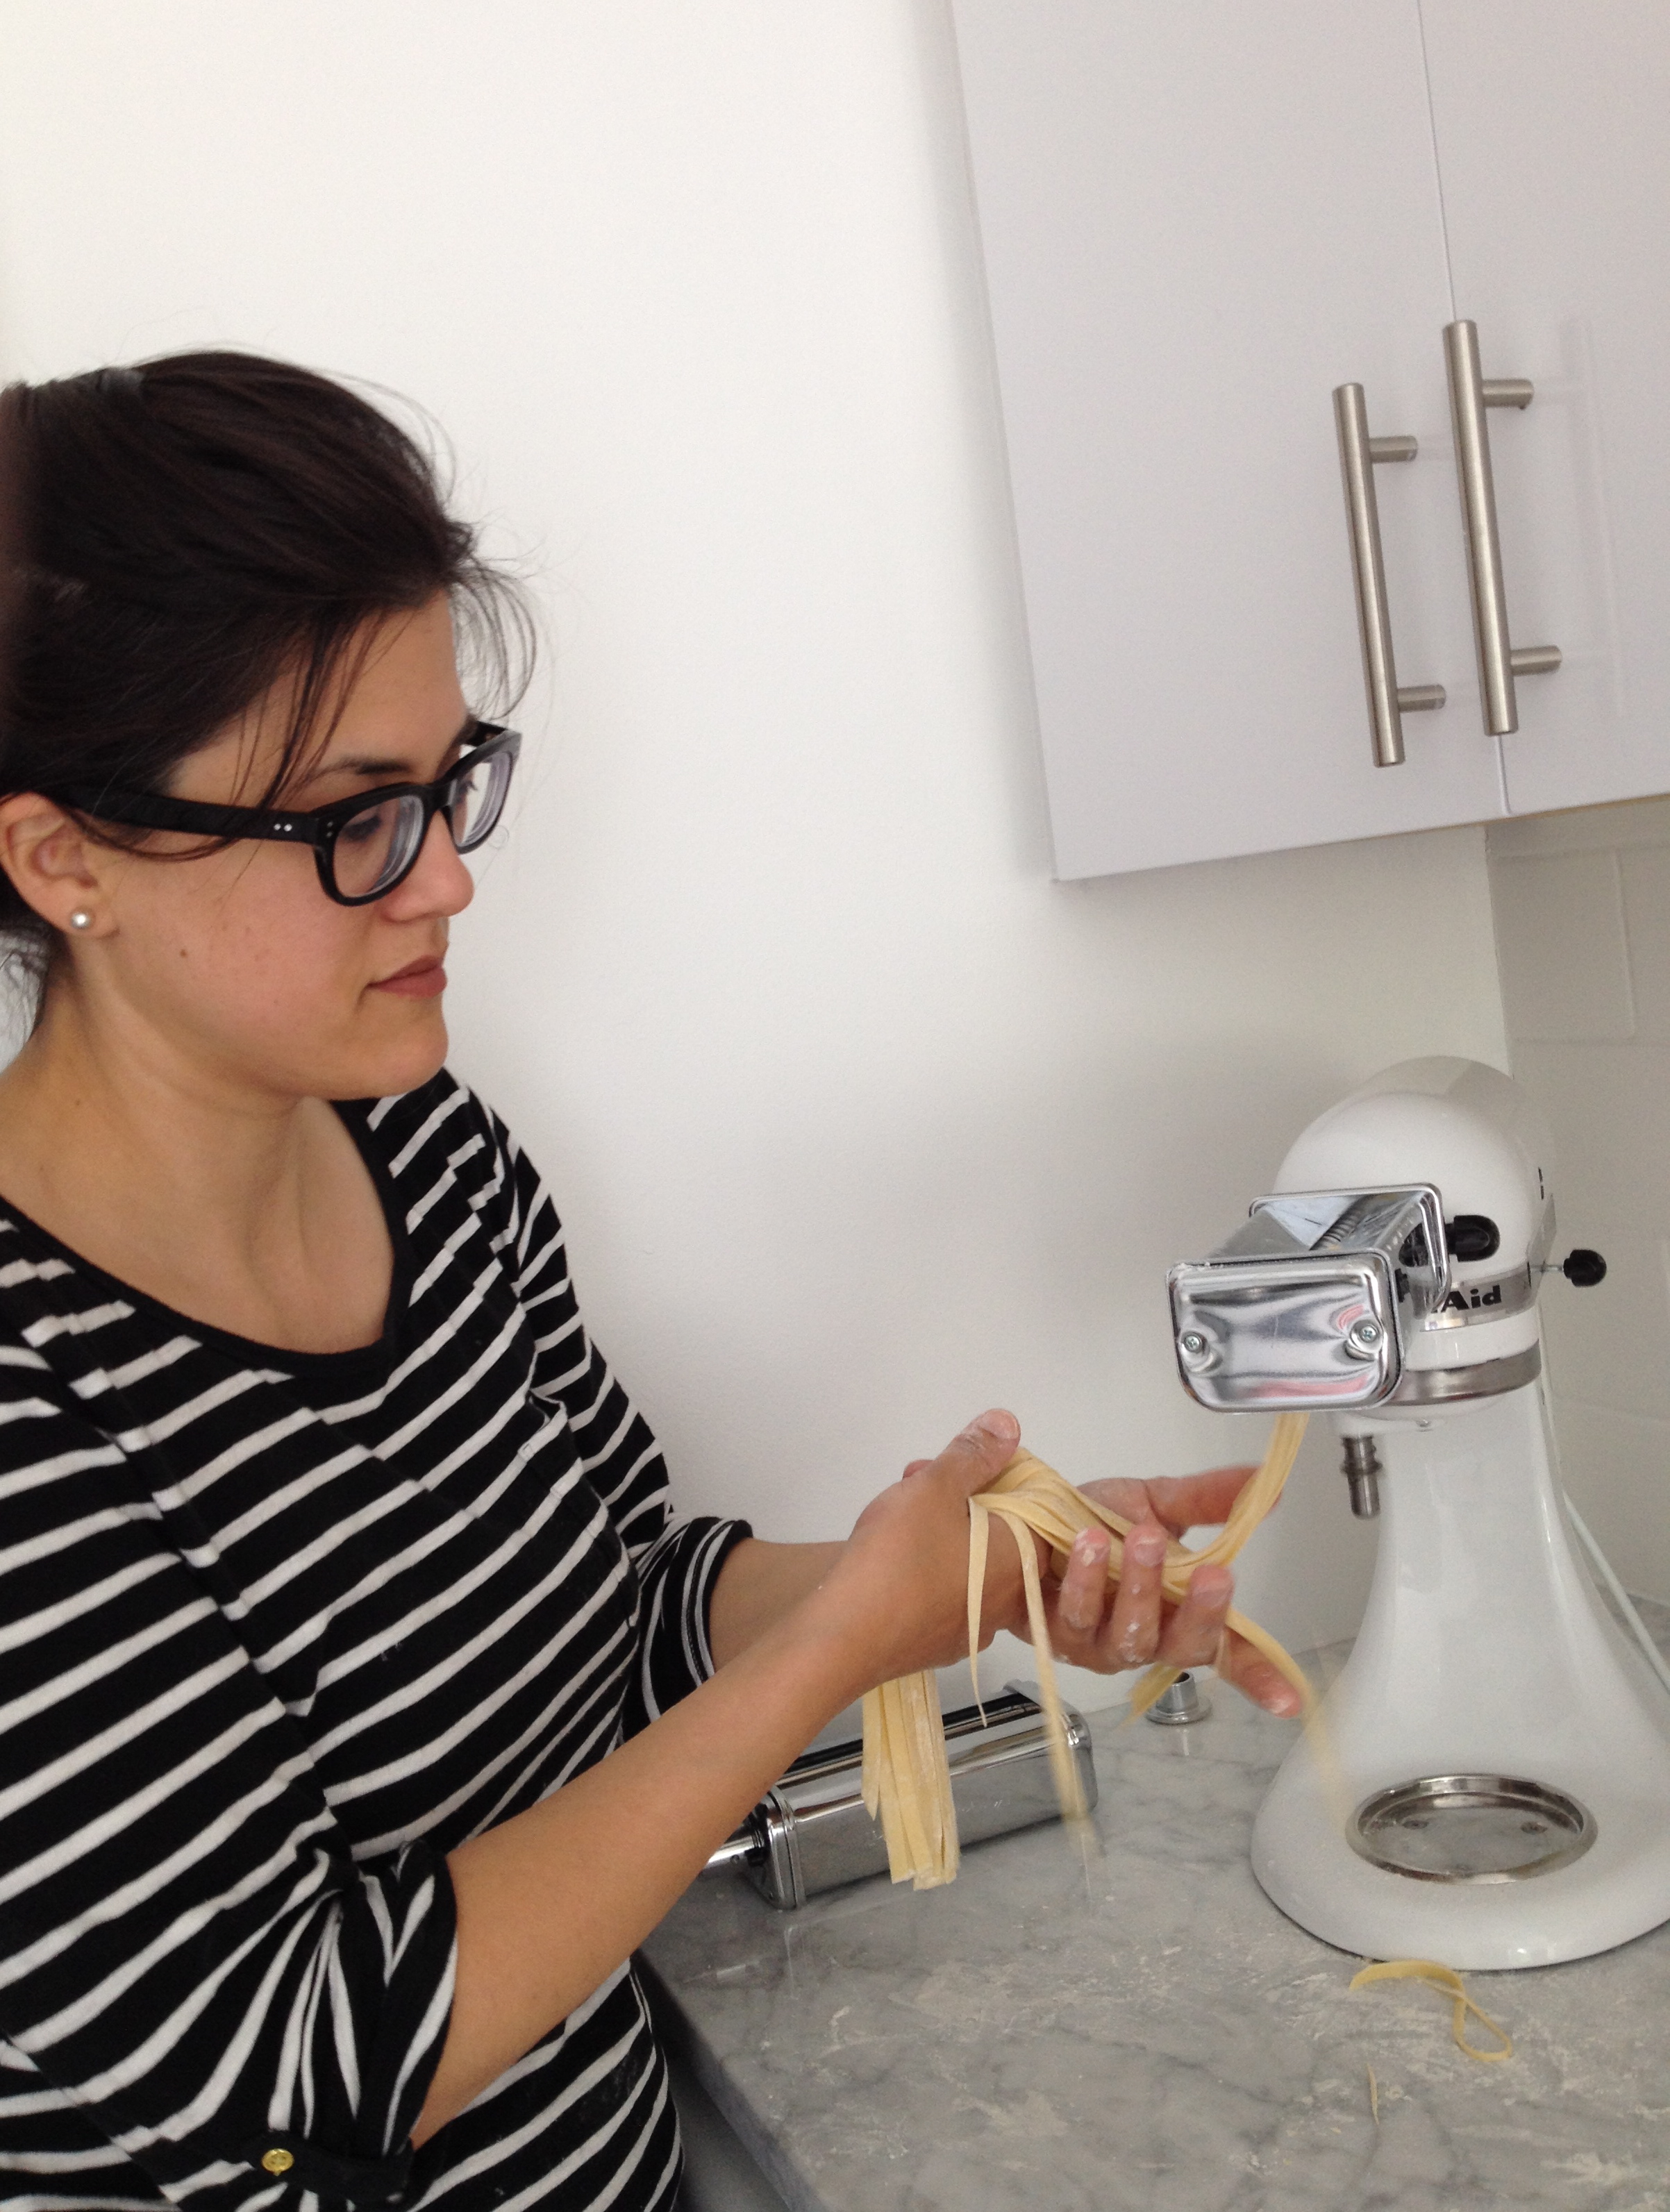
 I like twisting the pasta into round spirals, but I flour the heck out of them before doing this to avoid sticky strips. The pasta (both versions) turned out very well, and it was delicious paired with fresh tomato sauce (I tried my mom’s sauce recipe, which she thought was almost as good as hers…tough crowd). In the end, neither of us are sure of the amount of ingredients that my mom used to adjust the KitchenAid dough, but if I try the recipe again, I’ll start with 2 cups of flour and add more as needed. KitchenAid sent over another version of the recipe when they heard I was in pasta-making distress (via Twitter, naturally), so I may give that one a try too.
Thanks, Mom, for your help and for snapping some great photos!
I hosted my parents this past weekend and I just had to show off my KitchenAid stand mixer. (I’m a Leo. We like attention.) I decided to test out this lemon poppy seed cake recipe that Joanna Goddard featured earlier last week. To everyone who is reading – this cake was super easy. If you like lemons and cake and poppy seeds, you should make it.
My KA stand mixer worked brilliantly and made the whole cake baking process go really quick and smoothly. For beautifully styled food photos, have a look at Joanna’s post. For photos of my version, keep reading…
sugar, flour, and poppy seeds are measured out
butter and sugar are creamed together with the KitchenAid paddle attachment
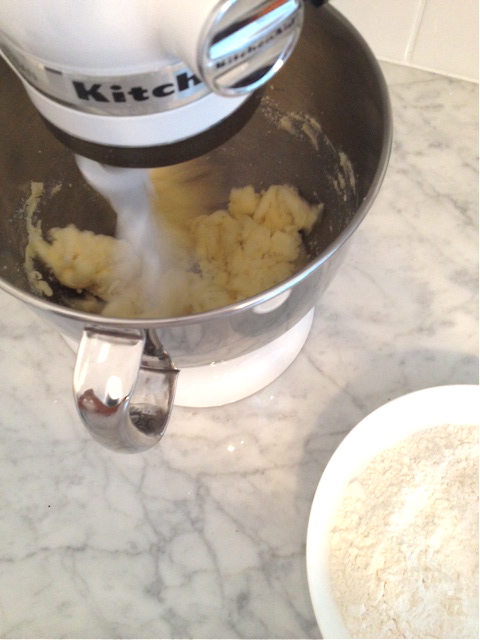
flour is added once the sugar and butter are creamy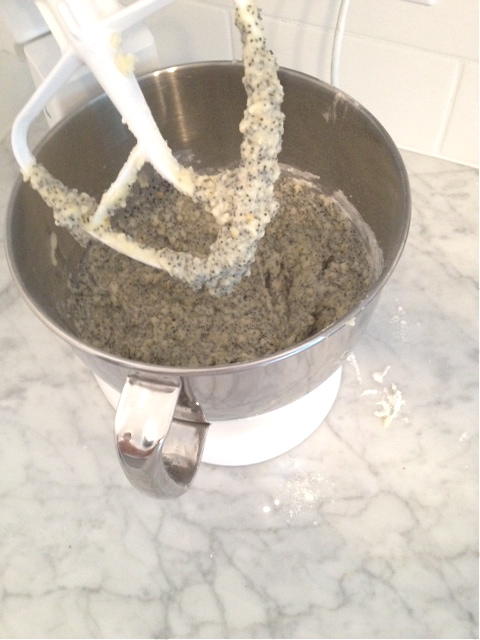
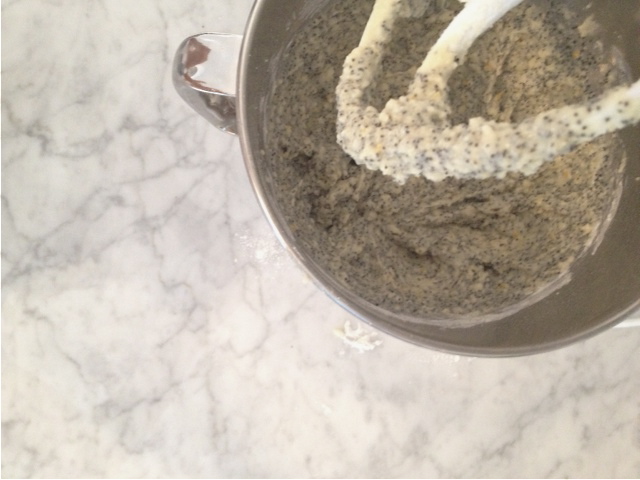
eggs, milk, poppy seeds & lemon zest are added at the end
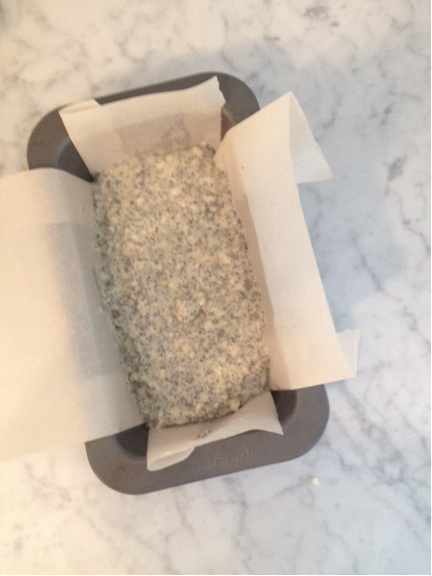
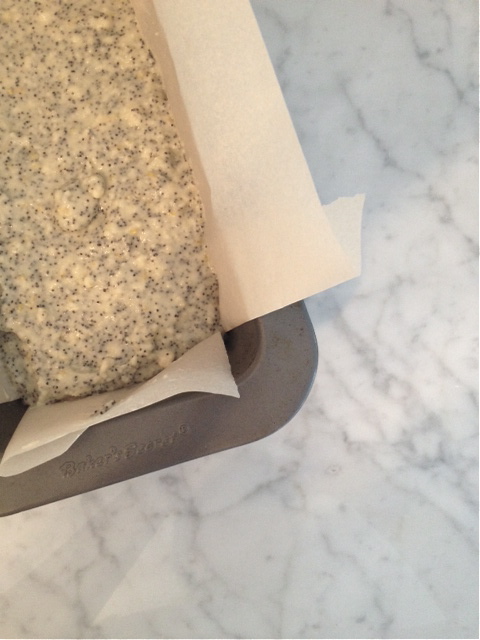 the dough is poured into a buttered & parchment lined loaf tin
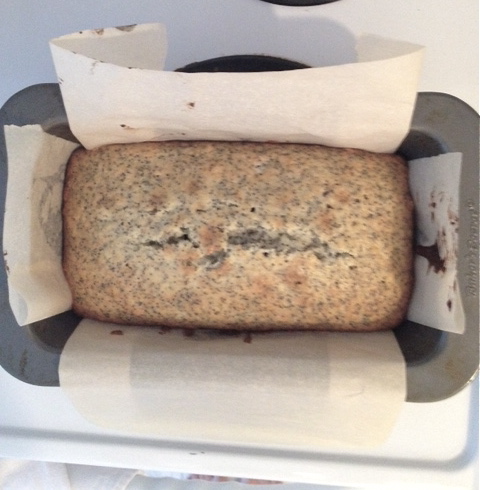
after about 40minutes in the oven, the cake is ready
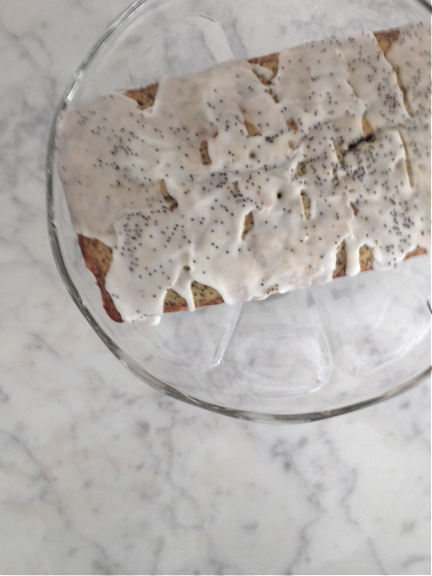
a sugary lemony icing is poured and poppy seeds are sprinkled on top
Here’s the complete recipe – from April Carter of Rhubarb and Rose (via Cup of Jo):
Recipe: Lemon Poppy Seed Loaf Cake
For the cake:
¾ cup unsalted butter, at room temperature
¾ cup sugar
1 ¼ cup all purpose flour
2 tsp. baking powder
pinch of salt
2 eggs
¼ cup milk
¼ cup poppy seeds
Zest of 2 lemons
For the glaze:
1 cup powdered sugar
Juice of ½ lemon
Poppy seeds, for sprinkling
Heat the oven to 350F and butter and line a one pound (4½ x 2½ x 8½ inch) loaf tin with baking parchment. Place the butter and sugar in a bowl and beat with an electric mixer until pale and creamy. Sift in the flour, baking powder and salt. Add the eggs, milk, poppy seeds and lemon zest and beat until just combined, scraping down the sides of the bowl with a rubber spatula as you go.
Spoon the mixture into the prepared loaf tin and bake for 40 to 45 minutes or until a skewer inserted into the center of the cake comes out clean. Allow the cake to cool in the tin for 10 minutes, then turn out onto a wire rack and remove the baking parchment.
While the cake is cooling, make the glaze. Use a spoon to beat the powdered sugar with enough lemon juice to form a runny but opaque glaze. Set the cooled cake on a wire rack and drizzle over the glaze. Sprinkle over the poppy seeds and allow the glaze to set for a few minutes before packaging up.
Let me know if you give this recipe a try. I would love to know how it turned out for you.
Little Mayhem‘s popularity is rising. The dresses she creates with her mom are pretty darn cute, but this one is my favourite look.
Apparently, the day Mayhem and her mom created this ensemble, she requested “All white today. And a fabulous headpiece too.” She just rocks that headpiece, doesn’t she?
A loonie can buy you this Tolsby photo frame from Ikea. For a toonie, you can buy two.

Tolsby frame, $0.99
Don’t want to use it for a photo frame? Have a look at the Tolsby hacks here and here.
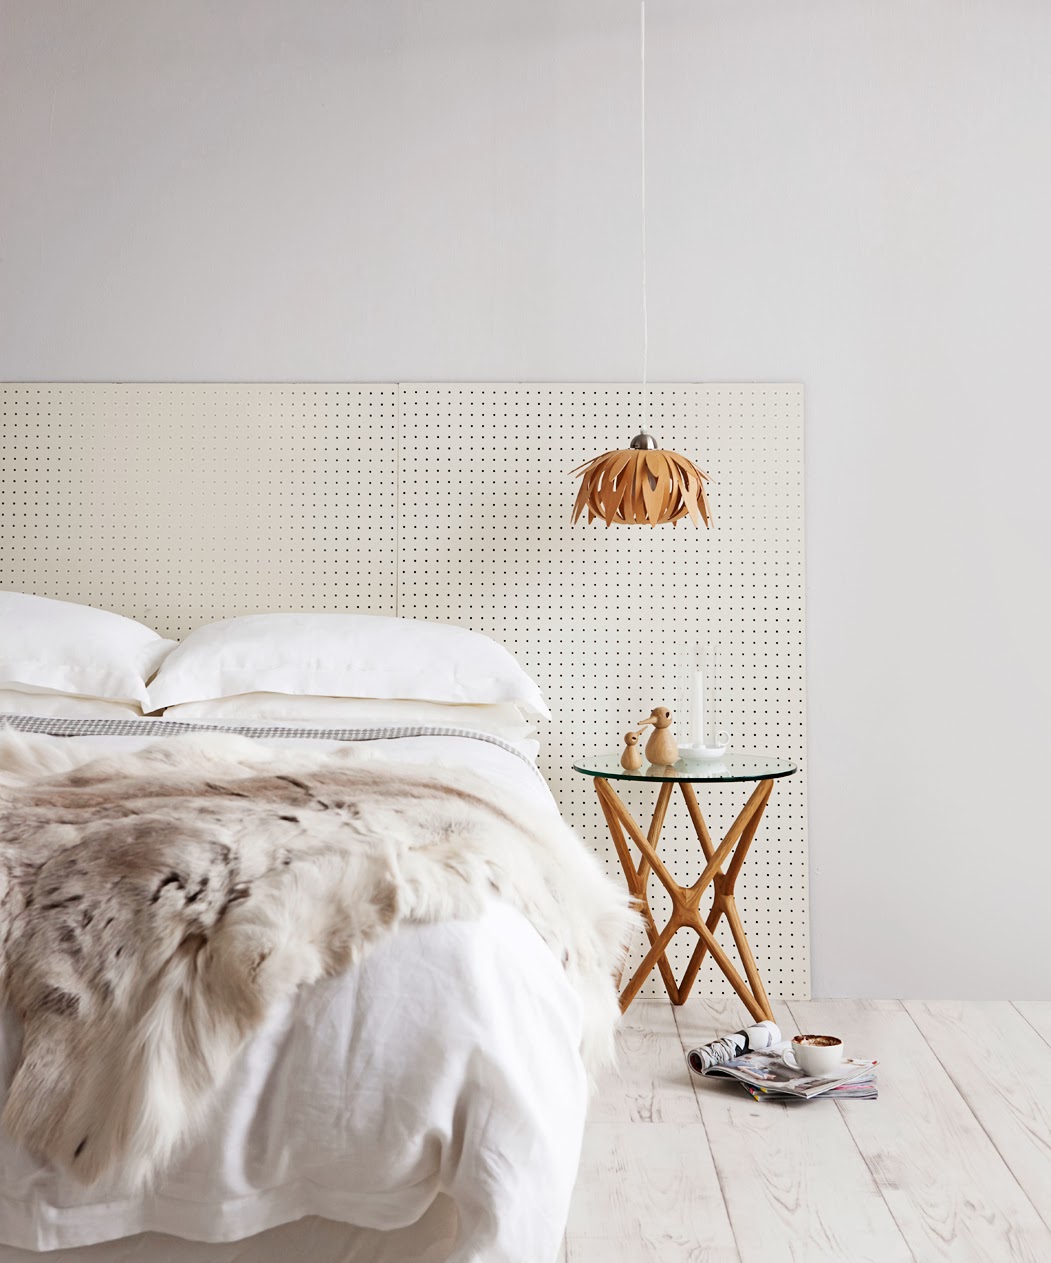
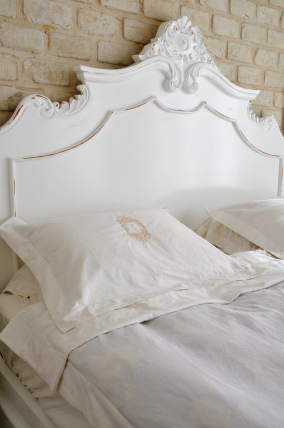
I’m going to need a new headboard, eventually. I am completely fine with the one that I currently have, but getting a new one has crossed my mind. But then again, what hasn’t crossed my mind in terms of home decor?!
The headboard below is actually a pegboard. A super easy DIY that makes for a really modern and interesting backdrop.
This next bed is sans headboard and it still looks like a completely finished bed. The paintings over the bed add interest and focus to the space. While I love the crispness of this space, I much prefer a bed with a real headboard.
South Kensington home, London, UK
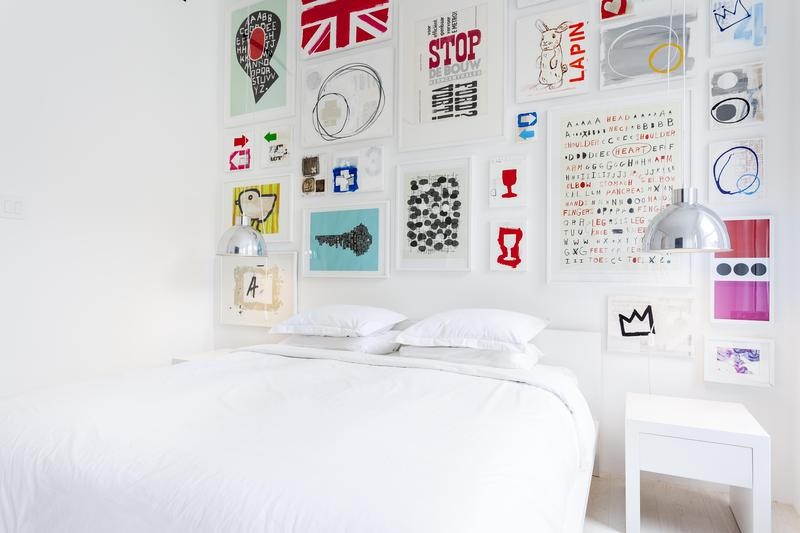
The headboard below has such a low profile. You can barely see it, but it’s definitely there. The gallery wall above the bed is so interesting and colourful. I love it. I probably wouldn’t put a full gallery wall over my bed though, because I’d be too scared that something would fall on top of me.
Manhattan apartment, Flatiron District
I love the detail of the headboard below. It’s like a piece of art and serves as a nice focal point in this minimalist space.
apartment in Tribeca, Manhattan
I can’t quite tell if the headboard in the room below is made out of wood or metal, but I like it. It’s a classic.
Ah – simple, simple, simple. An upholstered bed frame is so comfortable to lean against. Love it.

upholstered headboard, Greece home
Reading in bed would be so easy with the headboard below. This DIY appears to be an easy and inexpensive one.

DIY headboard of books, Design Every Day
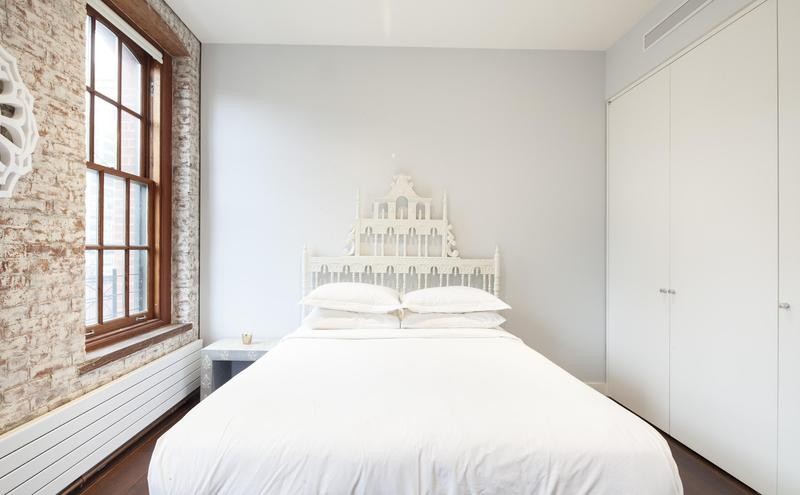
The final headboard is classic carved wood. There are a lot of these – in wood – on places like Kijiji and Craigslist, but they’d be easy enough to paint. All of my bedroom furniture is painted wood so something like this would completely fit in.
Do any of these headboards stand out to you? What’s calling your name?
As you may have noticed, I’ve taken a few days off from the blog to celebrate the holidays, have some downtime, and continue to do work around my home. I hope you have enjoyed a wonderful Christmas with friends and family and that you’re now ready to welcome in the new year!

via Style Me Pretty
I am wishing all my readers, sponsors, and blogger colleagues a most happy and successful 2014. Happy New Year!
Brr…it’s cold outside! I’m adding some warmth to the blog today by way of candles and soft lighting.

Jeff Loves Jessica Photography via Style Me Pretty

Melissa Schollaert Photography via Style Me Pretty

via Colin Cowie

via Colin Cowie

via Pinterest
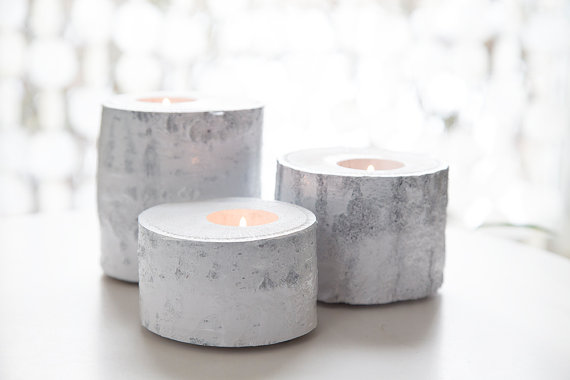
There. Are we warm now?
DIY and diamonds don’t seem to go together, do they? Oh, but they do! Have a look…

via Design and Form


via I.De.A.
Have a wonderful weekend!
Here is my nephew Reef dressed up as a ghost last year (or was it the year before?). Easiest costume ever. And cute too!

Happy Halloween!
I saved this Halloween DIY from last year. It’s cheap and easy to create and the effect is, well, scary.

via Delia Creates
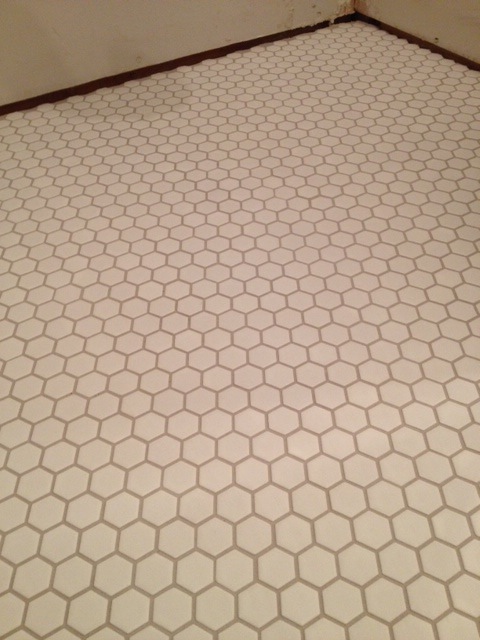
I’m pleased to announce that I have now completed the tile work in my powder room. I ordered the grout – smoke grey – from Twin City Tile and grouted the floor over the Thanksgiving long weekend. I am SO incredibly pleased with the floor and I am SO glad I decided to rip out the vinyl.
Grouting was easier than laying the tiles down. I was certainly less stressed about this part of the process. How did I get the job done? I followed the directions on the grout package as well as the instruction I received from the Home Depot tiling workshop I attended and the mini lesson I received from Silvano at Twin City Tile. I mixed the grout powder with water and stirred it all up (with a paint stick – it was a small batch so this was good enough) so it had the consistency of pudding or icing (tiling and grouting is just like icing a cake!). I used the spatula (grout spreader) and moved the grout into the spaces like I’ve seen on TV (honestly!). I let the grout dry for about 10-15 minutes and then spent quite a bit of time (over an hour maybe) cleaning the tiles very carefully. I knew I couldn’t leave any grout residue on the tiles otherwise my floor would be ruined. I spent so much time wiping the grout off with a damp sponge just as I had been taught (one direction, rinse the sponge after each wipe, etc.). It was time consuming but very satisfying. I then let the grout dry for a few days (I think it only needed 24 hours) before I actually stepped on the floor.
The room is almost done. Since the last powder room progress update I bought a new toilet (dual flush – so fancy) and a new mirror. I (and my handy parents) now just need to…
– sand the walls
– prime the walls
– paint the walls
– buy baseboards
– install baseboards
– install vanity (this one)
– install faucet (this one)
– install toilet
– install light fixture
– install mirror (from here)
And then the room will be ready for a big reveal!
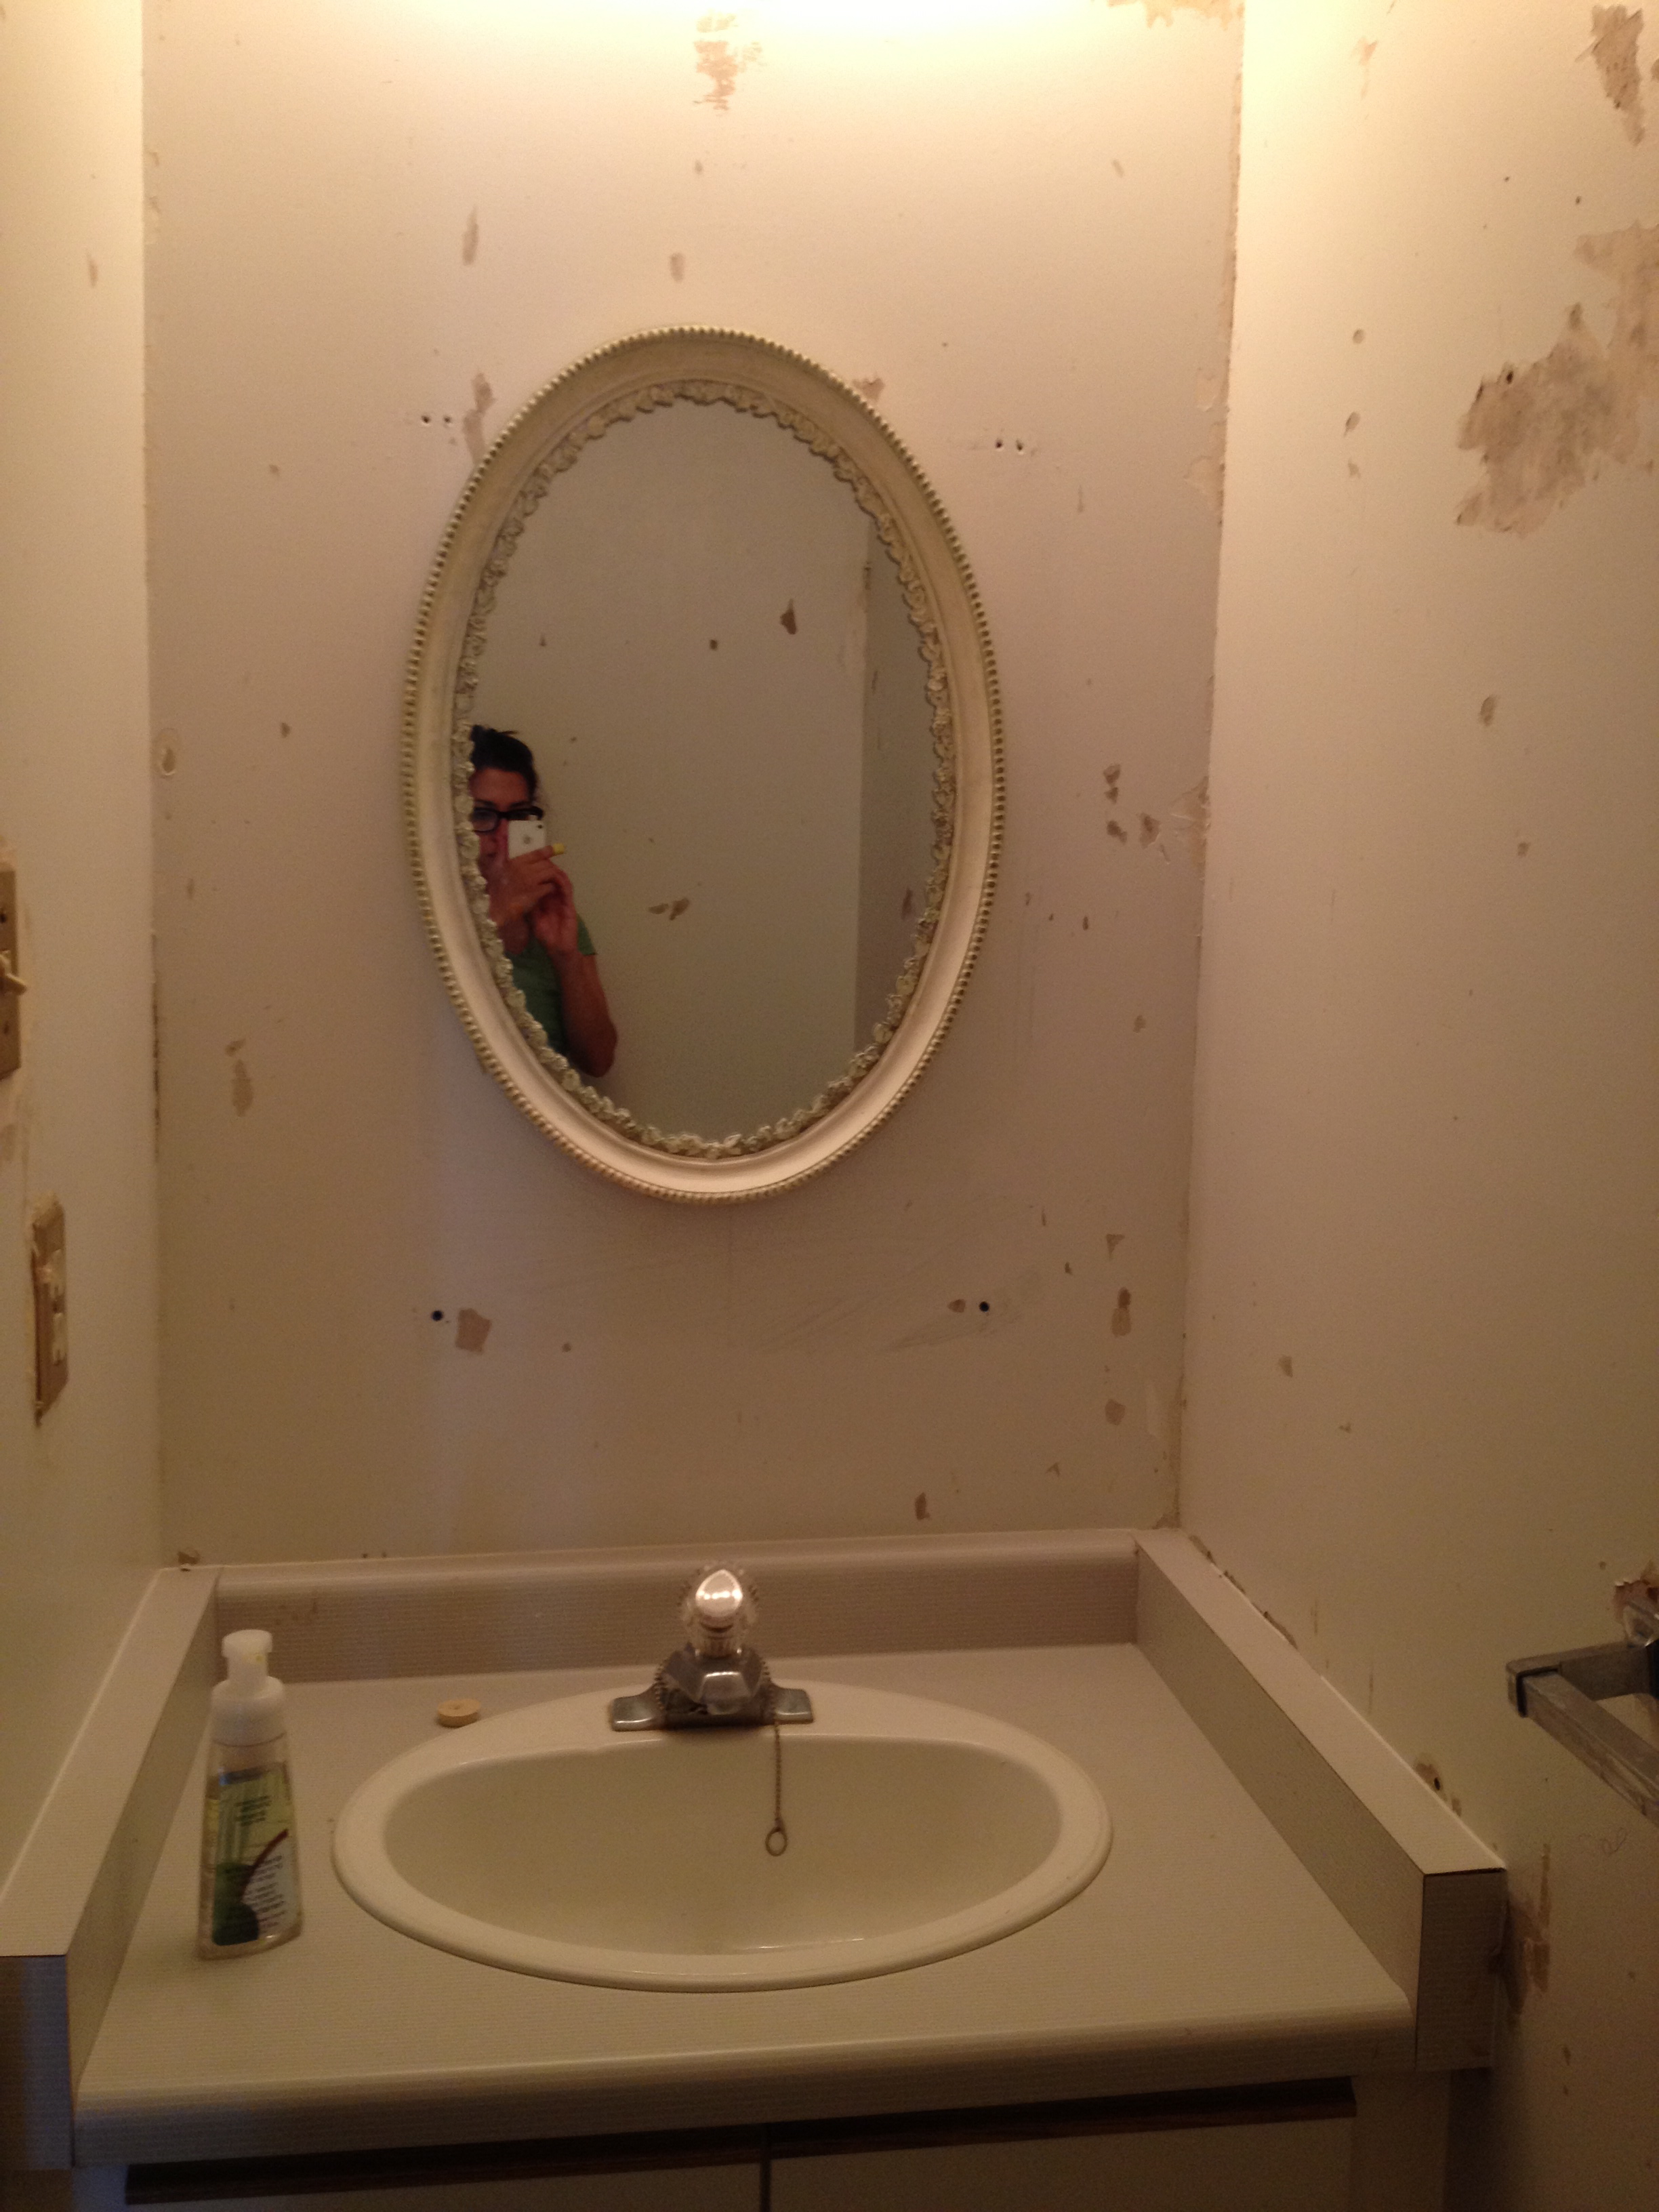
When I moved into my house, my plan for the powder room was to rip off the wallpaper and install a new faucet. Well, plans change.

powder room before
The powder room is now getting a full makeover. Oh, how I love a good makeover story! Progress has been slow but steady and I am really enjoying the full reno experience (minus the mess and constant clean up). To begin this makeover, I spent several evenings ripping down the wallpaper. Then I spent several more evenings (and weekends) scraping wallpaper glue from the walls.
powder room – progress – wallpaper removed
It didn’t take me long to decide that I wanted a new vanity so at this point I handed the room off to my dad who, in addition to patching up a whole bunch of holes (thank you so much wallpaper glue) and rearranging the light source, removed the vanity and toilet. Once the room was empty, I decided that the vinyl flooring had to go so I ripped it out one Friday evening. I ripped it out without really planning what was going to come next but I was encouraged by a chat with Tia and a visit to Twin City Tile.
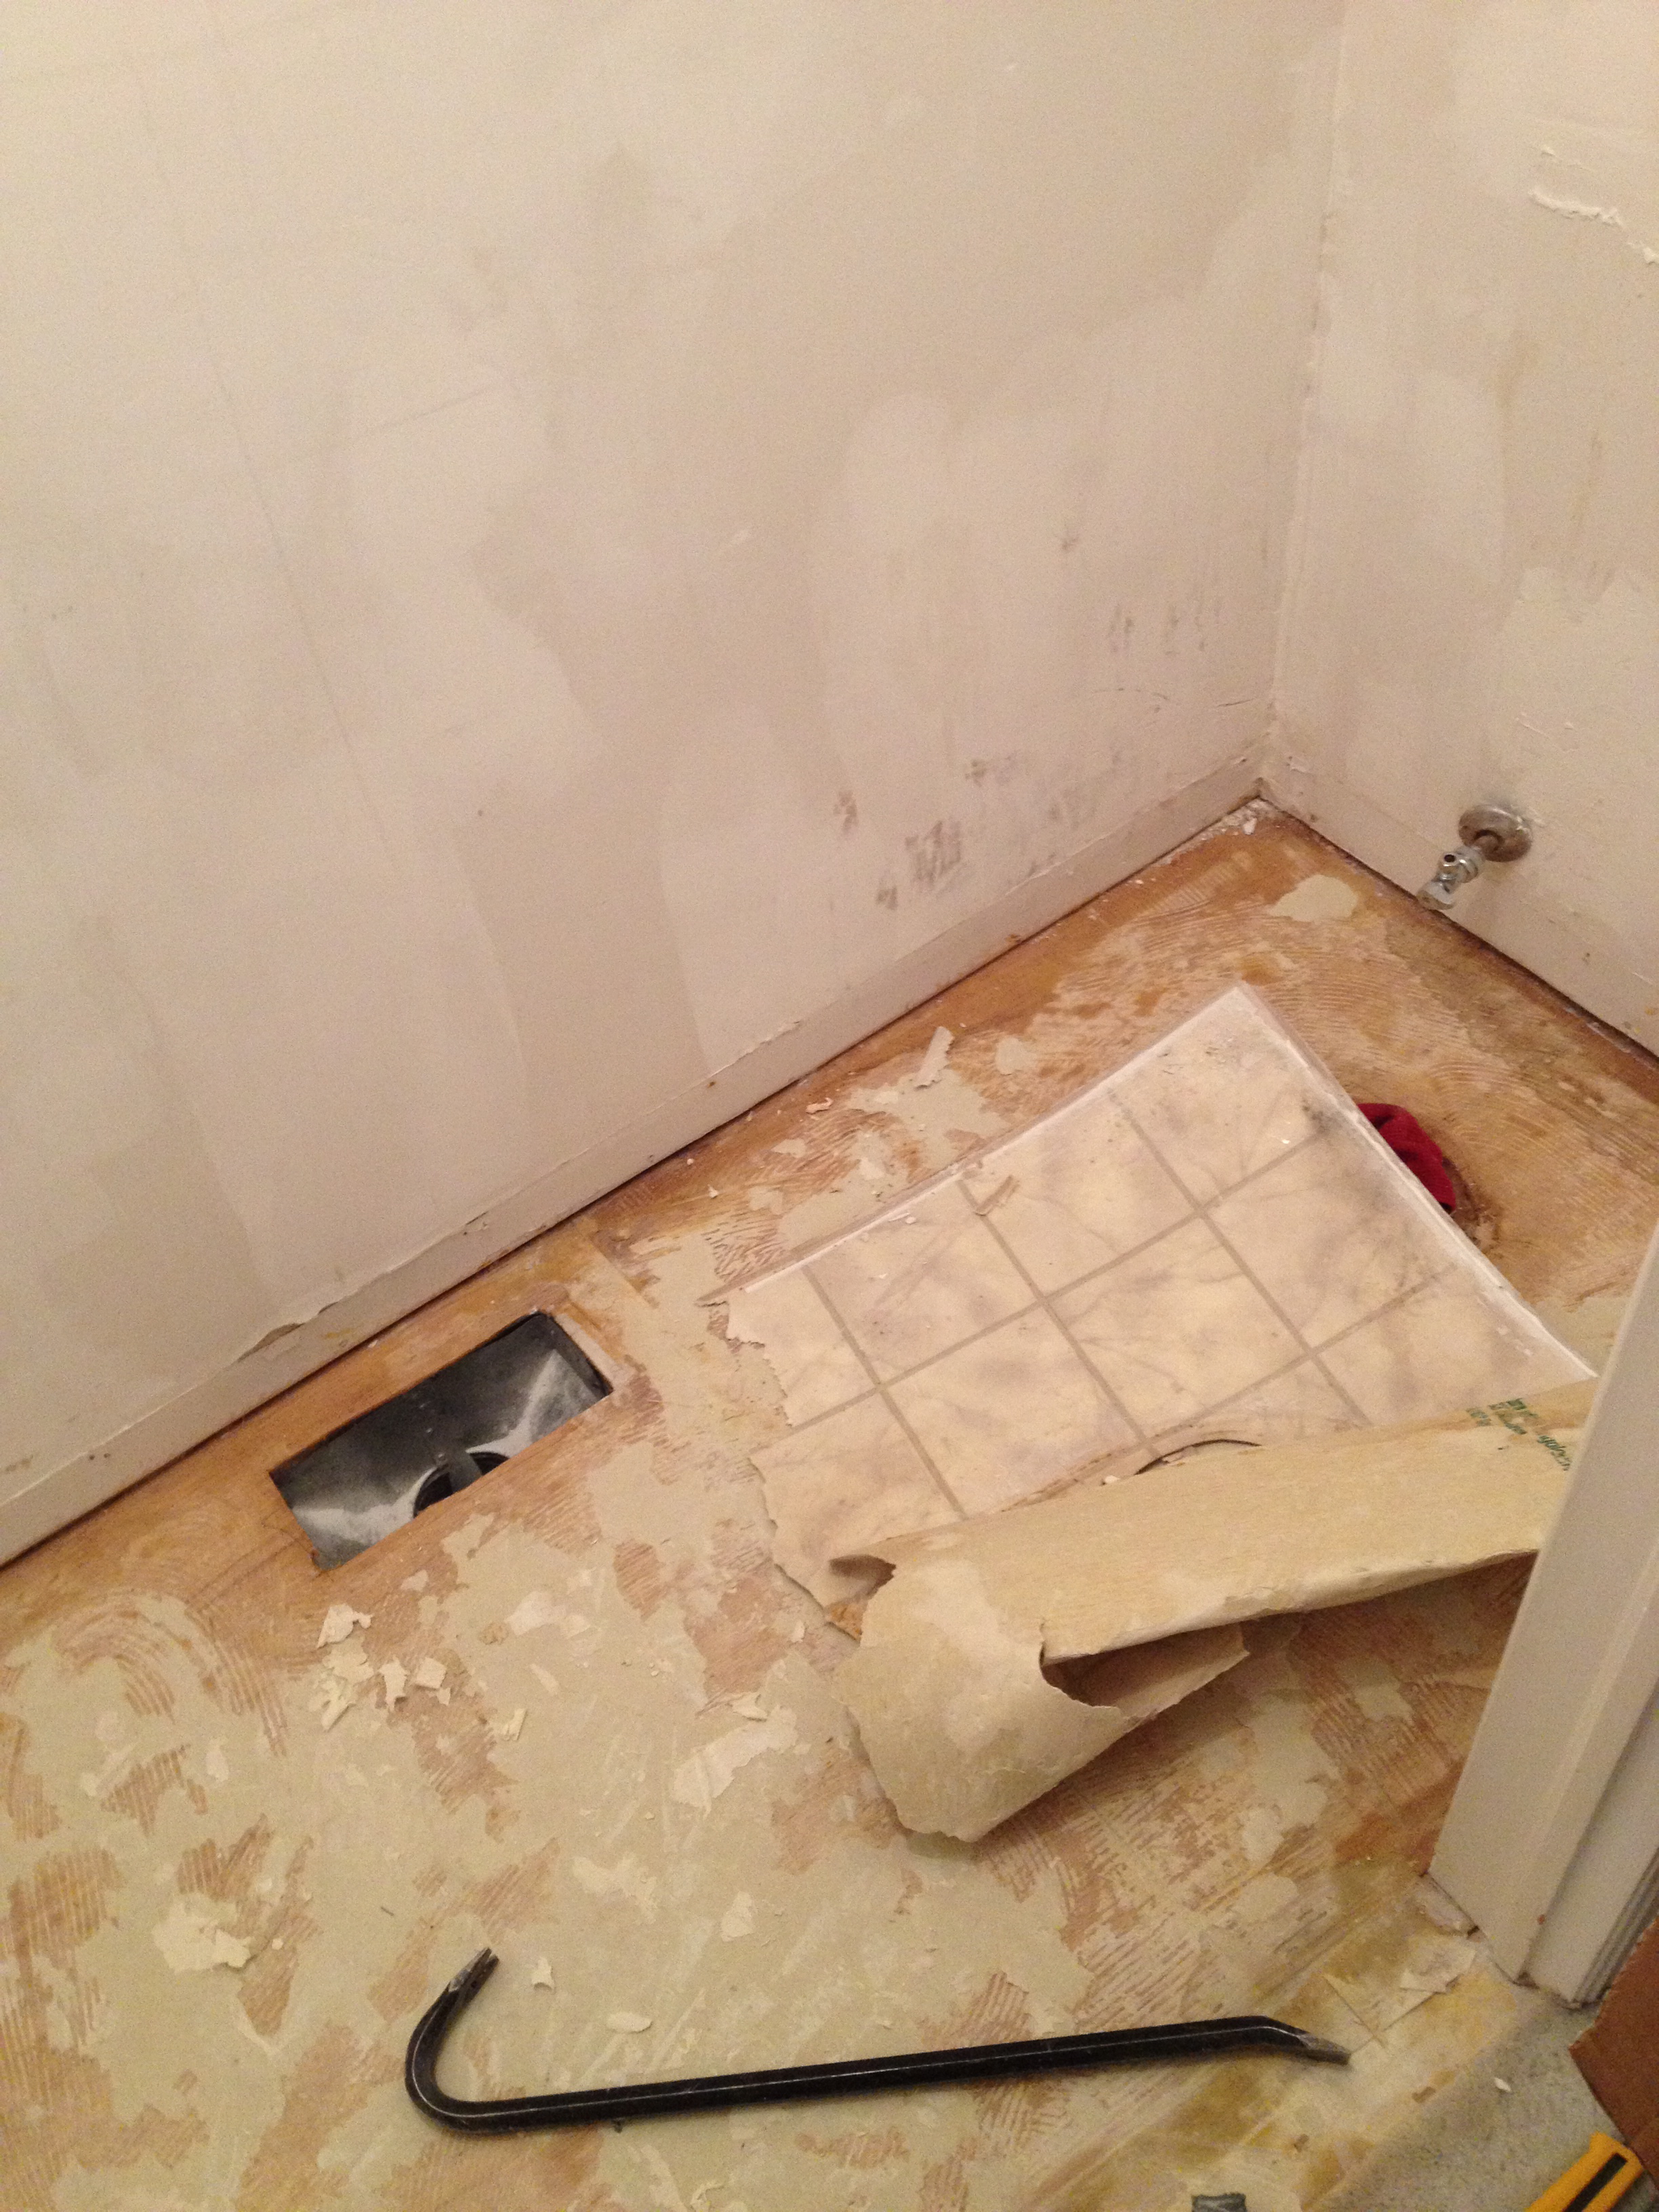
powder room – ripping out the vinyl floor
In between all of the destruction, I bought a new sink and vanity. I placed a tile order with Twin City Tile feeling only half-way confident that I could actually install a new floor by myself. After a mini-lesson from Silvano, I realized that I would need to install a new sheet of plywood over the subfloor in order to ensure a smooth installation of the new tiles. My dad and I cut a piece of plywood to size and the difference it made was pretty impressive. With the new flat floor in place, I went ahead and planned out the tile placement. I started with finding the centre point in the room and drawing lines to help line up my sheets of hex tile.
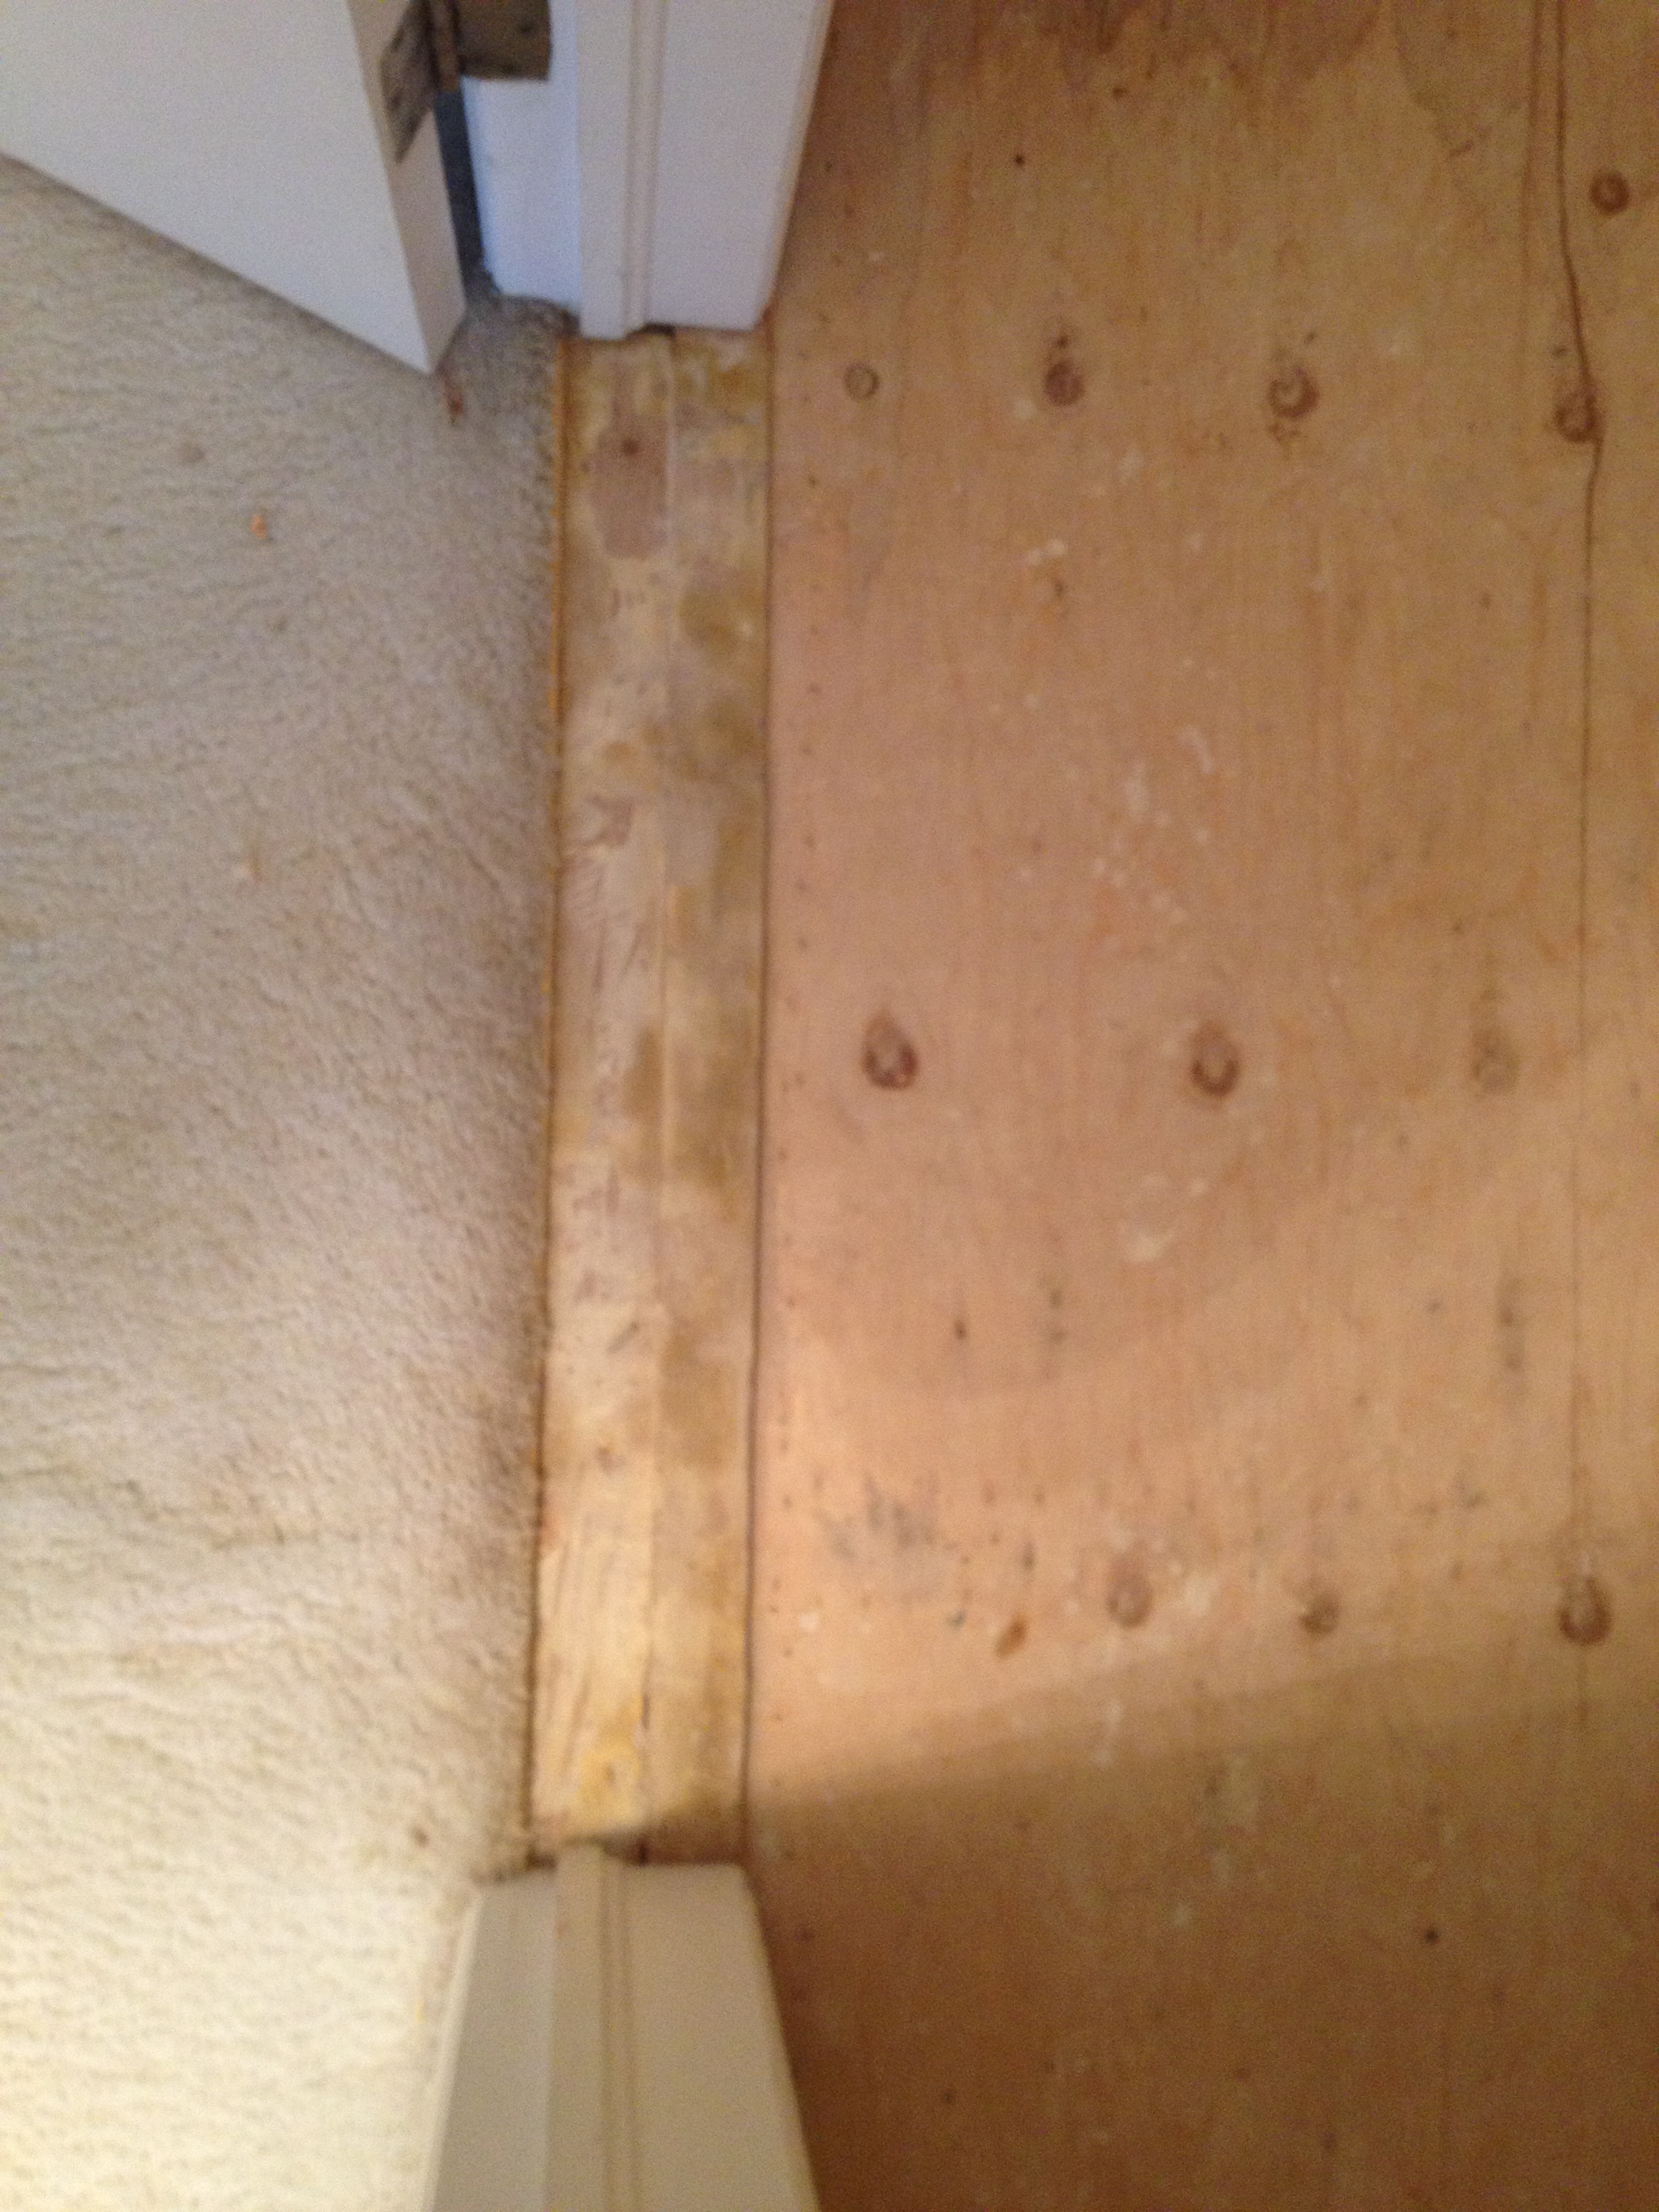
powder room – new subfloor ready to be screwed down
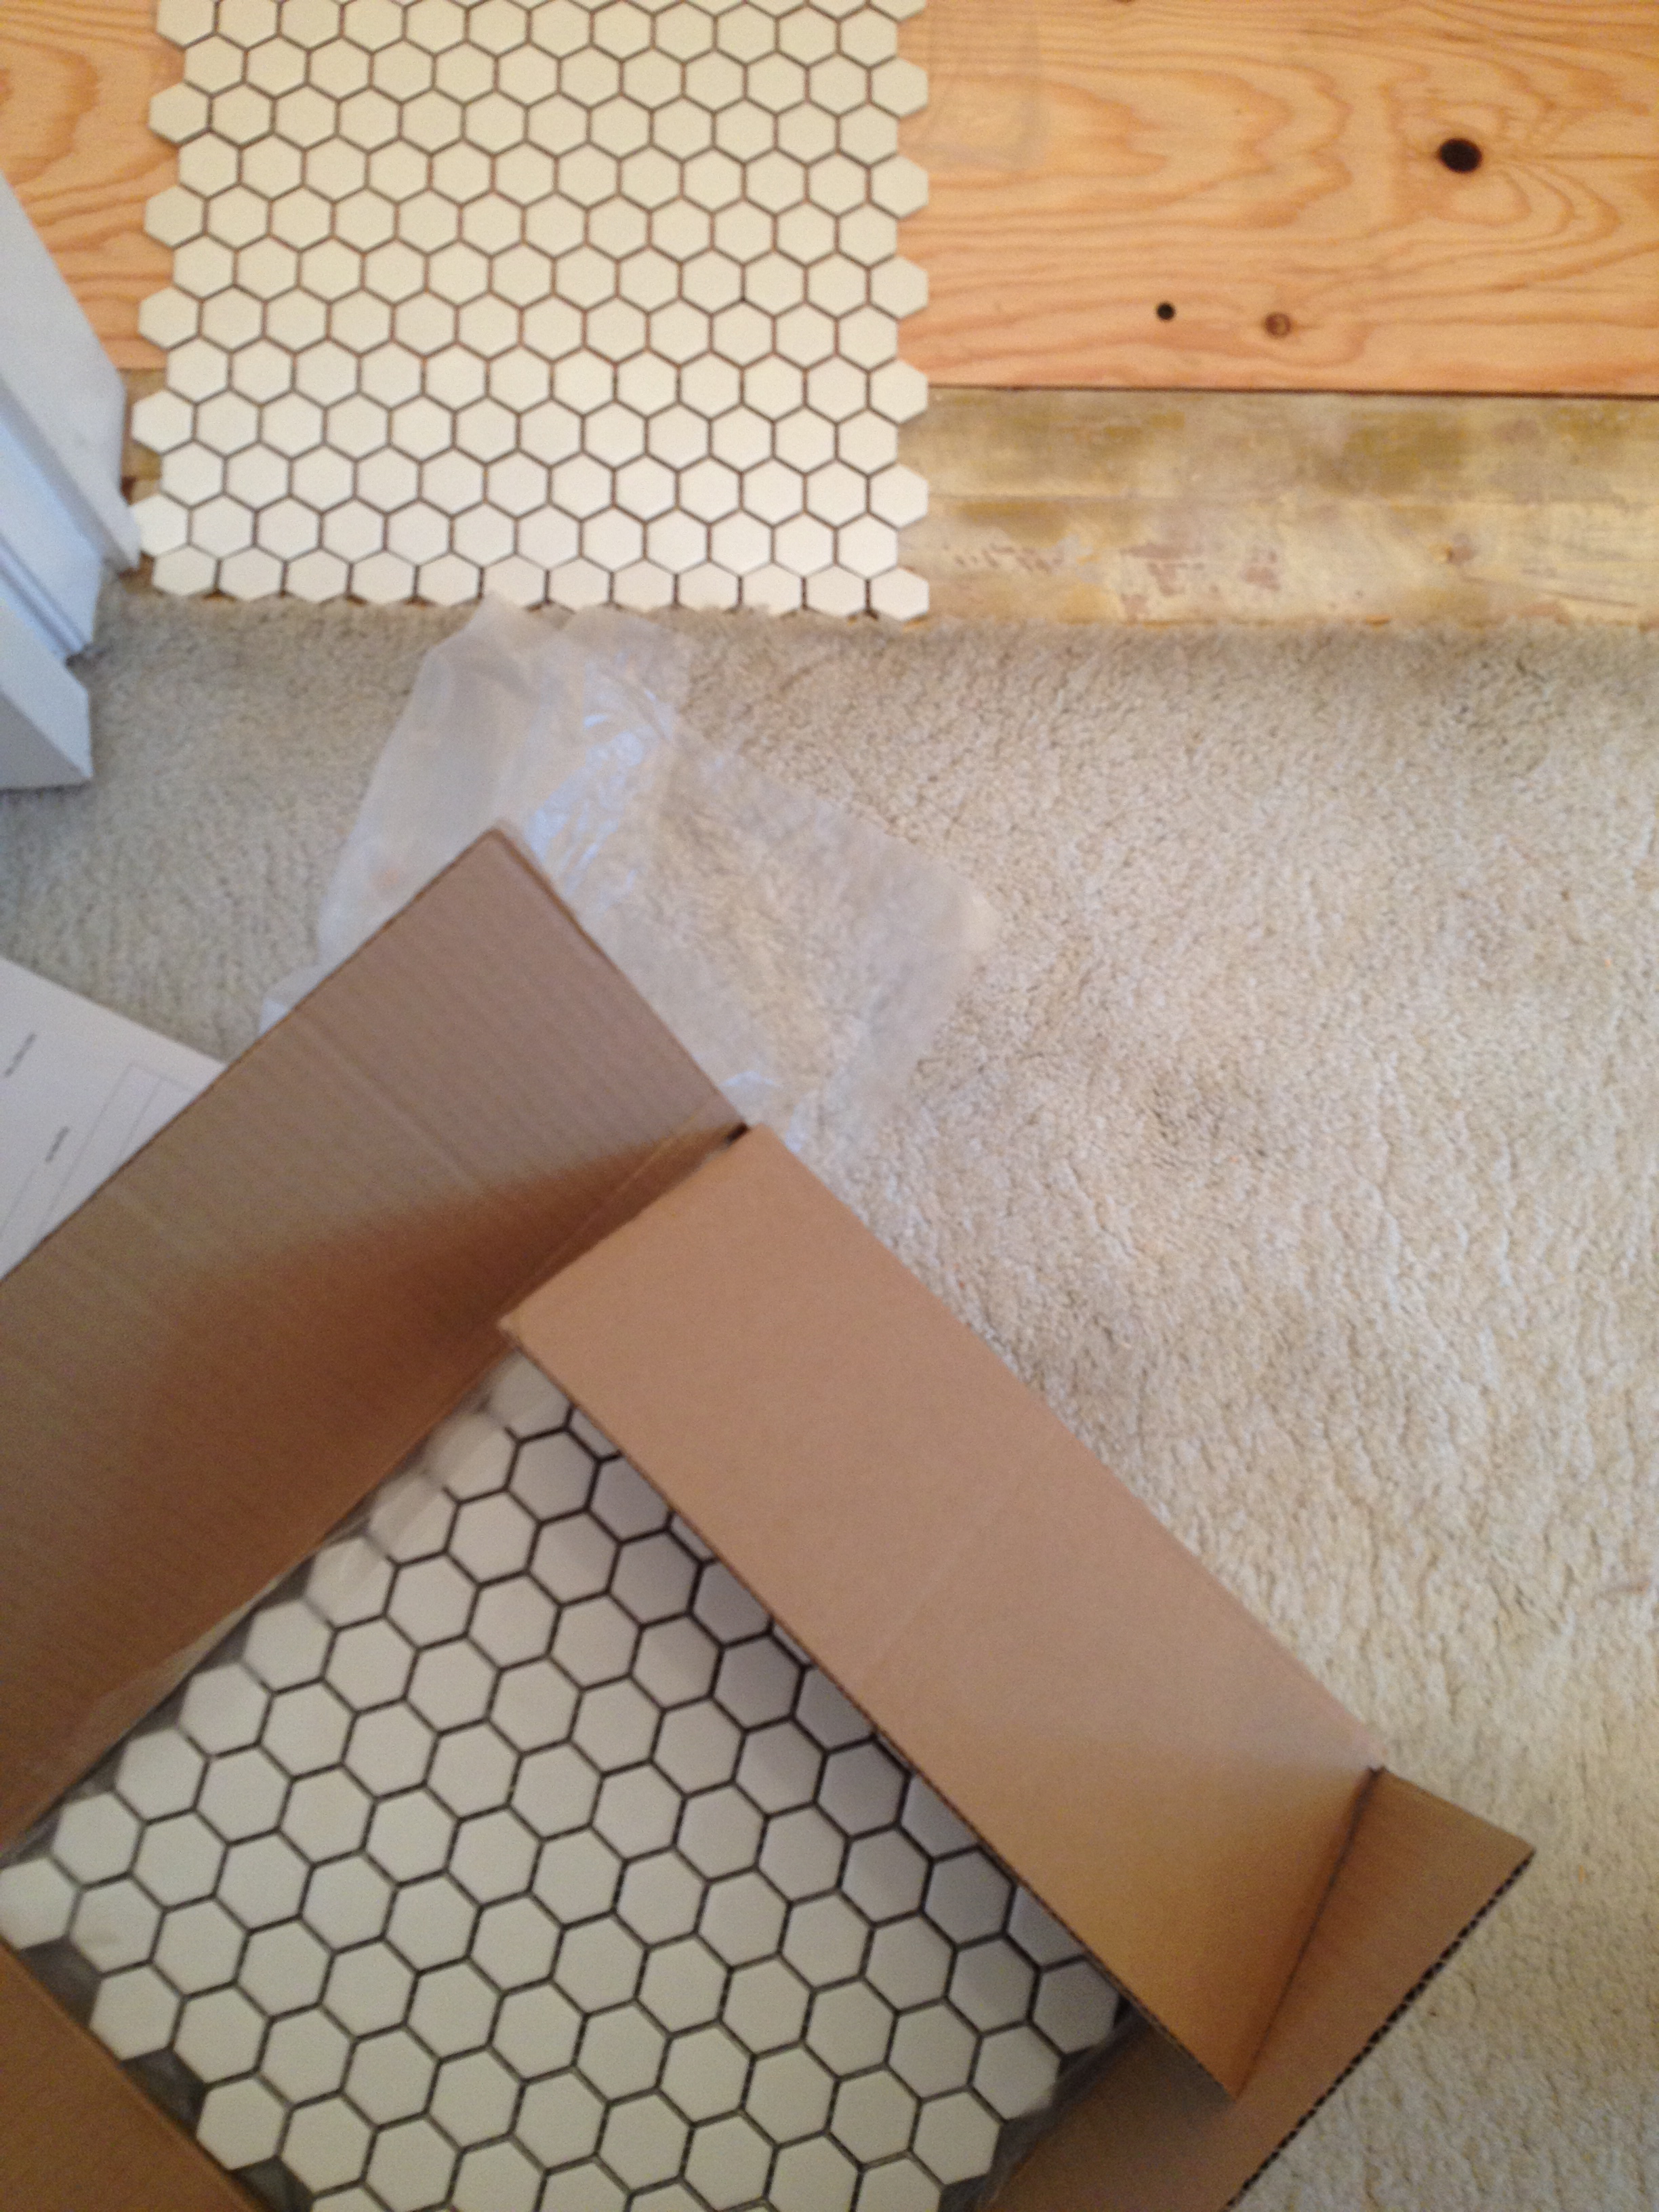
planning for the new tile floor
Over the period of 4 hours, I managed to dry-fit my tiles in the space, figure out how to mix adhesive to the correct consistency (not too soupy), and installed my tiles. I’m SO happy with the progress I made and I am incredibly proud that I managed to lay my first ever tile floor*.
 top view of the powder room – new tile floor is secure!
I haven’t grouted yet. I’m going to try and get to it this week or upcoming weekend. I am leaning towards a grey grout. Then I’m going to build my vanity and figure out how to do plumbing**.
* Thanks to Silvano at Twin City Tile for a mini lesson, the Home Depot for offering a free backsplash installation workshop, and for the blogging community for documenting the tile installation process. I’ve learned so much from you all!
**I’ll likely leave the plumbing up to my dad. We’ll see.
Two new items have made their way into my home recently…

roller frame, $5.99, Home Depot

microfibre paint roller refill, $12.97, Home Depot
and they’ve been put to good use!