Food: How to Make Gnocchi

Easter lunch at my parents’ place means gnocchi. This tradition certainly makes me a happy daughter! My mom’s gnocchi and tomato sauce is amazing. While I always help out – we all have our jobs when it comes to making gnocchi for a gazillion people* – this year, I tried to document the gnocchi making process just in case some readers are interested in learning how to make it.

This isn’t a definite recipe. With much of my mom’s cooking (and recipes), you just “have to feel it”. This makes learning a bit of a challenge, I have to say, but I’ve gotten better at figuring out what “feels” right, and I’m sure you will too!

1. Boil a bunch of potatoes with the peels on for a bunch of minutes so they soften.

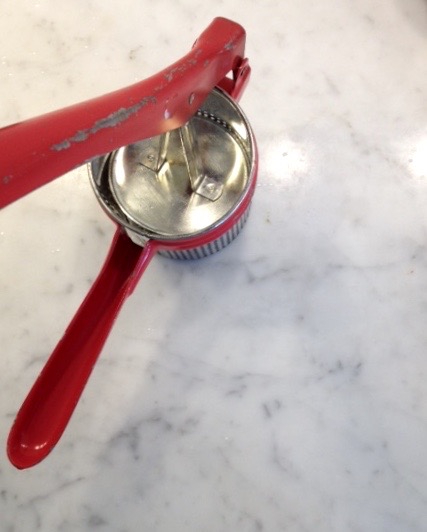
2. Drain the potatoes, peel them, and smoosh them in one of these potato press gadgets. (You can also use a food mill, but mom recently told me that she likes the results from the potato press better than the food mill.)

White-Cabana-how-to-make-gnocchi-5

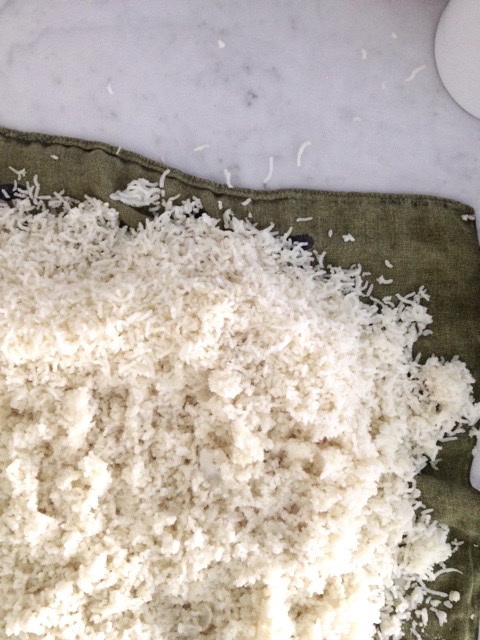
3. Spread the grated/smooshed potatoes onto a clean tea towel and let them cool.

White-Cabana-how-to-make-gnocchi-1

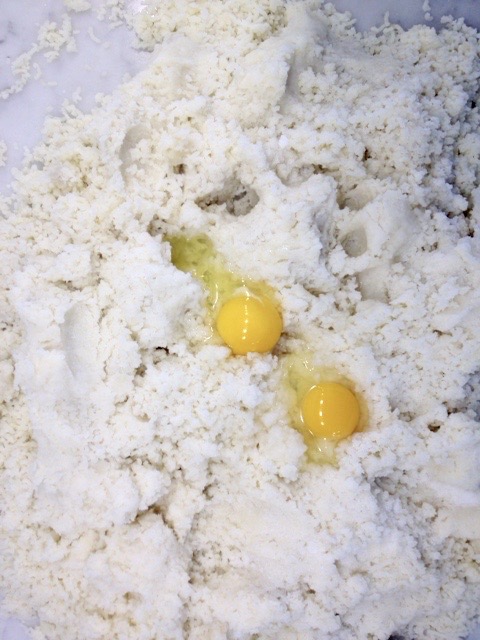
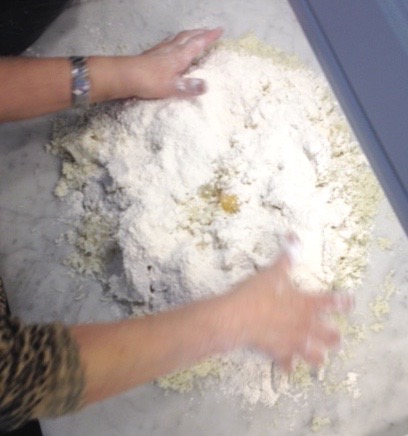
4. Once cool, put the grated potatoes onto the counter, crack two eggs on top of them, and spread a bunch of flour around the pile of potatoes.

White-Cabana-how-to-make-gnocchi-2

White-Cabana-how-to-make-gnocchi-3

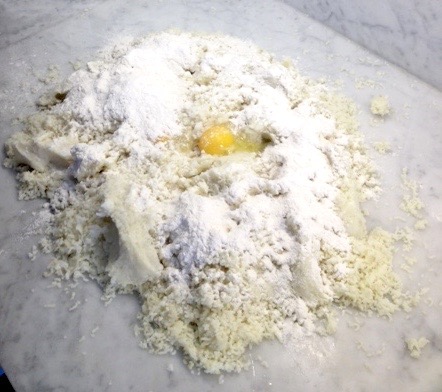
5. Gather these ingredients together, then knead, knead, knead, and knead some more. The consistency has to be “just right” so “feel” the dough and stop kneading once the texture is good. If the dough is too soft, the gnocchi will lose its shape. If it’s too hard, it’ll be tough to eat. Like I said, the dough should “feel right”. Good luck!

White-Cabana-how-to-make-gnocchi-4

White-Cabana-how-to-make-gnocchi-6

White-Cabana-how-to-make-gnocchi-7

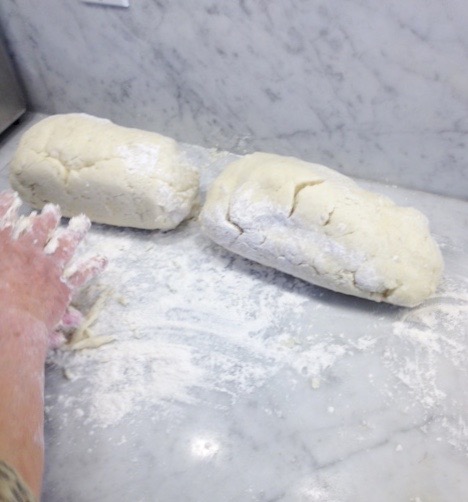
6. Once the dough has been formed, break off small bits, and roll the dough into long dough snakes.

7. Cut 1-inch-ish pieces from the dough snakes. Flour the pieces as you go, so they don’t stick together.

White-Cabana-how-to-make-gnocchi-8

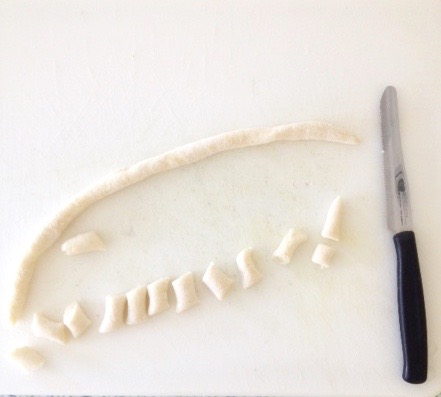
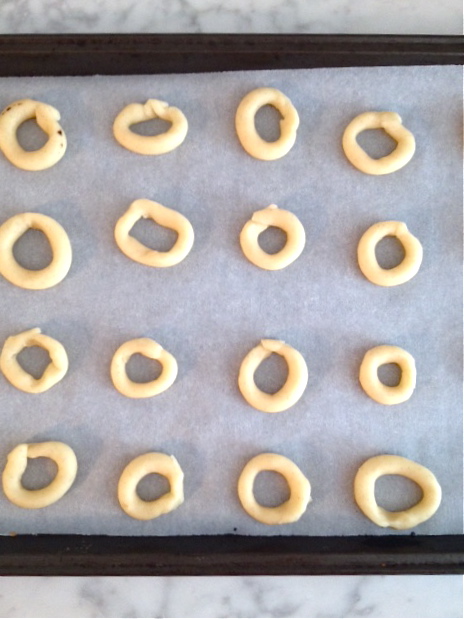
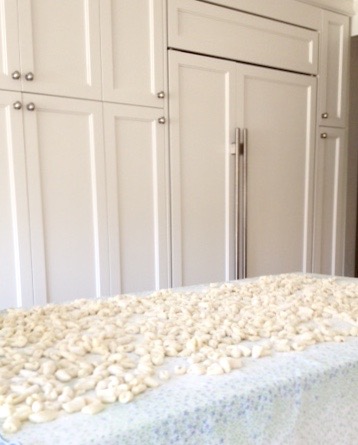
8. Spread all the pieces out on a large, clean tablecloth** and sprinkle flour over top the pieces.

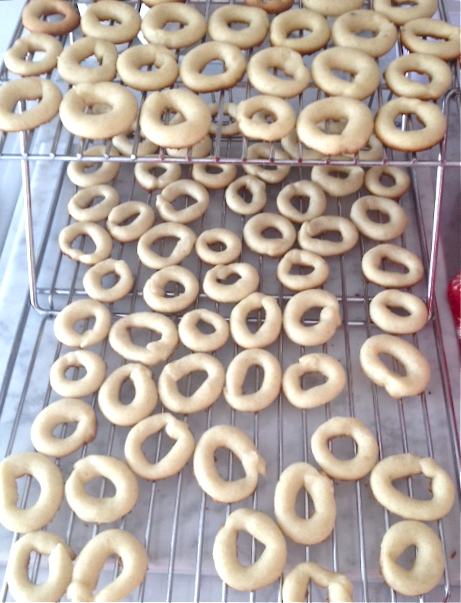
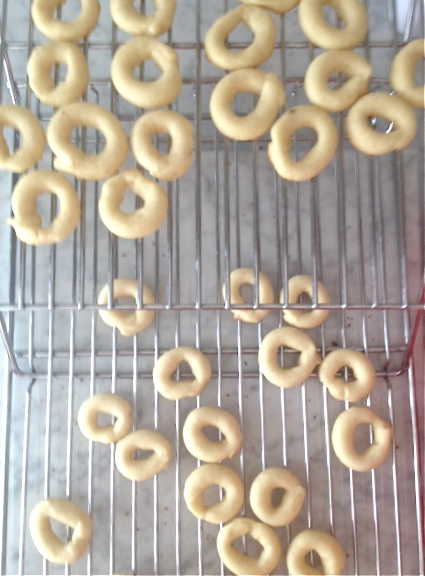
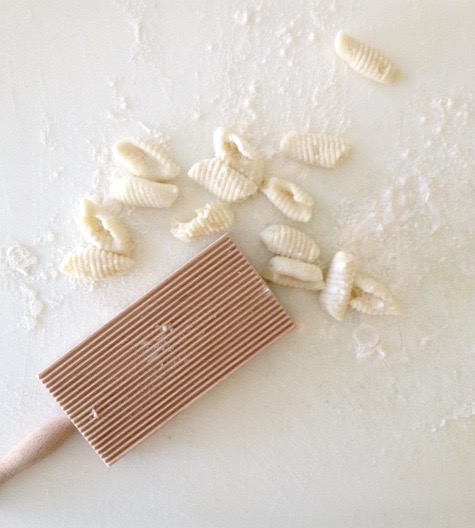
9. If you want to be fancy, invest in one of these inexpensive wood gnocchi rollers. Roll individual pieces of dough quickly down the wood gadget. While the gnocchi is delicious without this step, the rolled gnocchi is amazing because the newly formed ridges catch the sauce, and the little hole/space in the gnocchi holds sauce really.

White-Cabana-how-to-make-gnocchi-9 White-Cabana-how-to-make-gnocchi-10

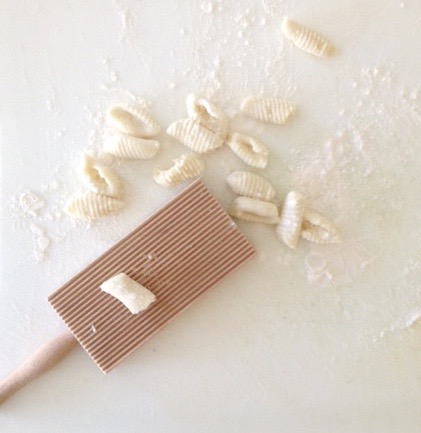
10. Take a moment to step back and admire your rolling work.White-Cabana-how-to-make-gnocchi-11 White-Cabana-how-to-make-gnocchi-12

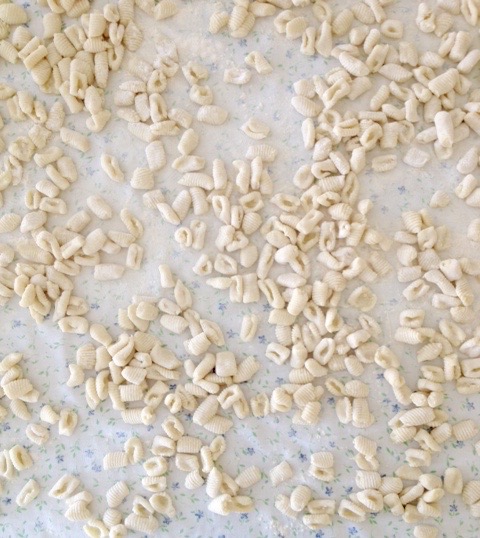
11. To cook the gnocchi, boil a pot of water. Once the water is boiling, add a bunch of gnocchi. The gnocchi are ready once they float to the top of the water and the water is boiling slightly again. Scoop them out, drain them, then add them to a bowl of sauce. By rolling them around in sauce right away, the gnocchi won’t stick together.

12. When you’re ready to serve, call out “tutti a tavola” just like Lidia Bastianich (and a lot of Italian people!). The expression is Italian for “everyone to the table”, which signals to your guests that it’s time to eat, and they should hurry up so they don’t keep everyone waiting.

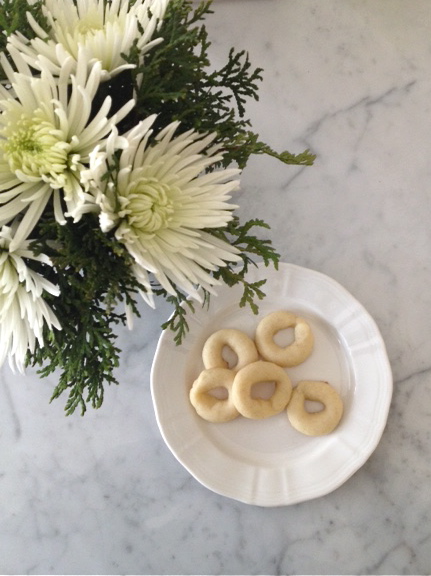
Unfortunately, I didn’t take a photo of the final product, but trust me, it was delicious, and the sauce worked beautifully with the rolled gnocchi.  (I was definitely more concerned about eating than taking photos once my plate of gnocchi was in front of me.)

*this year, there were only 6 of us, but mom must have made about 20 servings worth because a few of us like to have seconds and there’s always a bunch to share for leftovers

**The tablecloth is an essential part in our process. It might seem unusual, but it’s our tradition. The pieces might stick to a counter, but they don’t stick to a tablecloth.

Thanks, Mom, for letting me capture you in action!

The Friday Five: My Mom’s Favourite Blogs

How long does it take for something to become a tradition? For the last two years, my mom has shared her top blogs/websites with White Cabana readers on the Friday before Mother’s Day. She’s ready to take over the blog again today. I’d say that this has now turned into a traditional post, wouldn’t you?

When I asked my mom for her top five blogs, she obviously could not resist expanding her list to her top six. Such a classic Italian mom – always filling your plate with more!

Here they are, in no particular order:

1. The Enchanted Home

IMG_1690-768x1024via My Enchanted Home

2. Mark D. Sikes

House Beautiful HD #42 1108_AN_HouseBeautifulvia Mark. D. Sikes

3. Thistlewood Farms

farmhouse-kitchen-decorvia Thistlewood Farms

4. Preppy Empty Nester

kitch5via Preppy Empty Nester

5. Summer in Newport

August Wren-artAugust Wren via Summer in Newport

6. Jenny Steffens Hobick

spring-pasta-peas-prosciuttvia Jenny Steffens Hobick

Happy Mother’s Day, Mom! Thanks for sharing your reads with us!

I wish you all a wonderful weekend!

Read my mom’s blog and website picks from 2013 and 2014.

Travel: A Quick Trip To Toronto

A friend and I met in Toronto last weekend for a fun weekend away from reality. It was glorious. Here’s a quick recap of what we did, saw, and ate during our 24 hours in the city.

Shopping…what girls’ weekend doesn’t include a bit of shopping? Anthropologie was a highlight – mostly for the styling, I have to say. It’s such a pretty place!

White-Cabana-Toronto-9I saw the white background and thought it was perfect for a selfie. Please note: I am actually wearing sandals (spring has finally made an appearance), and I do not have a jacket on. There were big changes in the weather last weekend!


White-Cabana-Toronto-1On the recommendation of a friend, we went to The Carbon Bar for dinner. The menu has all the goodness of southern cookin’ – ribs, cornbread, slaw, grits – and the cocktails to match I was torn between the brisket and the squid/mussels/pork belly + lentils dish, and in the end, I opted for the fish. I don’t think you can actually make a wrong decision at The Carbon Bar. Everything that was coming out of the kitchen looked delicious.

White-Cabana-Toronto-2White-Cabana-Toronto-3  White-Cabana-Toronto-4For Sunday brunch, we did a bit of a Google/Trip Advisor search and settled on Smith (Church & Wellesley). I’m rarely on this side of town when I’m in Toronto, so it was nice to see what’s on the go east of Yonge. If you don’t know where Smith is, you might just walk right past it (like we did), but once you find it, you’ll feel like you hit the jackpot. Our dining neighbours told us as much. I opted for the salmon plate (with cream cheese, capers, and bagel crisps), and my friend got the croque madame. We were both pleased. The food was plentiful and fresh. I loved the design of this space, and the patio and bathroom both looked really cool.

White-Cabana-Toronto-7White-Cabana-Toronto-8White-Cabana-Toronto-6   White-Cabana-Toronto-5So there you have it – a peek into my quick weekend in Toronto.

Food: Vanilla Danish Cookies

A couple of years ago, I learned about Danish chef Trine Hahnemann as I was munching on some simple vanilla cookies that a friend made from Trine’s recipe. The little white rings are full of goodness – they’re perfectly sized and have just enough sweetness.

Trine-hahnemann-danish-cookies-White-Cabana-6

I didn’t make them in time for Christmas, but I did bake a batch in time for my family’s New Year’s Day feast.

Trine-hahnemann-danish-cookies-White-Cabana-3Trine-hahnemann-danish-cookies-White-Cabana-4Trine-hahnemann-danish-cookies-White-Cabana-5

before – little ring cookies ready for the oven

Trine-hahnemann-danish-cookies-White-Cabana-2Trine-hahnemann-danish-cookies-White-Cabana-1after: little ring cookies ready to be eaten

Trine-hahnemann-danish-cookies-White-Cabana-7

Trine Hahnemann’s Vanilla Danish Butter Cookies

375 g butter
250 g sugar
1 egg
2 vanilla pods
500 g plain flour

1. Cream the butter and sugar together in a bowl until the mixture is pale and fluffy. Add the egg and continue beating.
3. Split the vanilla pods lengthways and scrape out the seeds with the tip of a knife. Stir them into the flour.
4. Fold the dry ingredients into the butter mixture. (I knead the dough a little bit so everything sticks together.)
5. Wrap the dough in cling wrap and chill for (at least) two hours.
6. Preheat the oven to 200°C (I set mine at 390°F).
7. Roll the dough into very thin sausages about fix or six centimetres long. Curl each on into a ring and press the ends firmly together.
8. Place rings on a parchment-lined baking tray (I put the trays in the fridge for a few minutes before putting them in the oven. This helps them keep their small ring shape).
9. Bake for about eight minutes (I baked mine for about 6 minutes.)
10. Cool cookies on a wire rack.
11. Store the cookies in an airtight container and do not mix them with other types of cookies or they will go soft.

*Instead of converting the measurements into cups and tablespoons, I used a scale and weighed each of the ingredients.

Thanks to Emmy for teaching me about these delicious Danish cookies. Recipe via Red (original recipe is in The Scandinavian Cookbook). Photos by me.

1 2 3 4 5 6 16