My big bathroom was a disaster when I moved in to my house last year, but I knew I couldn’t spend a whole lot of money on a full bathroom reno. Instead, I opted to make minor, but high-impact changes, to the space. I ripped off the silvery wallpaper (ugh!), painted out the wood trim on the 80s vanity, installed a new countertop and over-mount sink, and replaced the faucet, mirror, and lighting. I also cleaned the heck out of everything. The renos definitely improved the space, but the grey/cream linoleum flooring and the grey tub and tile surround were distracting. Rather than trying to change these things, I decided to create a high-impact gallery wall to divert people’s (and my) attention. I think it’s working, too!
I’ve been slowly filling in my Rorschach-inspired gallery wall as I come across frames of different sizes in thrift stores, yard sales, and stores. When I’m out and about, I try to find frames that might fit an empty space on the wall. When I have a few frames, I start painting the inkblots. And then I hang them where I feel they might look best (I only created one extra mistake hole so far…yay). I can be quite impatient so I didn’t wait until I had all the frames/art to start hanging them up. I constantly add to the wall. Here’s what it looks like now:
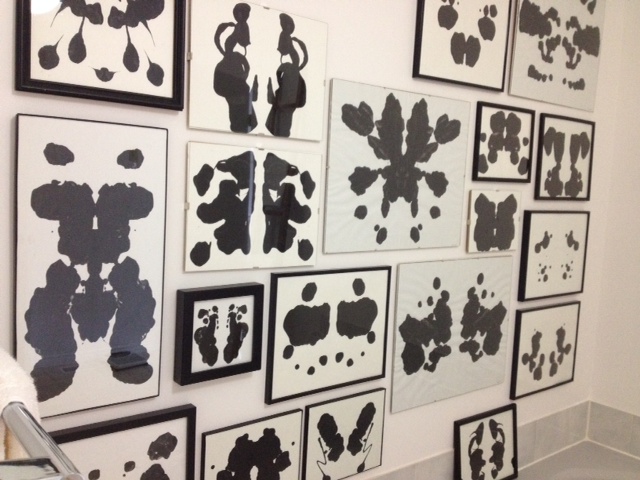
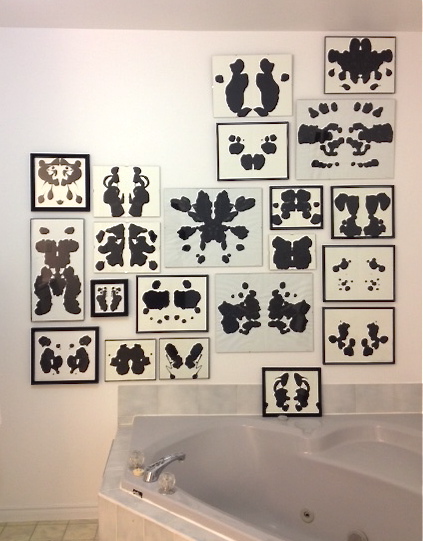
The upper left corner still needs to be filled in. Other than that, the wall is just about done.
Making inkblot art is super easy. Here’s my step-by-step process:
1. Find a frame (I only use black frames or borderless frame).
2. Cut a piece of white paper to fit inside of the frame. (I tend to use bristol board because it’s strong and thick and the paint won’t seep through.)
3. Fold paper in half.
4. Plop/drip/spread gobs of black paint on one half of the paper (I use artist’s acrylic paint, but craft paint from a dollar store also works fine).
5. Refold the paper in half.
6. Rub your hand over the folded paper. Smoosh the paint around through the paper.
7. Unfold the paper. (I love this step!)
8. Surprise! What do you see? (This is the best part!)
9. Let the paint dry.
10. Frame your art.
What do you think? Do your eyes – or your brain – hurt from staring at the wall too long? What do you see in the inkblots on my wall?


I LOVE this! Great way to fill in that big wall in your bathroom! Maybe I’ll put a set of three in that weird spot above my tub?
Aw. THANKS!!! The wall – and tub – are so massive. It’s big enough for a dance party! You can try doing three for above your tub. They basically cost zero dollars. Let me know if you need any paint. A nice grey or blue/grey might be soothing. Or you could try fuchsia or navy. Or black. 🙂 Or white paint on black background. The possibilities are endless.